During the Summer of 2016 Dr. Larry VanSuch was honored to present this material, ‘5 Torgues for Faster Running Speed’ at the Realta Clinic Seminar attended by world class Olympic athletes, trainers, coaches, and therapists from Jamaica, Ireland, Belgium, and other parts of Europe.
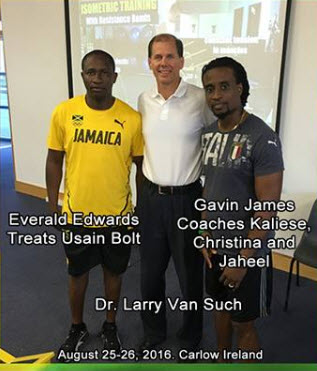 Everald Edwards – Personal Trainer to Usain Bolt – Gold Medal Olympic Champion
Gavin James – Therapist/Teacher/Trainer to the Jamaican Olympic Sprint Team and personal trainer to Christina Day (400m Sprint), Jaheel Hyde (2014 World Junior 400m Hurdles Champion), & Kaliese Spencer (400m Hurdles)
5 Torgues for Faster Running Speed
by Dr. Larry VanSuch 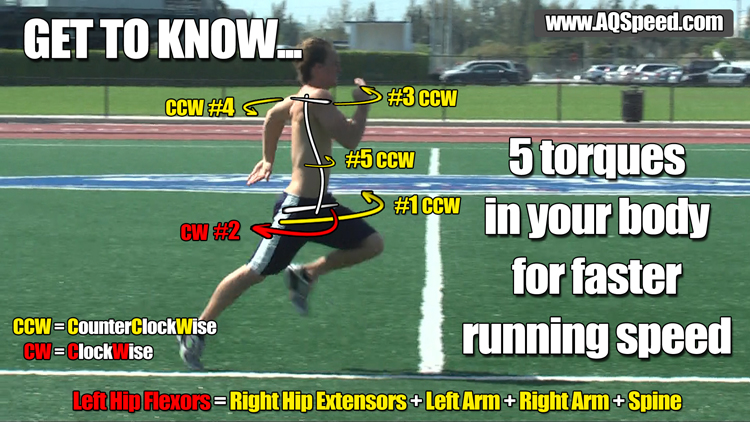
Did you know that your body produces 5 torques, or rotational forces, around your spinal column when you run? Most athletes usually only think of running as a ‘push’ with one leg at a time.
But, your body is way more complex than that! In fact, while your glutes/hams are pushing hard in one leg, the opposite leg is pulling you forward at the exact same time as well!
Plus, both of your arms are also doing their ‘thing’ and believe it or not, your abdominal muscles are getting in to this act.
So if you are ready to finally start maximizing you true running speed potential, then get started right now by watching each of the 5 running speed videos in the body torque sections below.
Torque #1
How the Glutes/Hams, Quads and Calves Power Running Speed
Video #1
In this series I am going to reveal to you how your body generates 5 rotational forces, or body torques, around your spinal column to help you run faster.
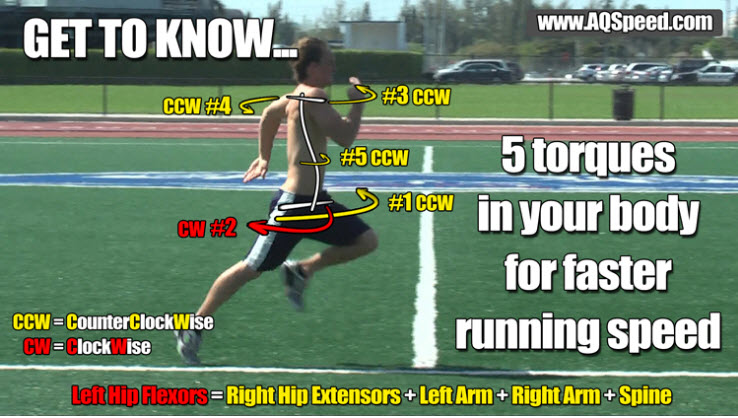
These 5 rotational forces are created from powerful muscle contractions found within your 1) right leg, 2) left leg, 3) right arm 4) left arm and 5) torso. See Figure 1.
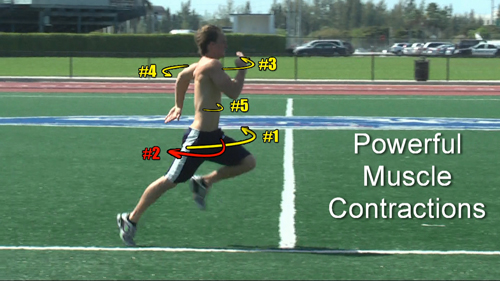 Figure 1. 5 Rotational Forces to Run Faster.
And as an athlete, you absolutely must know about these 5 rotational forces because if you fail to train even just one of them then you are likely under-training when it comes to running speed. And if you are under-training then it is safe to say that you will not run as fast as you WERE meant to.
So I want to encourage you to watch the rest of this FIRST video because not only will you learn about the first body torque involved in running faster, but many of you are also going to start to see just how limited and perhaps just how narrow your speed training focus currently is. See Figure 2.
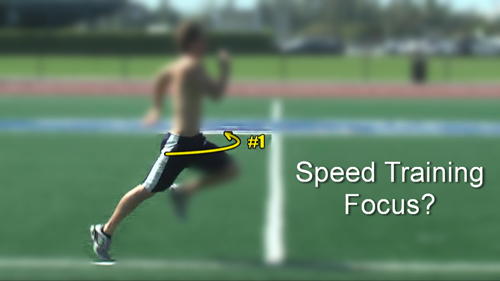 Figure 2. Narrow Speed Training Focus.
And my hope for you is that once you see this this you will want to watch all of these videos so that you can tap in to your true running speed potential.
Now if you are ready, let’s begin.
What is Torque?
Torque is defined as any force that causes rotation and for our purposes here, we only need to concern ourselves with the direction of this rotation which can either be clockwise or counterclockwise. See Figure 3.
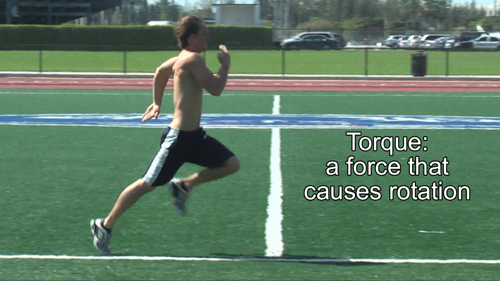 Figure 3. Torque is a force that causes rotation.
So, for example, if we are looking at the face of a clock and apply a force to the minute hand in this direction, it will cause it to rotate in the clockwise direction. See Figure 4.
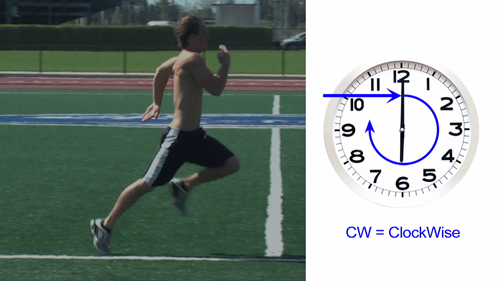 Figure 4. Clockwise Torque.
And similarly, if we apply force in this direction, it will cause it to rotate in the ccw direction. See Figure 5.
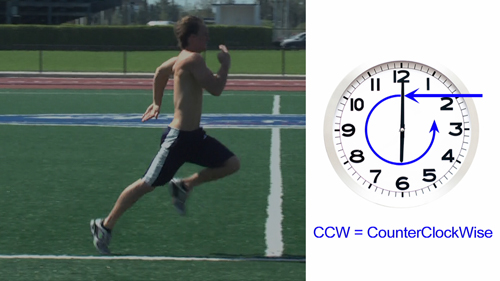 Figure 5. Counterclockwise Torque.
That’s easy enough right? So with that in mind, let’s go ahead and see if we can identify our first body torque.
Torque #1
In this figure we are going to draw just three simple lines on our athlete so we can start to envision where these body torques will act on the body. One line represents the spinal column as well as the center of the body where all 5 of these rotational forces will try and turn the body around. Another line is drawn across the shoulders and represents where the arms are attached and where they will try and rotate the upper body around the spinal column, and another line is drawn across the hips and represents where the legs are attached to the pelvis and is where they will try and rotate the lower body around the spinal column. See Figure 6.
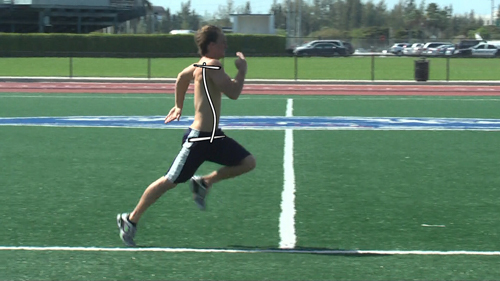 Figure 6.
Now the first body torque that we are going to talk about will come from the right leg through the right hip. Since the right leg is on the ground behind our athlete pushing forward, we know then that a force, relatively speaking with regards to direction, will push the right hip going forward. See Figure 7.
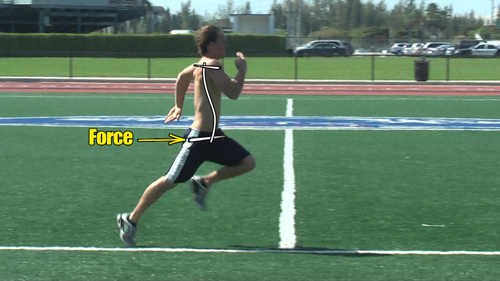 Figure 7. Force pushing through right hip.
Now if this were the only force acting on the body, the question then is this. Which direction, if any, will it cause our athlete’s hips to turn?
Well the first thing to take notice of here is that, with respect to the spinal column, the force is coming from the right hip which is displaced to the right of it.
So we know that it has to rotate the body in one direction or the other. Because, the only way it wouldn’t cause the body to rotate would be if it were directly in line with the spinal column itself, which is simply not possible. See Figure 8.
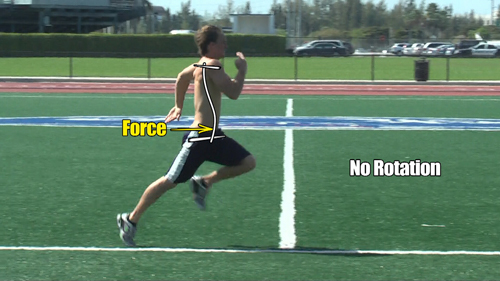 Figure 8. No rotation caused by force in the center of the spine.
So we know it has to rotate, but again, which direction? Well, if we imagine this force continuing in the same direction, forward through the right hip, we can then see that it will produce a counterclockwise torque AROUND THE SPINAL COLUMN as seen by the direction of this arrow. See Figure 9.
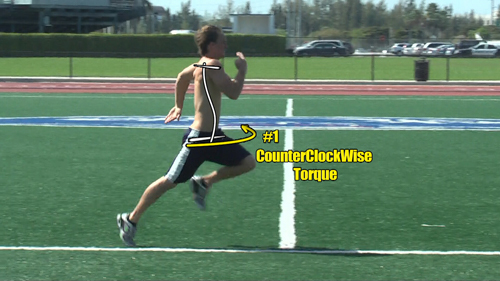 Figure 9. Torque #1 is Counterclockwise.
So there’s the first of five body torques to help you run faster and the muscle groups in your lower extremity responsible for this torque are primarily the hip extensors, or glutes/hams as they are often referred to, the knee extensors, or quads, and the ankle plantarflexors, or calf muscles. See Figure 10.
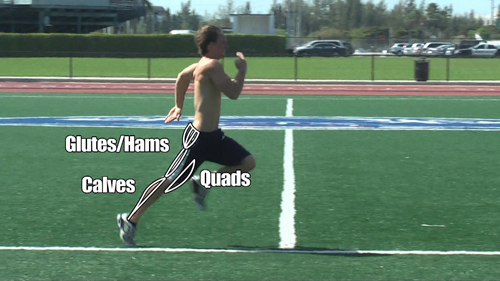 Figure 10. Glutes/Hams, Quads, Calves for Torque #1.
Now if you stop and think about what exercises you might do to help you train these muscle groups you will likely come up with many of them seen in this list. See Figure 11.
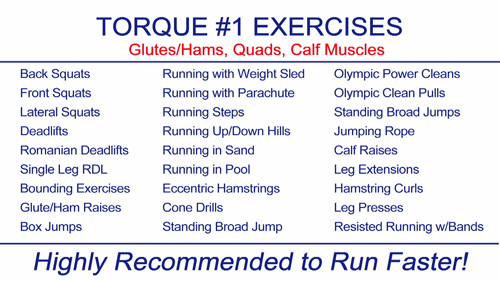 Figure 11. Torque #1 Exercises.
Most of them target the glutes/hams, some target the quads and some the calf muscles and some of them target all three at the same time.
Now before we go any further, I want to say that I like all of these exercises in this list and I highly recommend them for any athlete looking to run faster. In fact, you could even say that this list of exercises is foundational to many training routines.
But what I find interesting about it and the muscles that are targeted, is that not only do many athletes choose specifically from it to help them run faster, any exercises they do outside of this list to help them get quicker will more often than not, still only target these same three muscle groups and again, that’s the glutes/hams, quads and calf muscles.
So while they may look to create a variety in their routines to help them find that elusive speed training breakthrough that they’ve always wanted, they usually never seem to break away from training any one or more of these three muscle groups. See Figure 12.
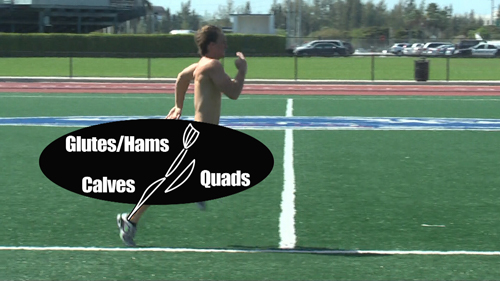 Figure 12.
And the challenge those athletes will face, the challenge that you are likely facing today as you look to get faster, is that if you continue to focus or limit your speed training to just the glutes/hams, quads, and calves, you will be missing the training necessary that these other 4 torques demand for you to run faster because they each involve a completely a different set of muscles. See Figure 13.
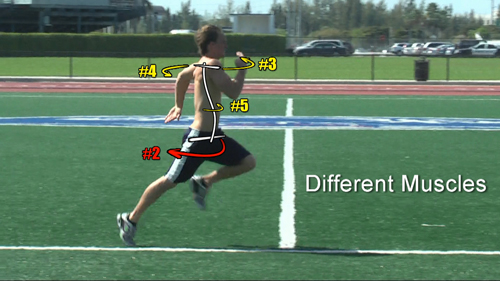 Figure 13.
Furthermore, this first toque that is generated by your glutes/hams, the quads and calves needs to be offset by one or more of these other 4 torques. See Figure 14.
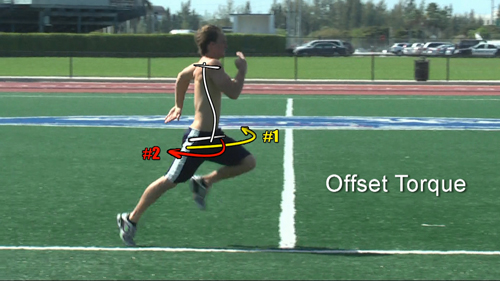 Figure 14.
In other words, your body must produce some sort of torque in the opposite direction to counterbalance this torque, otherwise you will have a hard time running in a straight line. And if you don’t have the necessary strength in other muscles to counteract the powerful glutes/hams, you won’t be able to take full advantage of their powerful strength.
So, that leads us to the second body torque involved in running, one that is necessary to counteract or counterbalance this first torque, and that is the subject of our next video.
Torque #2
How Hip/Thigh Flexors Help You Run Faster
Video #2
The second body torque involved in running will come from the left leg. Since the left leg has been thrust in front of our athlete, we know then that a force, relatively speaking with regards to direction, will end up pulling the left hip forward.
And seeing this, we can ask a similar question just like we did for the first body torque and that is, if this were the only force acting on the body, which direction, if any, will it cause our athlete’s hips to turn?
Well in this case, and with respect to the spinal column, the force pulling on the left hip is displaced to the left of it. So we know that it has to rotate the body in one direction or the other.
And if we imagine this pulling force continuing in the same direction, forward, we can then see that it will produce a clockwise torque around the spinal column as seen by the direction of this arrow. See Figure 2.
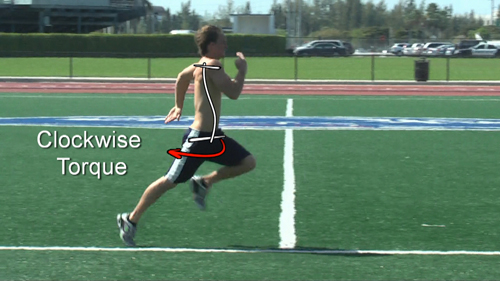 Figure 2. Clockwise torque around the spinal column by left leg.
The muscles responsible for this torque are primarily the hip flexors, and their names are the psoas, iliacus, rectus femoris, Sartorius, adductor brevis, adductor longus and pectineus. See Figure 3.
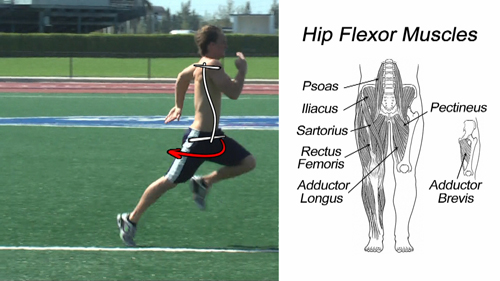 Figure 3. Hip Flexors muscles creating torque in clockwise direction.
Now these 7 hip flexor muscles are a very interesting group for at least three reasons.
Reason #1 of 3
There are not many exercises and/or machines available for athletes to train their hip flexors
The first reason the hip flexors are an interesting group of muscles is that here we have one of the longest and strongest muscle groups in the body that is responsible for improving your running stride and turnover rate, yet when it comes to the opportunities for athletes to train them, there appear to be very few. See Figure 4.
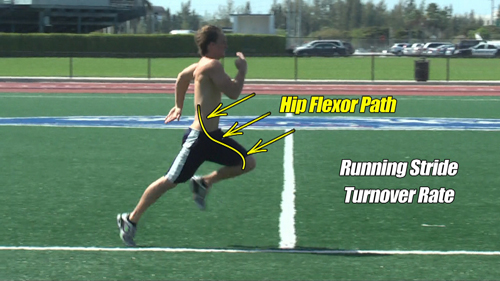 Figure 4. Not many exercises available for hip flexor training.
For example, if you were to go in to a gym, any gym for that matter, the chances of you finding a machine to help you train these muscles would be very slim. From my own personal experience, there is just one machine dedicated in this regard and it looks like this, where you stand on a platform and have a lever with a pad on it placed over your knee that will allow you to raise it upward while lifting a stack of weights. See Figure 5.
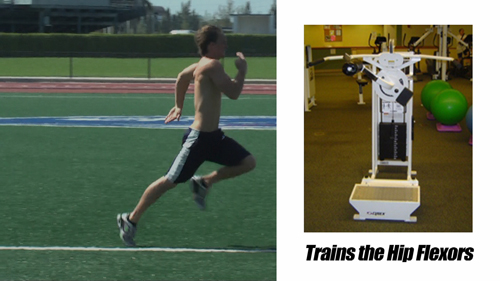 Figure 5. Dedicated hip flexor machine.
The only other opportunity you might have to train them as far as using a machine is concerned is that you could possibly pull a stack of weights through a cable that is attached around your ankle, but personally I don’t recommend this as an exercise because of the risk of injury to the hip flexors should you lose your balance during the routine. See Figure 6.
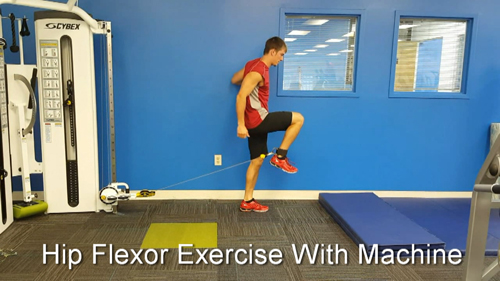 Figure 6. Hip flexor exercise.
And that’s about it as far as machines are concerned. If there are any other dedicated hip flexor machines, I simply haven’t seen them and if they do exist, they are not very popular at the moment.
Now with regards to simple exercises to help you train them, you are looking at things like sit-ups and hanging knee raises. You might also consider tying a resistance band between your thighs and running to create tension in the hip flexors as the knees are thrust upward and forward. See Figure 7.
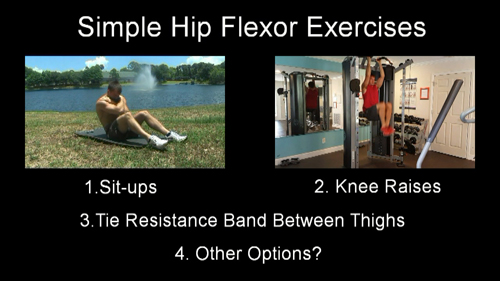 Figure 7. Simple Hip Flexor Exercises.
And that’s about it with regards to what many athletes have as options to train this muscle group which again is quite unique considering the importance of them to running faster.
Now with regards to these exercises we just mentioned which include the dedicated hip flexor machine, situps, hanging knee raises and running with bands between your thighs, I personally like all of them. See Figure 8.
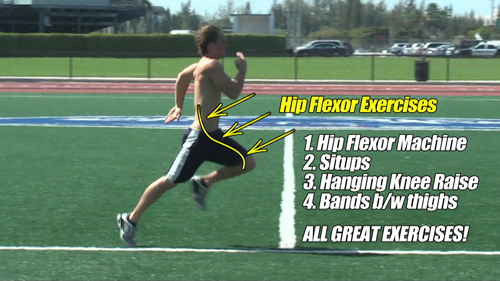 Figure 8. All Great Hip Flexor Exercises.
But even if you are really devoted to these exercises to help improve your hip flexor performance, you will have a hard time training all 7 of your hip flexor muscles if these are the only exercises you do. In fact, you will likely only be training two of them with these exercises which brings us to the second reason why this is such an interesting group. See Figure 9.
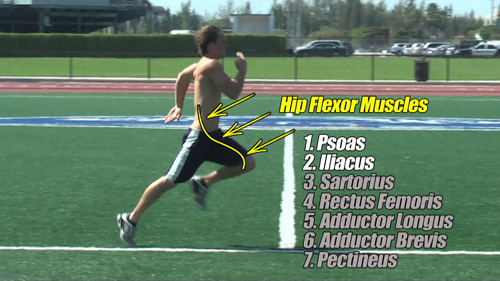 Figure 9. Only 2 out of 7 hip flexor muscles are typically ever exercised.
Reason #2 of 3
Not all 7 hip flexor muscles are created equal.
The second reason why the hip flexors are such an interesting group of muscles is because even though your hip may go into flexion, this doesn’t mean that all 7 of them will be working equally at the same time. See Figure 10.
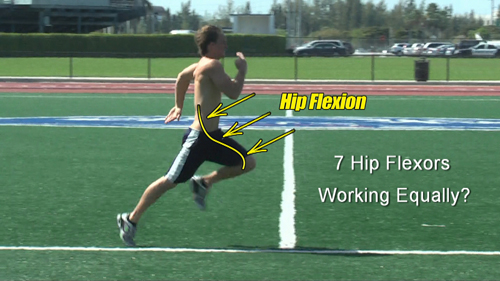 Figure 10. Not all 7 hip flexors work equally.
And this has to do with the differences between where each of these muscles originate and then insert that give some of them a little more responsibility over the others depending on the position of your hip, thigh and leg.
So, for example, let’s talk about the psoas and iliacus muscles. These are perhaps the two most popular hip flexor muscles that you are likely to train. The psoas originates from the transverse processes of T12 through L5, crosses over the hip joint and then inserts into the lesser trochanter of the femur as seen by this line here. See Figure 11.
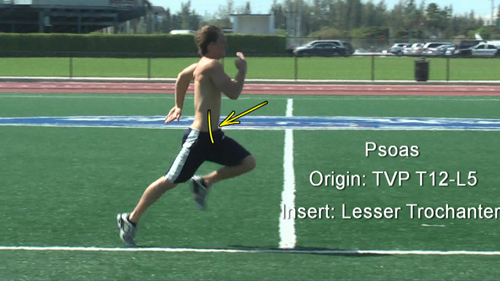 Figure 11. Location of Psoas muscle.
The iliacus originates from the upper 2/3’s of the iliac fossa, crosses over the hip joint as well and also inserts into the lesser trochanter of the femur as seen by this line. See Figure 12.
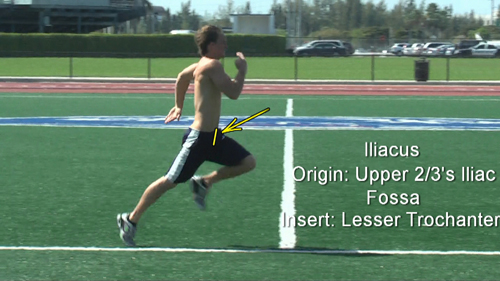 Figure 12. Location of Iliacus muscle.
Now any flexion of your thigh upward, similar to what you are seeing in this image, will be caused primarily by these two muscles. And this is similar to the position of your thigh when you perform the exercises such as situps and hanging knee raises and the others. See Figure 13.
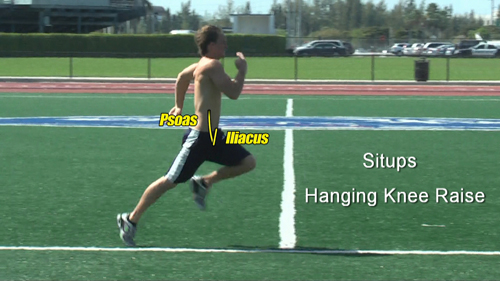 Figure 13. Psoas and Iliacus Muscles.
But as I mentioned previously, these exercises will not effectively engage the other 5 hip flexors muscles for reasons that will now be explained.
Targeting the Rectus Femoris
Starting with the rectus femoris, it crosses two joints, not just one. It crosses both the hip and the knee as seen by our line drawn here. See Figure 14.
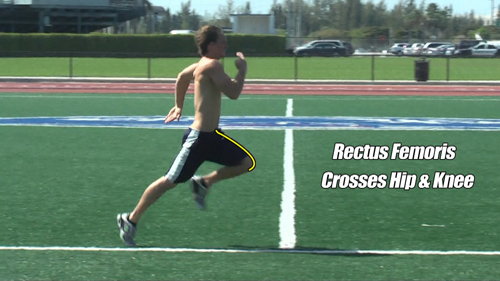 Figure 14. Location of Rectus Femoris.
And so to effectively engage this muscle, not only does the hip have to be flexed under resistance, but the knee has to also be extended under resistance, otherwise you will be missing out on a significant amount of hip flexor strength that this muscle can provide. See Figure 15.
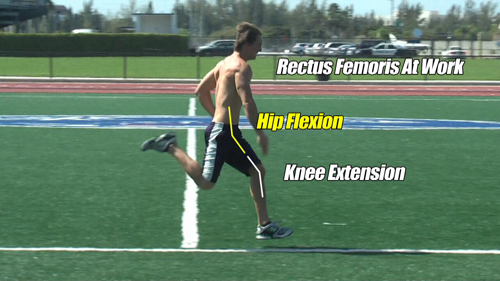 Figure 15. Rectus Femoris involved in hip flexion and knee extension.
Situps, hanging knees raises and the others don’t work the rectus femoris this way and that means, your stride and turnover rate will not be as quick and strong as it could be.
Targeting the Sartorius
Now, the Sartorius muscle also crosses two joints, just like the rectus femoris. It crosses both the hip and the knee as seen by our line drawn here. See Figure 16.
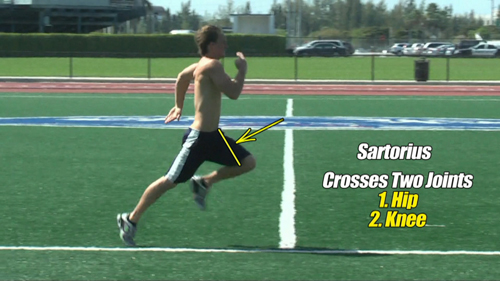 Figure 16. Location of Sartorius muscle.
For this muscle to be fully engaged within an exercise, not only does the hip have to be flexed under resistance and knee extended under resistance, but because the Sartorius inserts into the inside of the knee, the entire thigh and leg must also be externally rotated outward under resistance. See Figure 17.
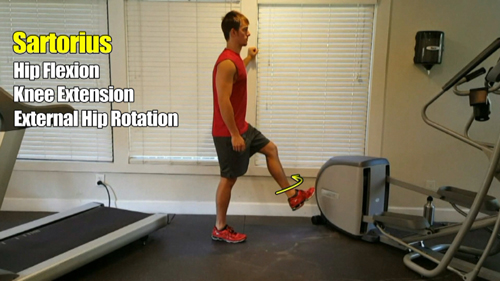 Figure 17. Sartorius targeted with hip in flexion, knee in extension and hip in external rotation.
Looking at this from a different angle, we see the thigh being flexed first, followed by extension of the knee and then finally external rotation of the hip. See Figure 18.
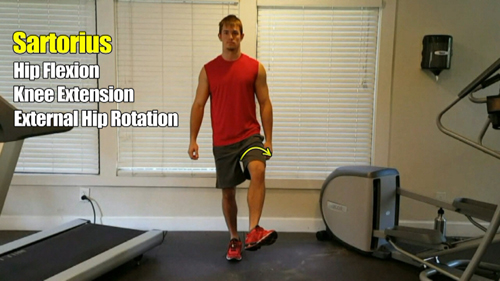 Figure 18. Sartorius targeted with hip in flexion, knee in extension and hip in external rotation.
And this also happens to be the same position to effectively draw in the remaining three hip flexor muscles, which are the adductor longus, adductor brevis and pectineus. See Figure 19.
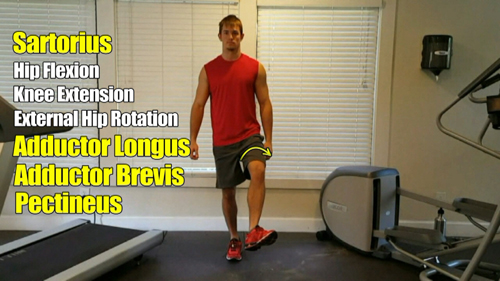 Figure 19. Targeting the Adductor Longus, Adductor Brevis and Pectineus by putting the hip in flexion, knee in extension and hip in external rotation.
So you can see that while performing exercises like situps and hanging knee raises are good exercises, they are limited to only the psoas and ilacus muscles. To get the other 5 hip flexors involved requires placing your leg and thigh into different positions.
Reason #3 of 3
The Hip Flexor Muscles are More Powerful and More Important Than You Might Think When it Comes to Running Faster
The third reason why the hip flexors are such an interesting group of muscles is because they are actually a lot more powerful and a lot more important than you might think when it comes to running faster.
Now as we mentioned in the first video, there are a total of 5 body torques, or rotational forces, acting on the spinal column and they all must offset each other, or counterbalance each other, so that you can maintain running in a straight line. See Figure 20.
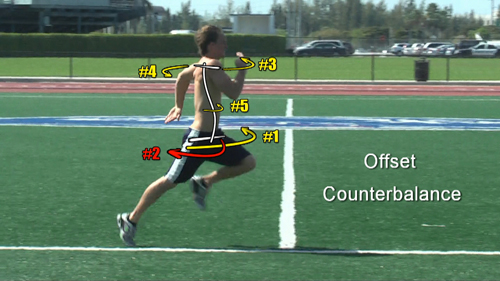 Figure 20. Five torques acting on the spinal column must offset each other.
This means that, when you add them all up, the net rotational force must equal zero. See Figure 21.
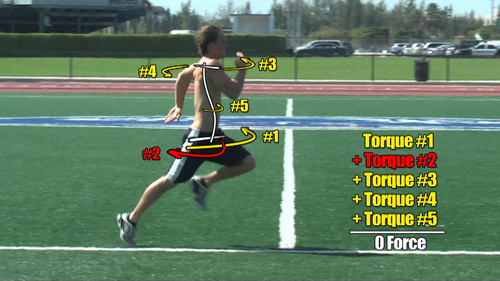 Figure 21. All torques must add up to zero force.
Or another way of seeing this is the amount of force produced by all of the CCW torques must equal the amount of force produced by all of the CW torques. See Figure 22.
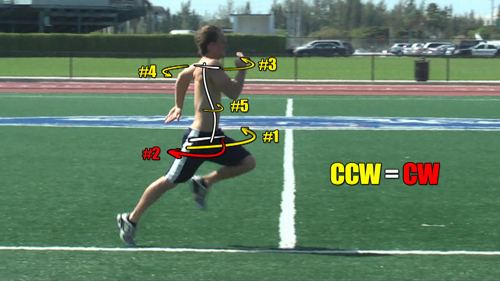 Figure 22. All Counterclockwise body torques must equal all clockwise torques.
And so, right now, you will recall back in video #1 of this series that we had body torque #1 going in the CCW direction which was powered by the glutes/hams, quads and calves on the right side of the body, and here in this video, we have torque #2 going in the CW direction which we just learned was powered by the hip flexors. See Figure 23.
 Figure 23. Torque 1 (CCW) and Torque 2 (CW).
With three more torques to consider, one for the left arm, one for the right arm, and one for the torso, I bet many of you would think that most, if not all of three of them, would favor the side of the hip flexors to help support them against the powerful glutes/hams, quads and calves…and if you did, you are going to be pleasantly surprised to find out otherwise. See Figure 24.
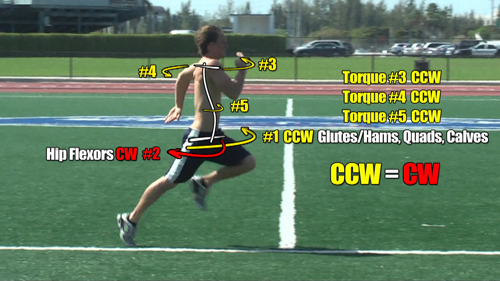 Figure 24. Torques 1, 3, 4 and 5 are CCW and Torque 2 is CW.
To see this, let’s move on to the next video where we discuss body torque #3 for the right arm and body torque #4 for the left arm.
Torques #3 and #4
Why Shoulder Flexors/Extensors Help Running Speed
Video #3
BODY TORQUE #3
Faster running speed with help from the arms as they produce torques around the body. Torque #3 will come from the right arm. Since the right arm has been thrust in front of our athlete, we know then that a force, relatively speaking with regards to direction, will end up pulling the right shoulder forward. See Figure 1.
 Figure 1. Right arm creates a pulling force on the body.
And if this were the only force acting on the body, the question then is, which direction, if any, will it cause our athlete’s upper body to turn?
Well in this case, and with respect to the spinal column, the force pulling on the right shoulder is displaced to the right of it. So we know that it has to rotate the body in one direction or the other.
And if we imagine this pulling force continuing in the same direction, forward, we can then see that it will produce a counterclockwise torque around the spinal column as seen by the direction of this arrow. See Figure 2.
 Figure 2. Torque #3 creating counterclockwise torque around the spinal column.
The muscles responsible for this torque are primarily the shoulder flexors, or upper arm flexors, and their names are anterior deltoid, long head of the biceps, pectoralis major and coracobrachialis. See Figure 3.
 Figure 3. Torque #3 Muscles are the Right Shoulder Flexors.
BODY TORQUE #4
The fourth torque involved in running will come from the left arm. Since the left arm has been thrust behind our athlete, we know then that a force, relatively speaking with regards to direction, will end up pulling the left shoulder backward. See Figure 4.
 Figure 4. Left shoulder creates a pulling force on the body backward.
And if we imagine this pulling force continuing in the same direction we can then see that it will also produce a counterclockwise torque around the spinal column as seen by the direction of this arrow. See Figure 5.
 Figure 5. Torque #4 creating counterclockwise torque around the spinal column.
The muscles responsible for this torque are primarily the shoulder extensors, or upper arm extensors, and their names are the posterior deltoid, the triceps, the teres major and the latissimus dorsi. See Figure 6.
 Figure 6. Torque #4 Muscles are the Left Shoulder Extensors.
PURPOSE #1 OF THE ARMS
One of the purposes your arms serve when you run is to help you overcome gravity and make your body feel and act lighter. Because the lighter you are on your feet, the less weight you have to move and the less weight you have to move, the faster you will be able to run.
And your body does this by vectoring not only one arm forward and the other backward at the same time, but it also vectors both arms upward, at the same time, as seen in here in Figure 7.
 Figure 7. Arms creating upward force to make you lighter in the air.
And this creates the necessary momentum in the vertical plane to make you feel lighter which is similar to what high jumpers do with their arms to help them jump higher.
Now momentum is mass times velocity and in this case, we are talking about the mass of each arm and the speed or velocity in which you are moving them.
So as an athlete, you have several opportunities to improve the momentum created by your arms to help you feel lighter and run faster.
One of them is you can add more mass or size to your shoulders and arms while maintaining the velocity in which you can swing them.
Another is you can work on improving the speed in which you swing your arms without adding any size to them.
And the last one is you can try to add both mass to your shoulders and arms as well as work on increasing the speed in which you swing them. See Figure 8.
 Figure 8. How to increase the momentum in your arms.
This is why you may have noticed that many sprinters have really big arms because it helps them create more momentum in the vertical plane when they run, making them lighter in the air, and therefore making them faster.
PURPOSE #2 OF THE ARMS
Another purpose the arms play while running is that they are needed to help counterbalance one of the torques produced by your legs.
And you may have experienced their value with this if you had ever tried to run without moving them, such as running with your hands in your pockets while it was raining or for some other reason.
And if you did, you will have noticed that it is rather difficult, if not impossible, to get yourself up to full speed.
And again, this is because your arms are needed to counterbalance one of the two torques created by your legs. And to see which leg torque your arms side with, let’s do a quick review of the 4 torques we have learned about so far.
REVIEW TORQUES #1 – #4
Torque #1 from video #1 of this series, produced by the glutes/hams, quads and calves, was found to be a counterclockwise torque in this image.
Torque #2 from Video #2 of this series, produced by the hip flexors, was found to be a clockwise torque in this image.
And here in this video we just learned that both Torque #3 produced by the right shoulder flexors and torque #4 produced by the left shoulder extensors were both were found to be CCW torques in this image. Siee Figure 9.
 Figure 9. Review of torques #1 – #4.
And since we learned in Video #2 of this series that all of the CW torques must be equal to all of the CCW torques we now have the following equation:
On CW side we only have torque #2 generated by the hip flexors on the left side of the body. And on the CCW side, we have the other three which include, Torque #1 generated the glutes/hams, quads and calves on the right side of the body, torque #3 from generated by the right shoulder flexors and torque #4 generated the left shoulder extensors. See Figure 10.
 Figure 10. Clockwise torques equal counterclockwise torques.
So with this we can start to see a pattern developing where the hip flexors are working alone to counterbalance the torques produced by the rest of the body.
And there are several conclusions that we can draw from this such as how it may affect your running speed as well as where to target your training so that you can reach your true running speed potential.
But before we get in to those details, we will need to talk about the 5th and final torque produced by your body and that is the subject of our next video.
Torques #5
How Lateral Spine Rotators Help Sprinting Speed
Video #4
In this video, we are going to talk about the fifth and final torque involved in running. This torque is produced by muscles around the spinal column that rotate the torso in one direction or the other. And because it doesn’t involve any of the extremities, it is not as obvious as the previous four torques.
Now the easiest way for us identify which direction the torso would rotate, if there were no other forces acting on it, would be to look at the torques involving both shoulders. See Figure 1.
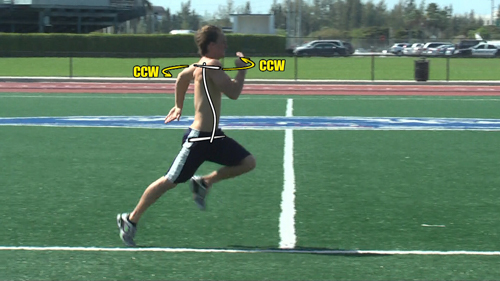 Figure 1. Left and right shoulders producing a counterclockwise torque around spinal column.
You will recall in the previous video that both shoulders produced a CCW torque around the spinal column. In order for this to take place the torso would also have to rotate in the same direction to assist this movement, much like it does when you are performing oblique sit-ups. See Figure 2.
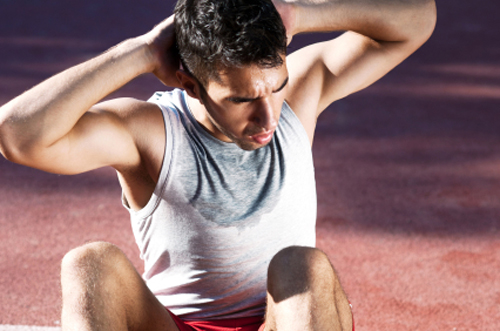 Figure 2. Torso rotates in same direction as shoulders during oblique sit-up.
The muscles involved in rotating the torso in this CCW direction are known as the lateral spine rotators and their names are the external abdominal oblique, multifidus spinae and rotatores spinae muscles. See Figure 3.
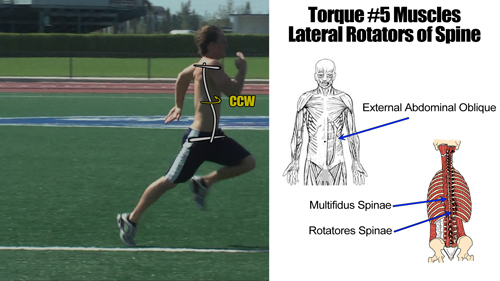
Figure 3. Lateral Rotators of the Spine Muscles.
The one thing that is worth mentioning here is that these lateral spine rotator muscles exist on both sides of the body. Therefore the ones located on your right side contract to turn the front of your body to the left as seen in Figure 4.
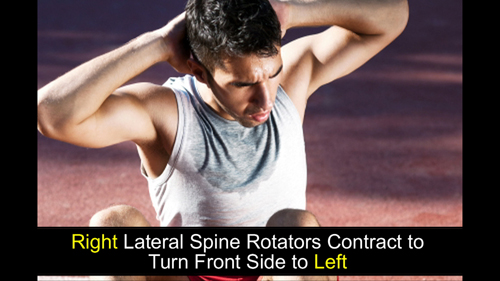 Figure 4. Right lateral spine rotators contract to turn front side of body to the left.
The lateral rotators of the spine on the left side contract to turn the front of your body to the right as seen in Figure 5.
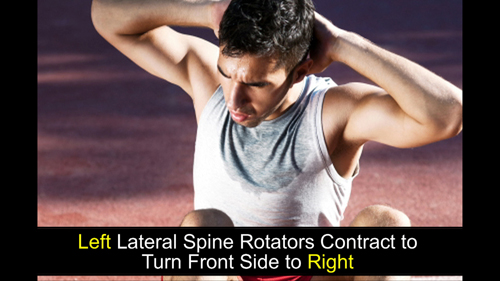 Figure 5. Left lateral spine rotators contract to turn front side of body to the right.
So now we know that it is the lateral spine rotators on the right side of this athlete’s body that are contracting to help produce this CCW torque. See Figure 6.
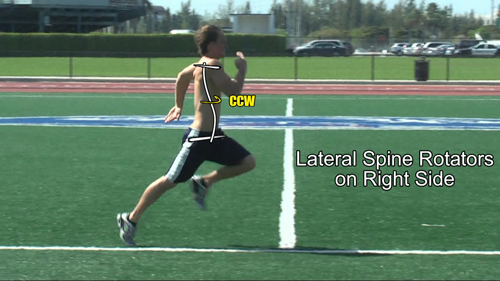 Figure 6. Lateral rotators of the spine contracting in this image.
That completes the identification of all 5 torques that are produced around the spinal column when you run and here they are for you to see all at once as well as the final torque equation that must be balanced so that you are able to run in a straight path. See Figure 7.
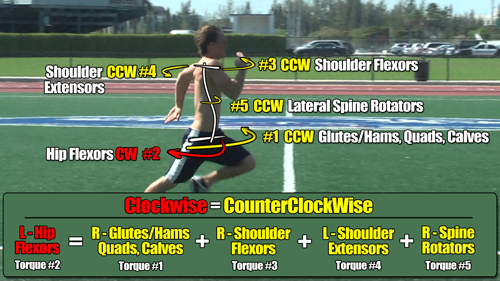 Figure 7. Final torque equation for the running process.
Now I am going to conclude this series of videos with one more final video where I will point out some unique details regarding these torques, such as what it means to your running speed, running stride and turnover rate if your hip flexors are weak, what would happen to your top end speed if your shoulders are weak as well as some other interesting relationships regarding all of these forces in the body.
Summary Torques #1-#5
5 Observations About Running Speed Torque
Video #5
We finished up our last video by showing you all five torques in action with the image shown in Figure 1 below:

Figure 1. All 5 torques in action.
Now I want to compare these same five torques with an image where the arm and leg positions are reversed. And in the process, I am going to point out five distinct observations regarding them.
Observation #1 of 5
Let’s start by removing some of the text from our image as well as the directions of the torques for the left arm, right arm, spine and left leg so that all we have left is the torque generated from the right leg as shown in Figure 2.

Figure 2. Torque generated from right leg.
Now let’s go ahead and slide this image over to the left and let’s put up an image next to it where the arm and leg positions are reversed for comparison. See Figure 3.
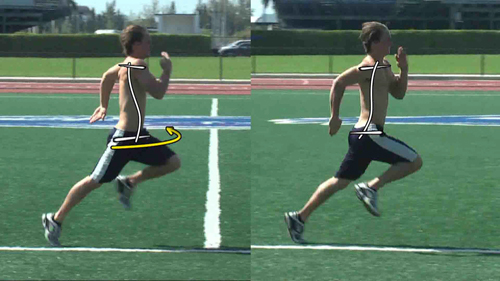
Figure 3. Comparison of images where the arm and leg positions are reversed.
So looking at the image on the left in Figure 4 below, we have the right hip in extension, the right knee in extension and the right ankle in plantarflexion and this is the classic triple extension position you have heard about and this is producing a CCW torque around the spinal column.
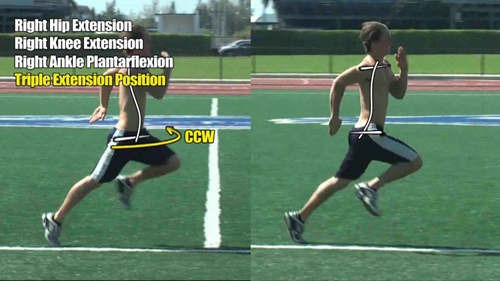
Figure 4. Image on left shows right leg in triple extension producing CCW torque.
And now in the image on the right (See Figure 5 below), the same right leg or hip is now in flexion, and if we imagine that the force that it produces acts alone, the question we want to ask ourselves again is, which direction will it cause the body to turn around spinal column?
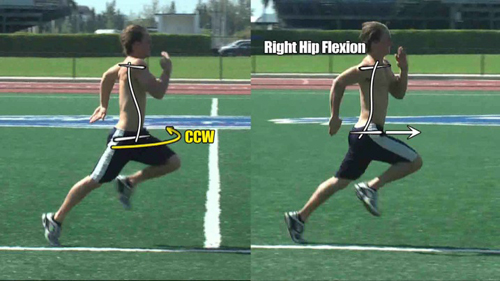
Figure 5. Image on right shows right hip in flexion.
Well, just like we have done up until this point before, we know that the force coming from the right leg is displaced to the right of the spine so it has to rotate the body in one direction of the other, and if we imagine this force continuing in the same direction, which is forward, we can see that it too will spin the body in a CCW direction around the spinal column, or in other words, the force coming from the right leg will also produce a CCW torque. See Figure 6.
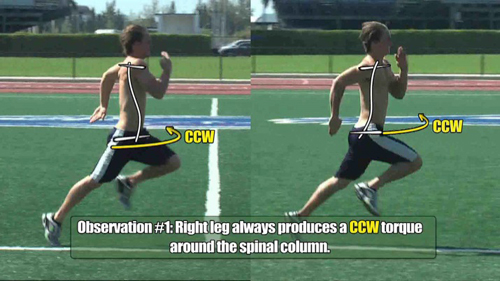
Figure 6. Right leg produces CCW torque in both images above.
So the first thing to take from all of this is that it doesn’t matter if your right hip is being pushed from behind as seen in the image on the left or pulled forward from the front as seen by the image on the right…your right leg will always produce a CCW torque around the spinal column.
Observation #2 of 5
And interestingly enough, a similar situation holds true with the left leg. Referring to Figure 7 below, if you recall from video #2 of this series, the left hip was in flexion as seen again here in image on the left. And we found that it produced a CW torque around the spinal column.
And now in the image on the right (See also Figure 7 below), where the entire left leg is in triple extension and pushing from behind, it also produces a CW torque around the spinal column.
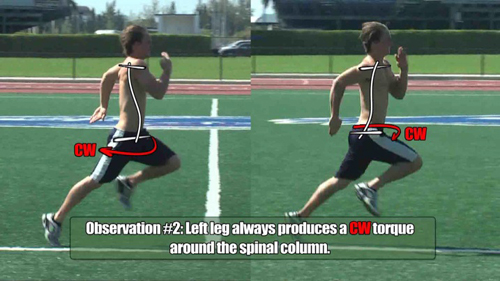
Figure 7. Left leg produces CW torque in both images above.
So that is the second observation to take from all of this and that is: your left leg will always produce a CW torque around the spinal column.
Observation #3 of 5
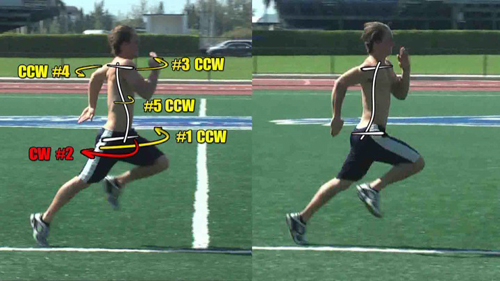
Figure 8.
In Figure 8 above, the image on the left should start to look familiar to you by now because this was how we ended our discussion on the five torques in the last video as well as how we started out in this on.
And we learned from this image that the torques produced by both arms and the spine, numbered 3, 4 and 5, were in the same direction, or CCW, as the leg in triple extension, which is the right leg labeled #1.
All of these torques are colored in yellow for a quick review so that you can easily see them turning in the same direction. The only one opposing all of these spinning in the opposite direction is Torque #2 for the hip flexors which is colored in red.
But now in the image on the right (See Figure 9 below), where the arm and leg positions are reversed, while the directions of the torques coming from the legs remain the same, the torques coming from both arms and the spine switch their directions to CW to line up and favor, or support once again the leg in triple extension, which is now the left leg.
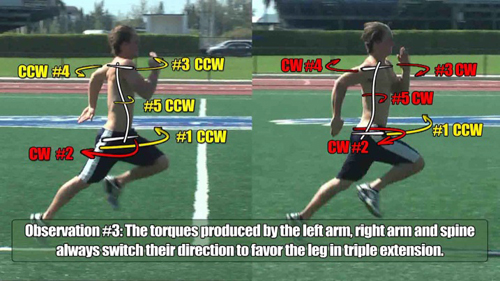
Figure 9.
So while the directions of the torques produced by the legs through the hips never change, those produced by the left arm, right arm and spine do, by switching their directions to favor the leg in triple extension.
So this becomes our third observation regarding these five torques: the torques produced by the left arm, right arm and spine always switch their direction to favor the leg in triple extension.
Let’s apply what we have learned so far
Now I want you to take a look at our athlete running in slow motion and apply what we have learned so far with these first three observations, so that you can start to see and appreciate a little more carefully just how amazing the human body has been designed for optimum performance.
What we want to do first is identify the leg in triple extension and determine whether it’s the right leg or left. See Figure 10 below.
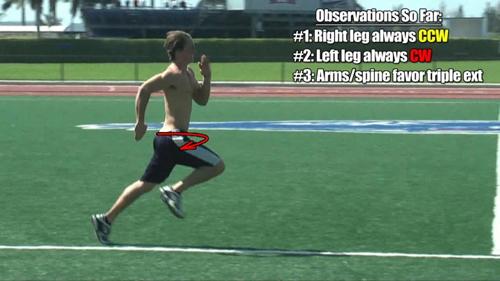
Figure 10. Left leg in triple extension produces CW torque.
So here we see that the left leg is in triple extension, and we know from observation #2, the left leg will always produce a CW torque around the spinal column as seen by our red arrow.
And now here comes the reinforcing help from the arms and torso also in red and also in the same CW direction that we learned about from our third observation in that they always favor the direction of the leg in triple extension. See Figure 11.
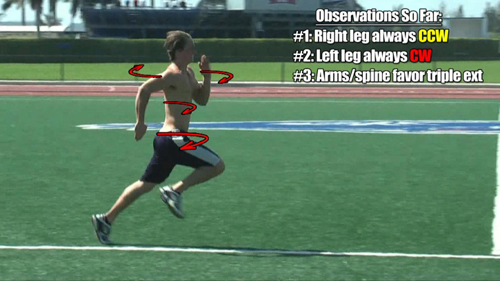
Figure 11. Arms and spine reinforce leg in triple extension with same CW torque.
And finally we see the hip flexors on the right, ACTING ALONE AND opposing these four torques, with a yellow arrow in the opposite, or, CCW direction to help maintain balance. See Figure 12 below.
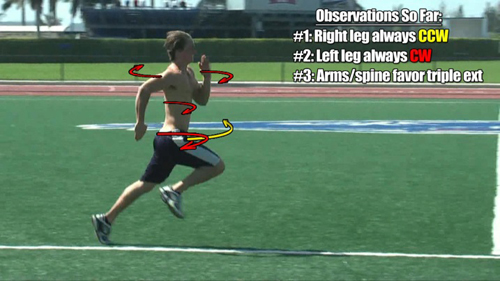
Figure 12. Right hip flexors (CCW) oppose other four torques for balance.
Of course this all occurs at the same time, but I wanted to piece it together for you here so that you can see how everything comes together perfectly.
Now let’s look at this when the arms and legs switch positions. Again, first identify the leg in triple extension, which is now the right leg, and we already know from observation #1 that it will produce a CCW torque around the spinal column as seen by our yellow arrow. See Figure 13 below.
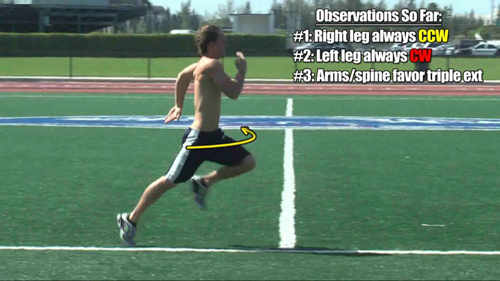
Figure 13. Right leg in triple extension produces CCW torque.
And now here comes the reinforcing help from the arms and torso, also in yellow and also in the same CCW direction as the leg in triple extension. See Figure 14 below.
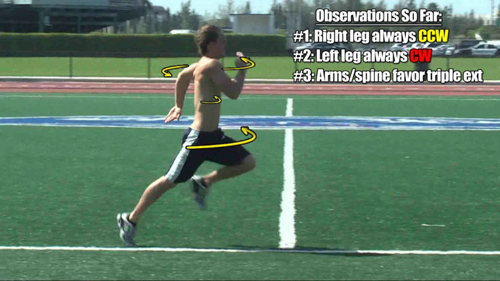
Figure 14. Arms and spine support leg in triple extension with same CCW torque.
And finally we see the hip flexors now on the left side, ACTING ALONE AND opposing these four torques with a red arrow in the opposite, or, CW direction to once again help maintain perfect balance. See Figure 15 below.
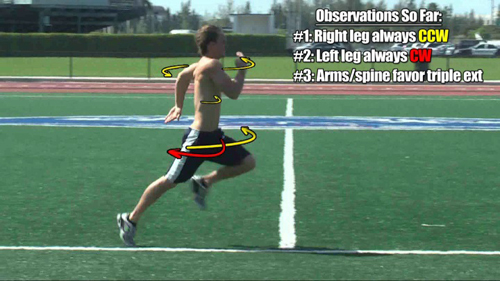
Figure 15. Hip flexors on left acting alone in CW direction to maintain balance.
Observation #4 of 5
I would be willing to bet that many of you watching this would never have guessed that the leg in triple extension, where the powerful glutes/hams, quads and calves are working the hardest, would still need extra support from the rest of the body to help offset the torque created by the front side hip flexors in the other leg, yet that is exactly what needs to happen in order for you to be able to walk and run in a straight line. See Figure 16 below.
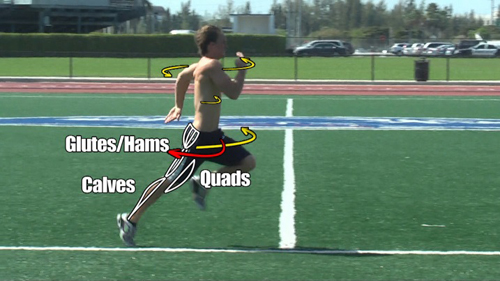
Figure 16.
And because of this, your hip flexor muscles are essentially the pace-setter when it comes to how fast you will be able to run. See Figure 17.
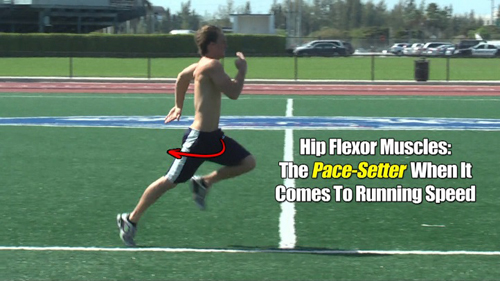
Figure 17. Hip flexors are the pace setter for running speed.
In other words, you can put in a lot of good effort training up your backside glutes/hams, as well as your quads and calves as shown in the list below in Figure 18, but in order for you to fully appreciate the hard work you put in, you will also need to equally raise the level of strength in the front side hip flexors to counter this effort.
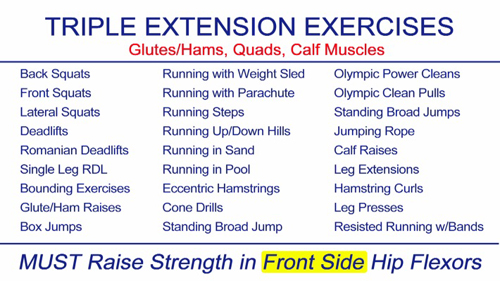
Figure 18. List of triple extension exercises.
Because if you don’t, you will hit a plateau in your speed training and that plateau is more than likely dictated by the strength, or lack thereof, in your front side hip flexors simply because many of you are putting very little effort in to them when compared to the backside glutes/hams. See Figure 19 below.
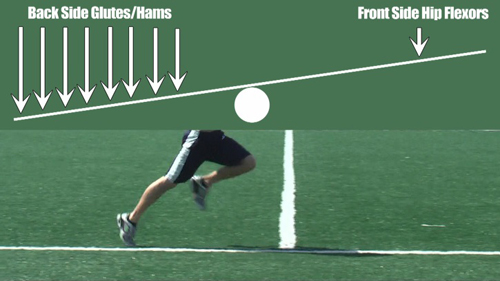
Figure 19. Plateau created by lack of balance between back-side glutes/hams and front side hip flexors.
And this can be easily seen by the equation below once again, where the two sides need to be in balance. See Figure 20 below.
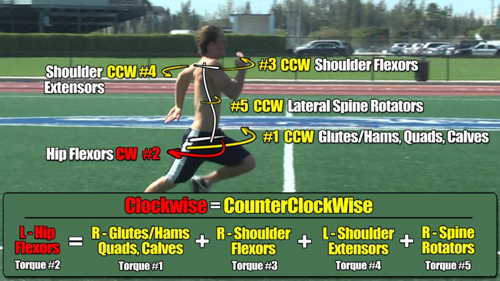
Figure 20. Running speed is an equation of balance.
Simply raising the strength on one side does not mean the other side will automatically get stronger as shown in Figure 21 below.
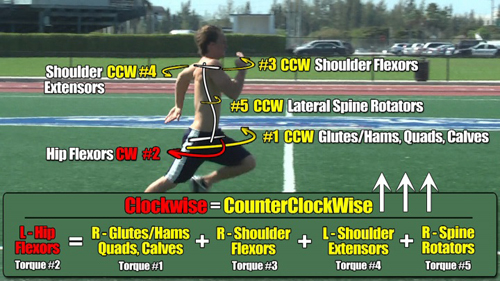
Figure 21. Unbalanced equation will not make you faster.
This is not an open-ended equation where you simply add strength to one part, or parts, of the body and speed follows, but rather, this is an equation of balance and so anything you do on one side, also needs to be countered on the other in order for you to raise your sports performance. See Figure 22 below.
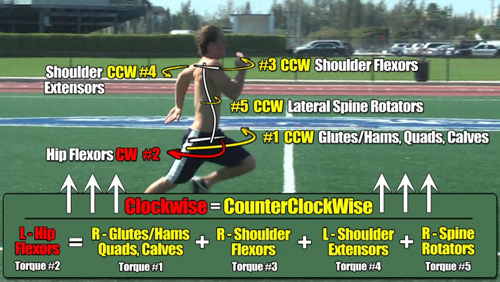
Figure 22. Balanced equation leads to improved sports performance.
So, that is our fourth observation and that is: your hip flexors are the pace-setter when it comes to how fast you can run and are needed to offset the powerful muscles involved in triple extension as well as the shoulders and torso. See Figure 23 below.
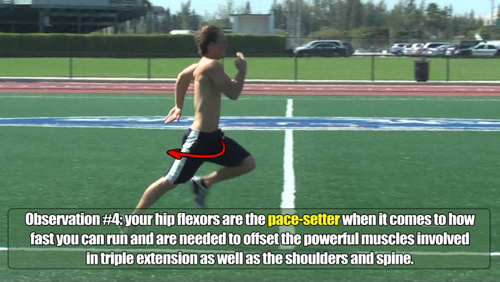
Figure 23.
Observation #5 of 5
The fifth and final observation is more of a reminder to you than anything and that is this: in order to achieve your true running speed potential, you will need a training routine that focuses on the muscles involved in triple extension, hip flexors, shoulder flexors, shoulder extensors and lateral spine rotators on both sides of your body. See Figure 24 below.
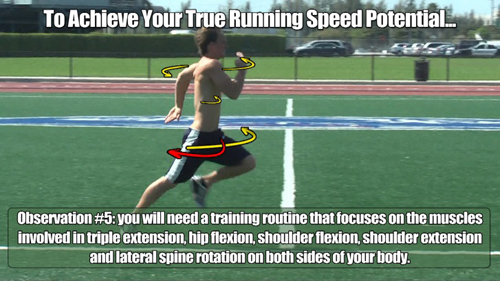
Figure 24.

