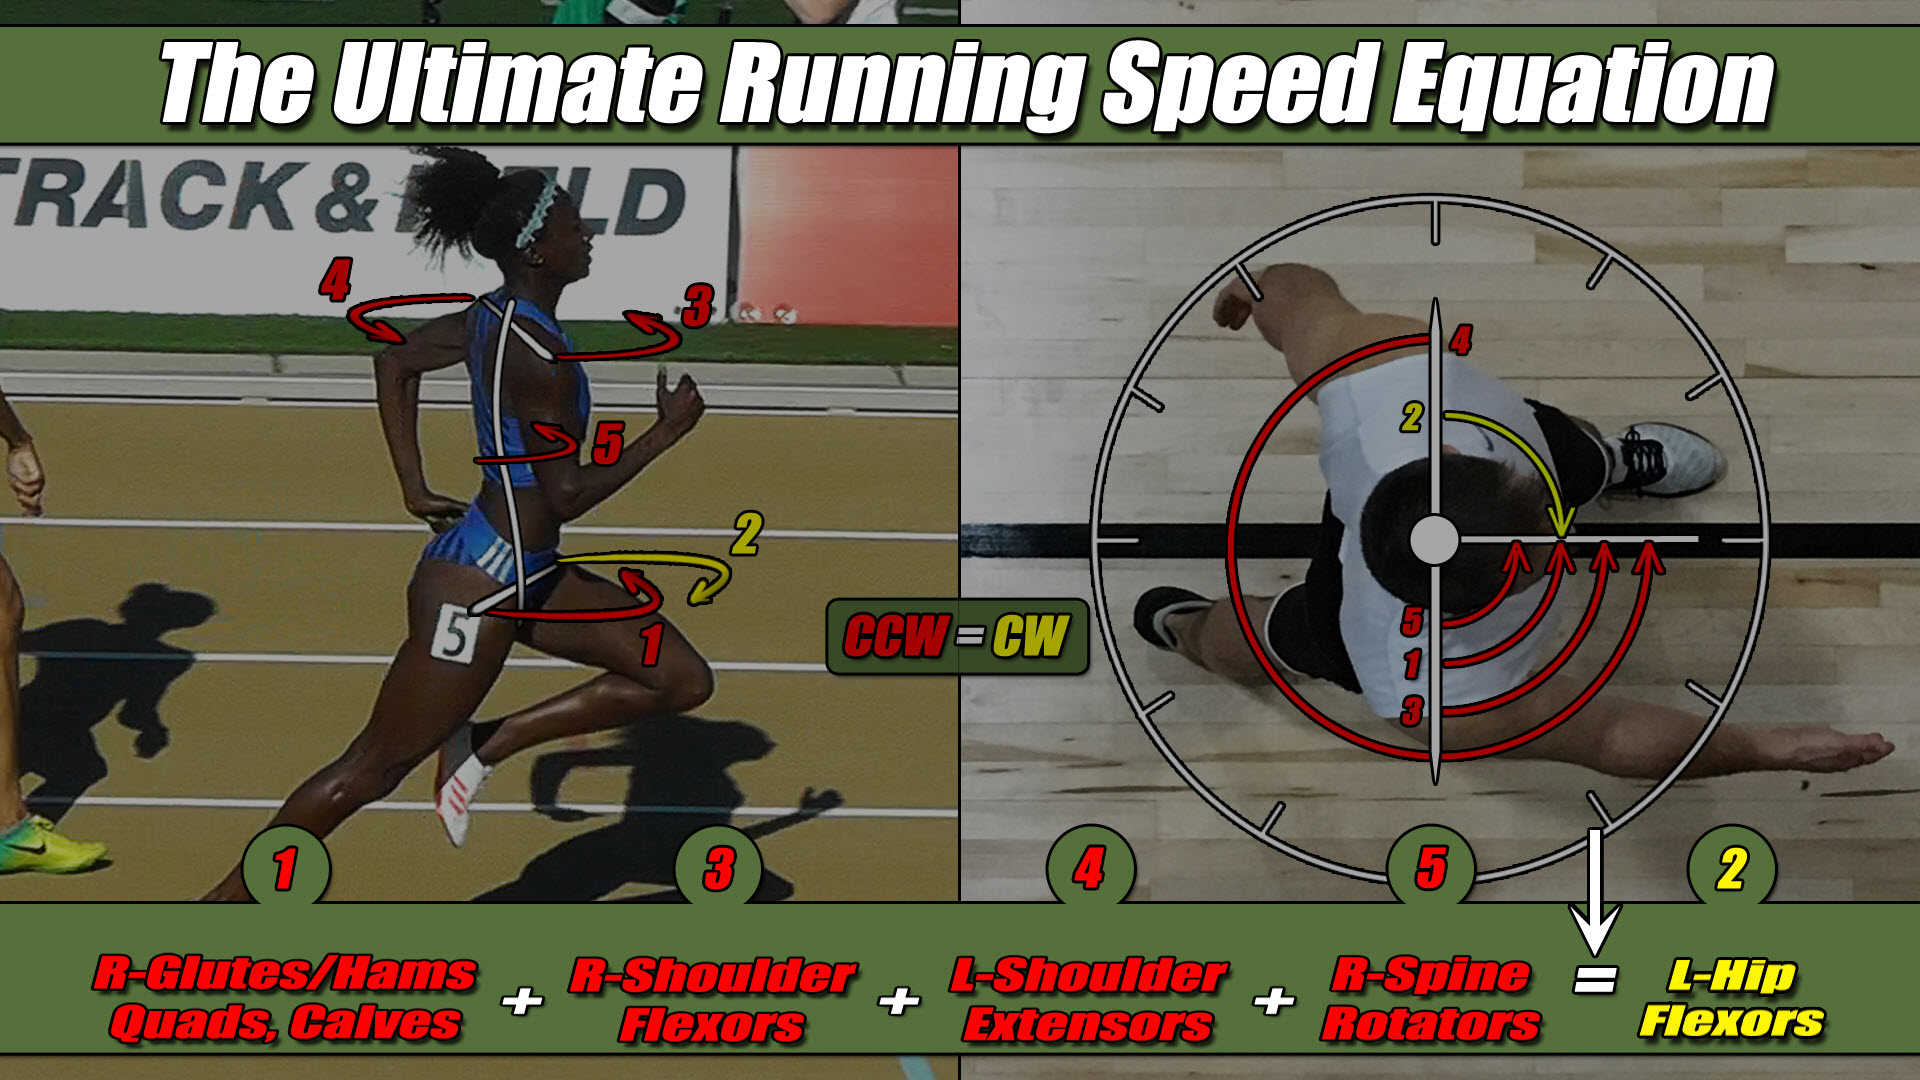
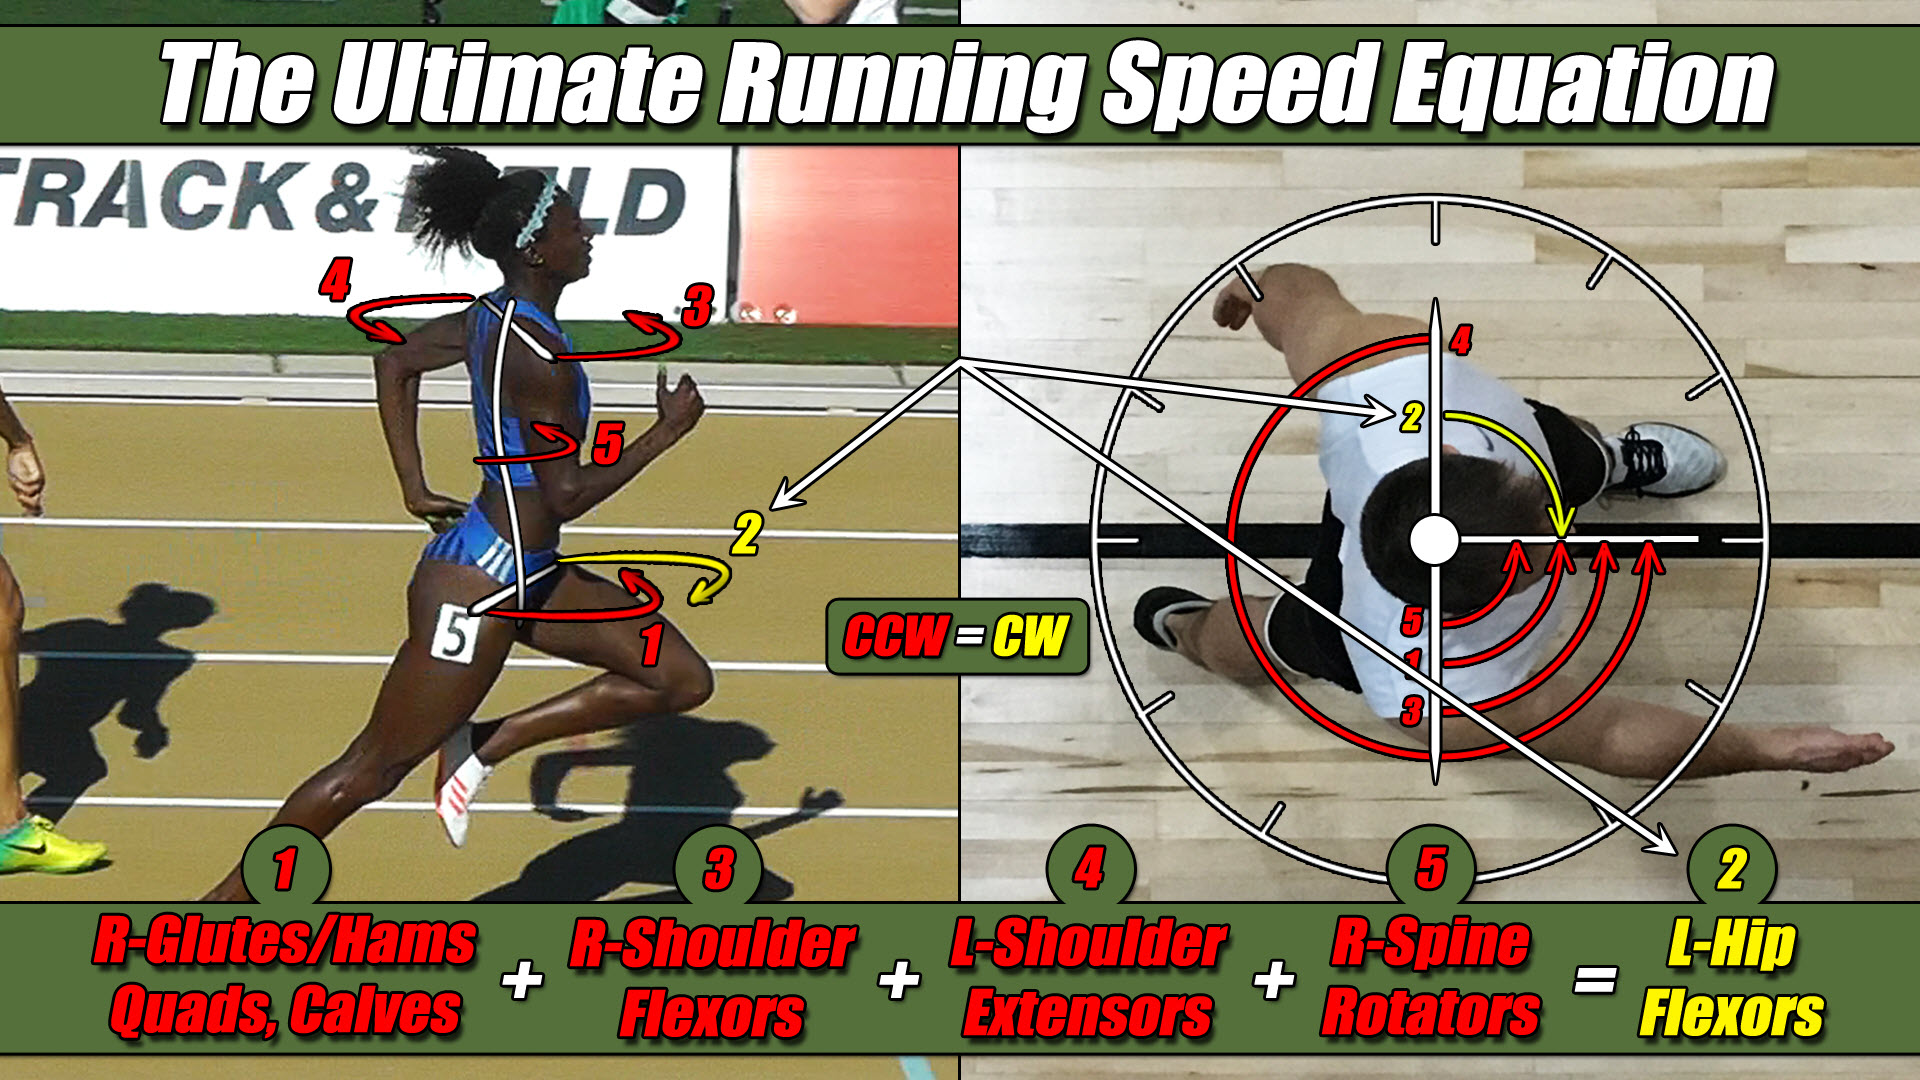
Now that I’ve had a chance to show you how each of these five torques are created and work individually, I want you to see them all at the same time so you can begin to appreciate how they come together to help you run as fast and efficient as humanly possible.
But instead of just putting them in to our image all at once, I’m going to put them back in, one at a time, since that will provide me with the opportunity to do a quick review of them before taking you further along this path.
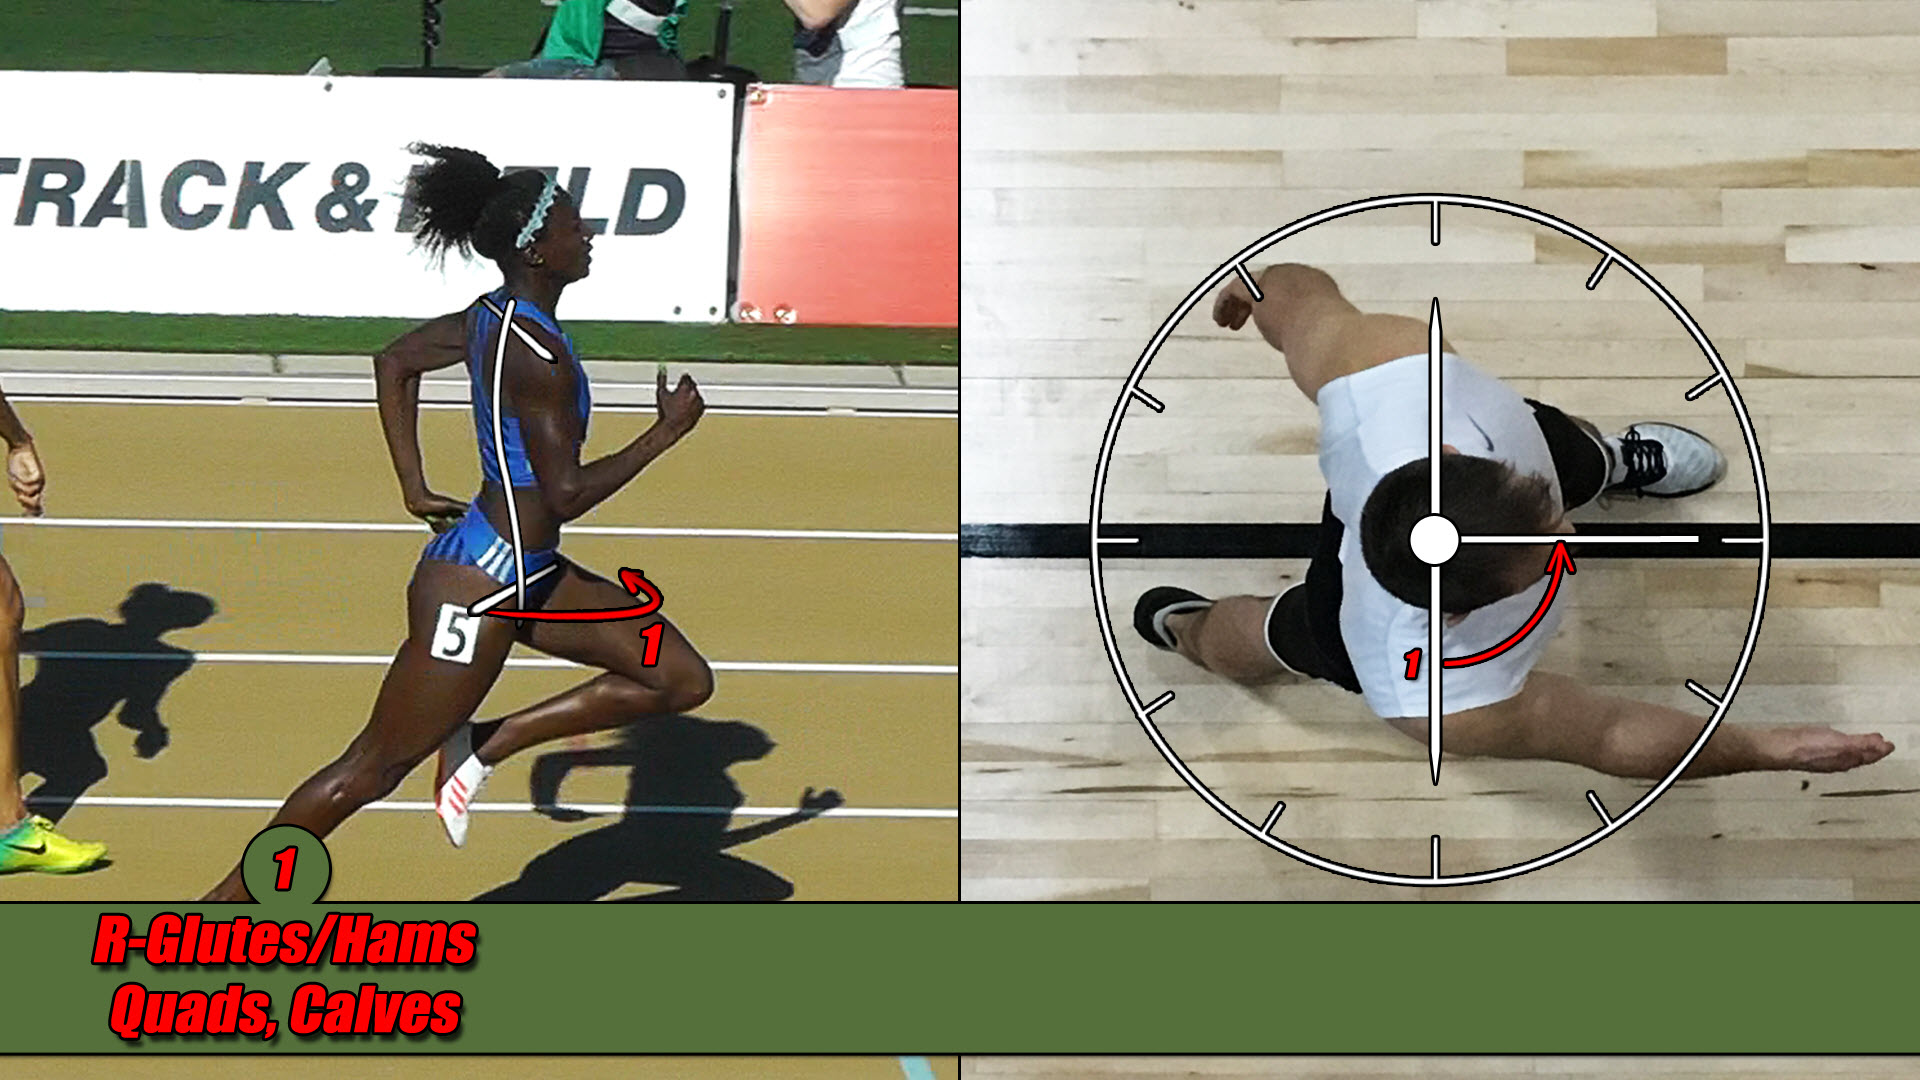
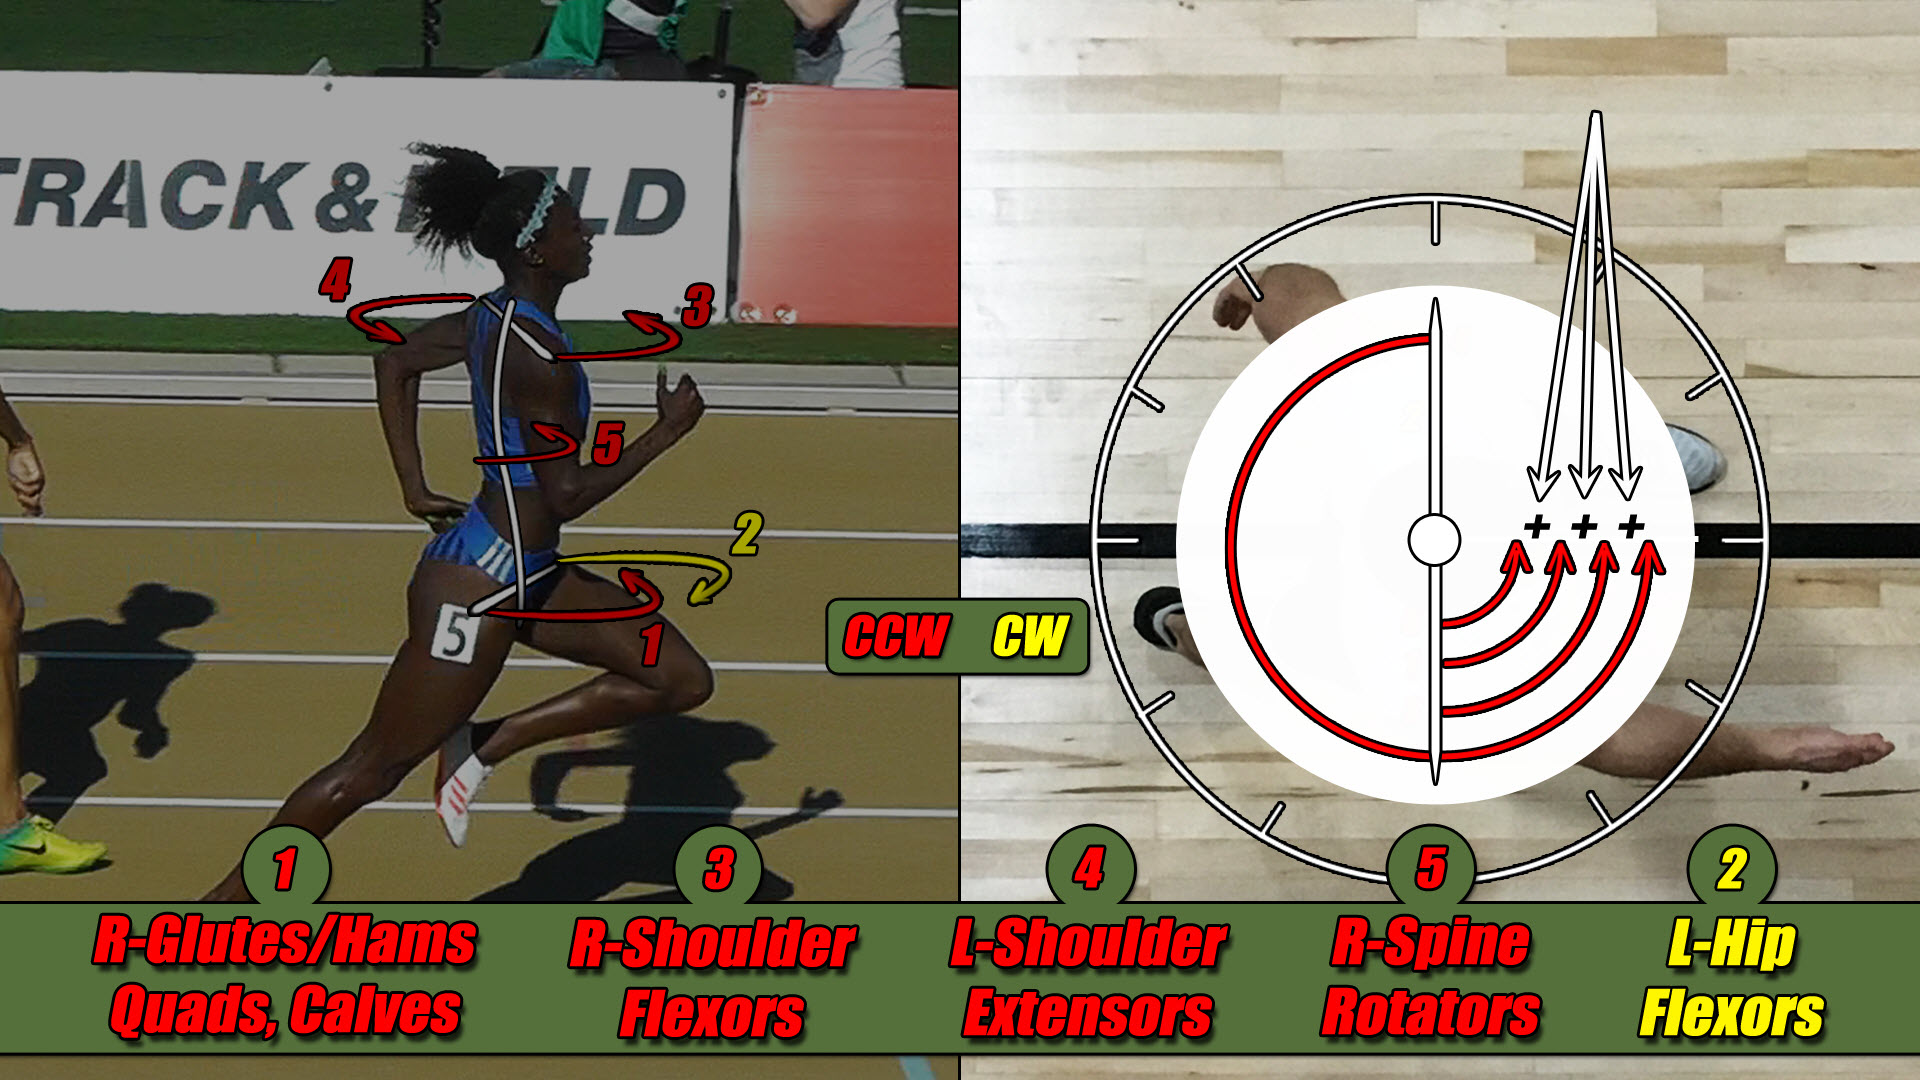
So, beginning with the first one. You will recall it was generated by the right leg from the action of the glutes/hams, quads and calves and we found it was going in the CCW direction and I’m going to them on the images here as well as write it down below. See Figure 09-1.
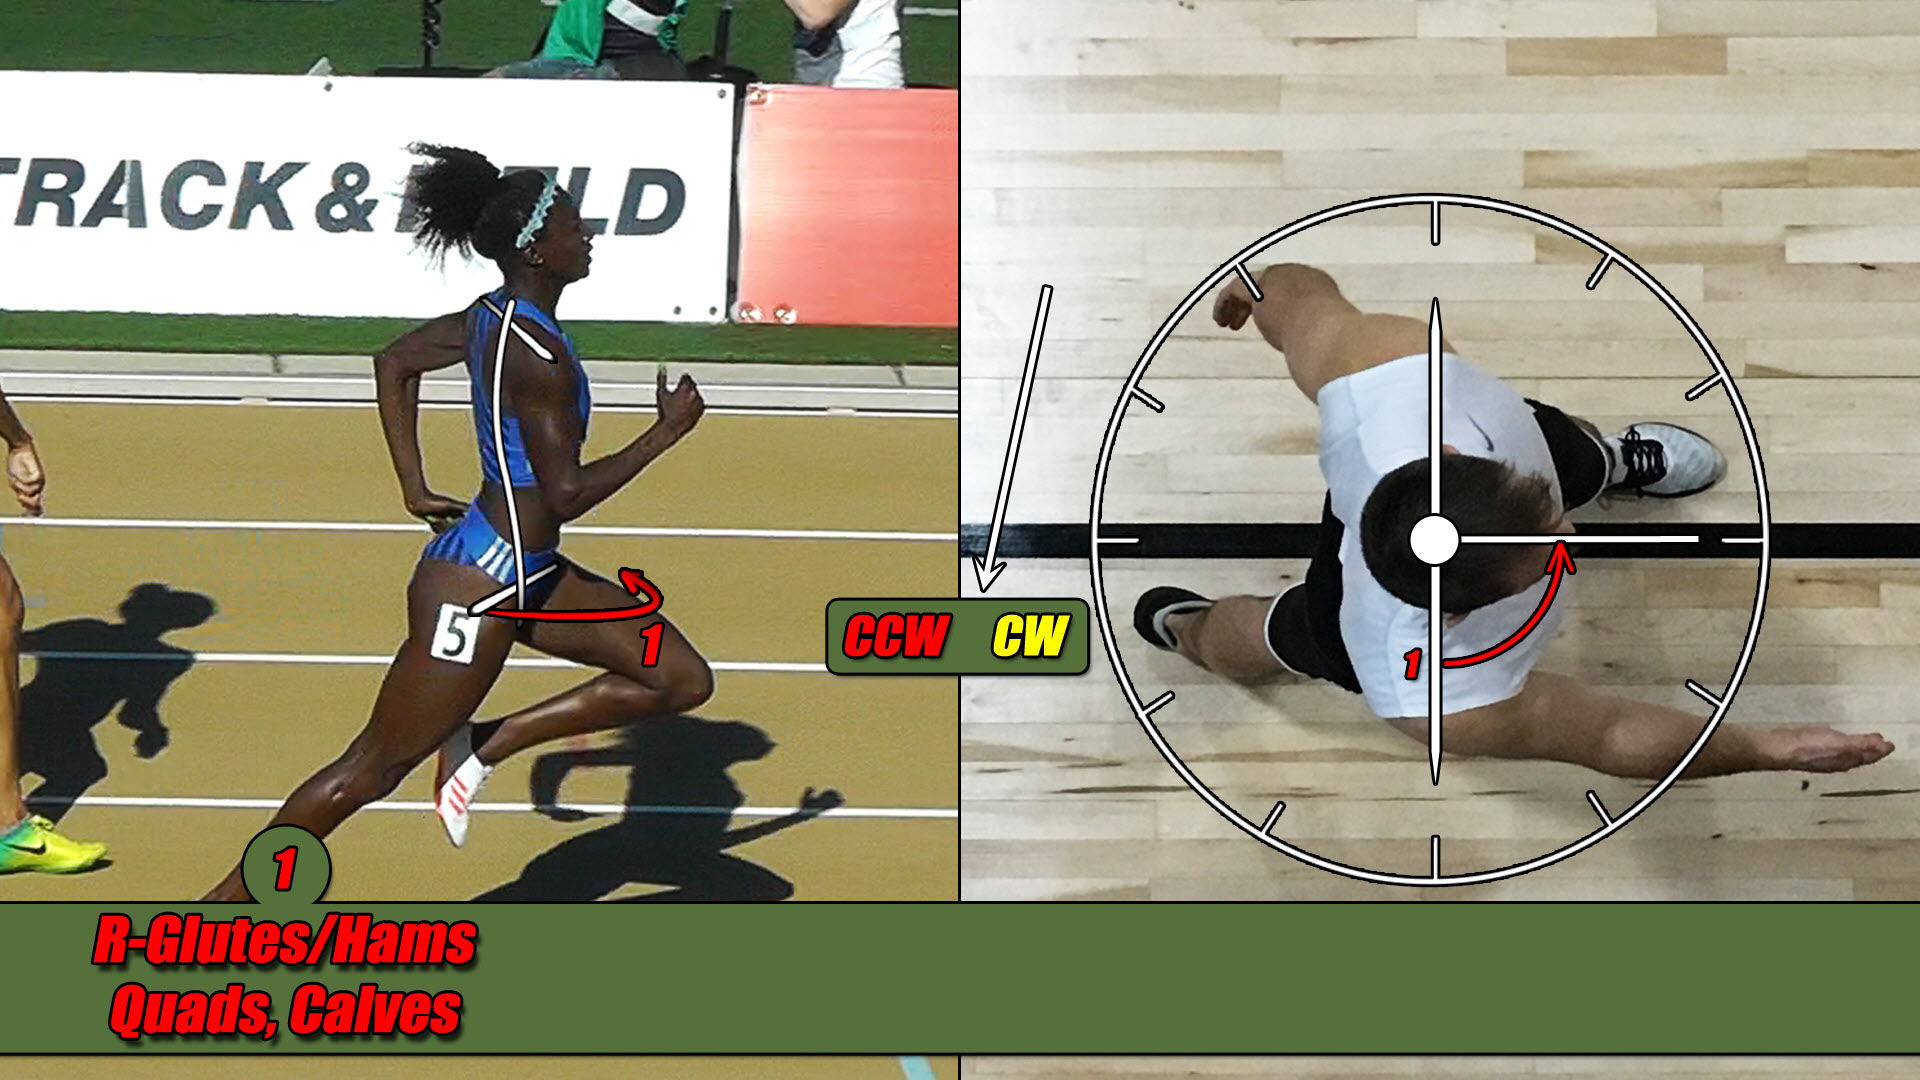
And you will notice I placed a little number “1” near these torques and that’s simply for easy reference as we go. Also, and to try and keep my image as clean as possible, I’m not going to write the letters CCW for counterclockwise and CW for clockwise next to every torque but instead, I’m going to make a little key for us showing that everything in red is a CCW torque and everything shown in yellow is a CW torque and again, this will prevent my images from getting too cluttered going forward. See Figure 09-2.
The second torque I showed you was generated by the left leg and we found it was going in the CW direction, seen here now in yellow, and I’m going write this down below, also in yellow and name it the left hip flexors since that was the main muscle group producing this rotational force on that side of the body. See Figure 09-3 below.
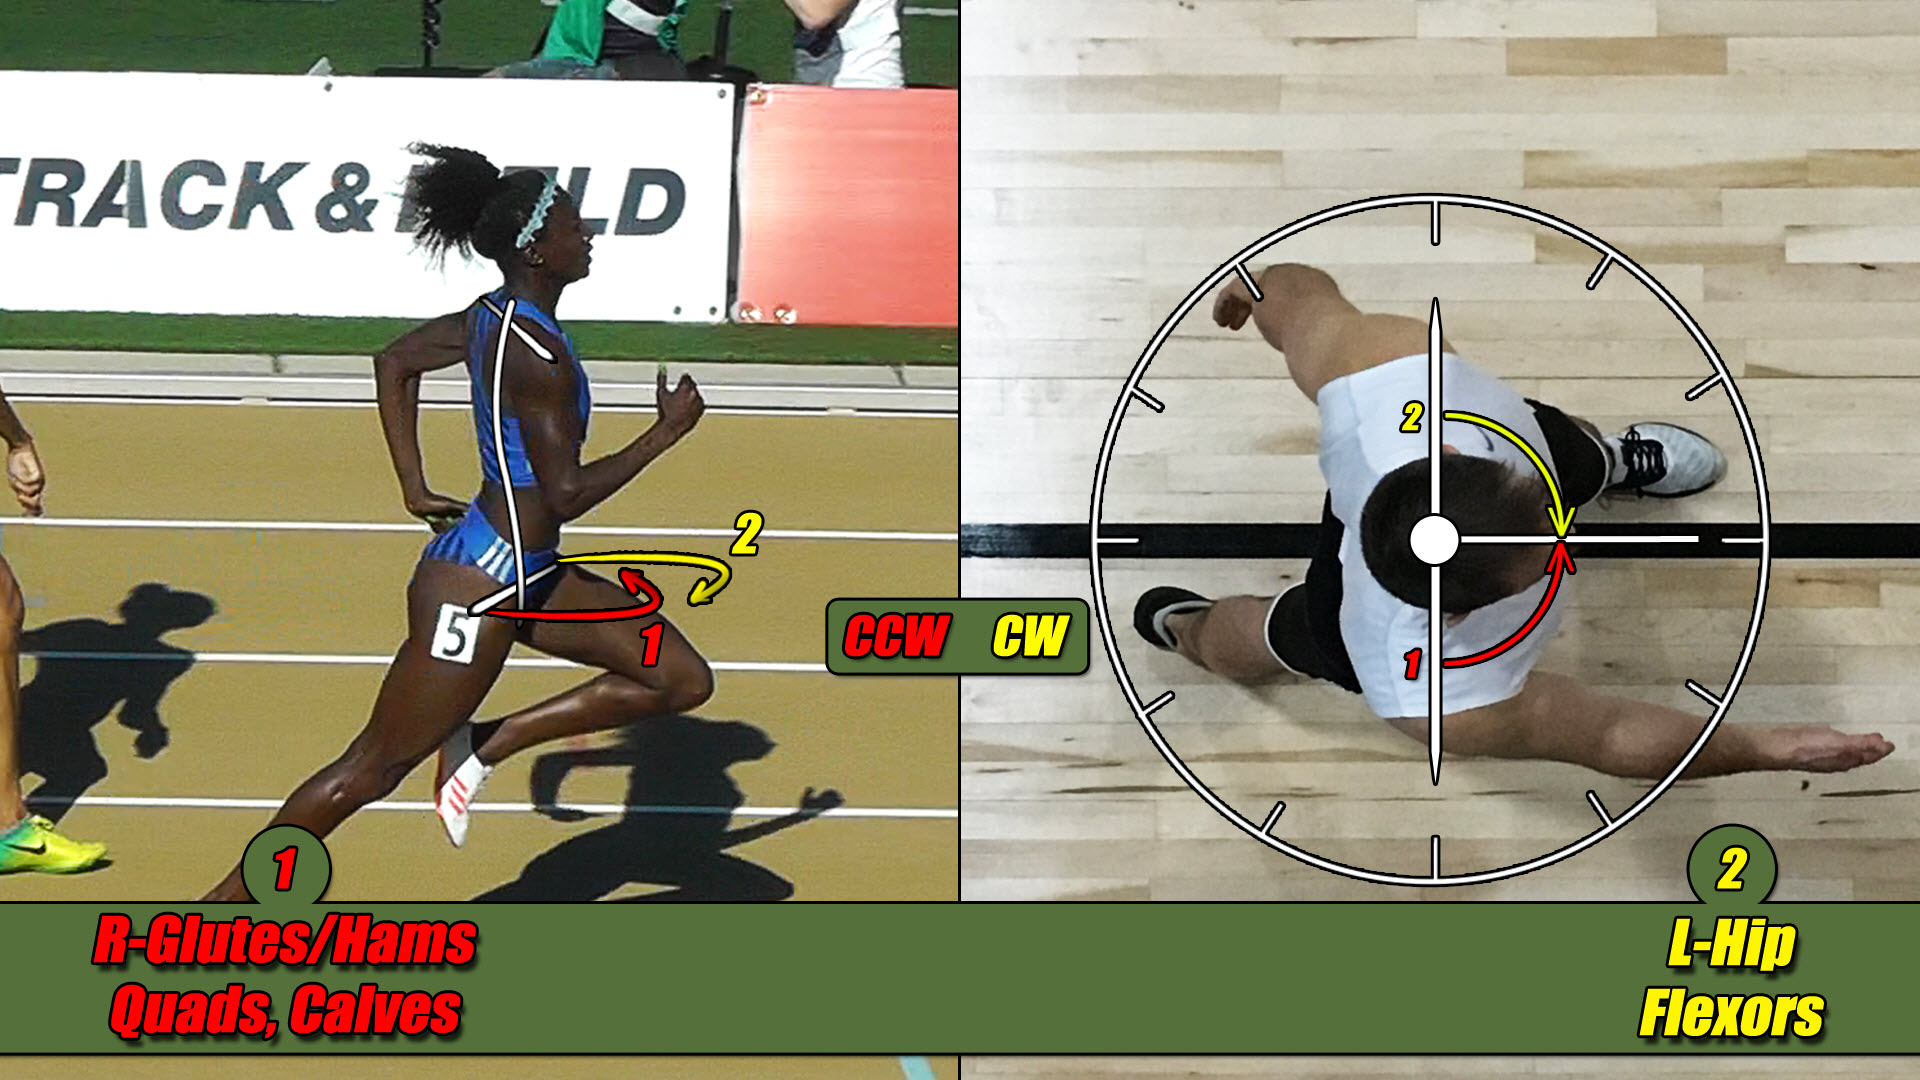
The third torque I showed you was generated by the right arm and we found it was going in the CCW direction, back to the color red, and I’m going write this down below, and name it the Right Shoulder Flexors since that was the main muscle group producing this rotational force on this side of the body. See Figure 09-4 below.

The fourth torque I showed you was generated by the left arm and we found it, too, was going in the CCW direction and I’m going write this down below, in red, and name it the left shoulder extensors since that is the main muscle group producing this rotational force on that side of the body. And you will notice I drew this torque all the way around until it met up with the other red, CCW torques. And I did this so you can see its relationship with them a little better here in just a moment. See Figure 09-5 below.
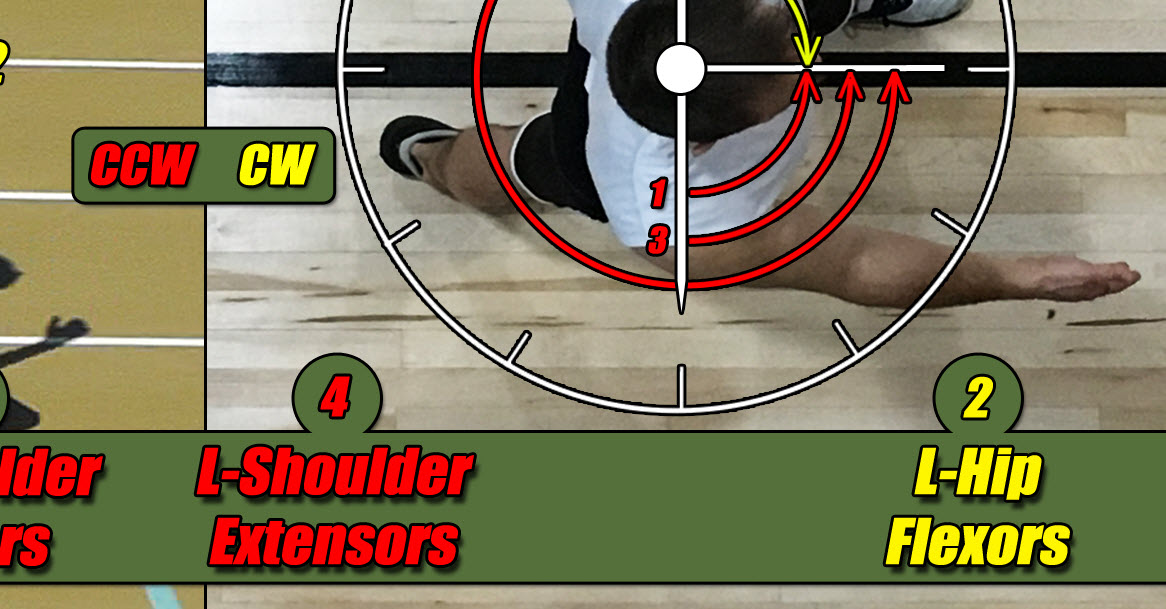
And the fifth torque I showed you was generated by the right spine rotators and we found it was going in the CCW direction and I’m going write this down below, in red, and name it the Right Spine Rotators since that was the main muscle group producing this rotational force on that side of the body. See Figure 09-6 below.
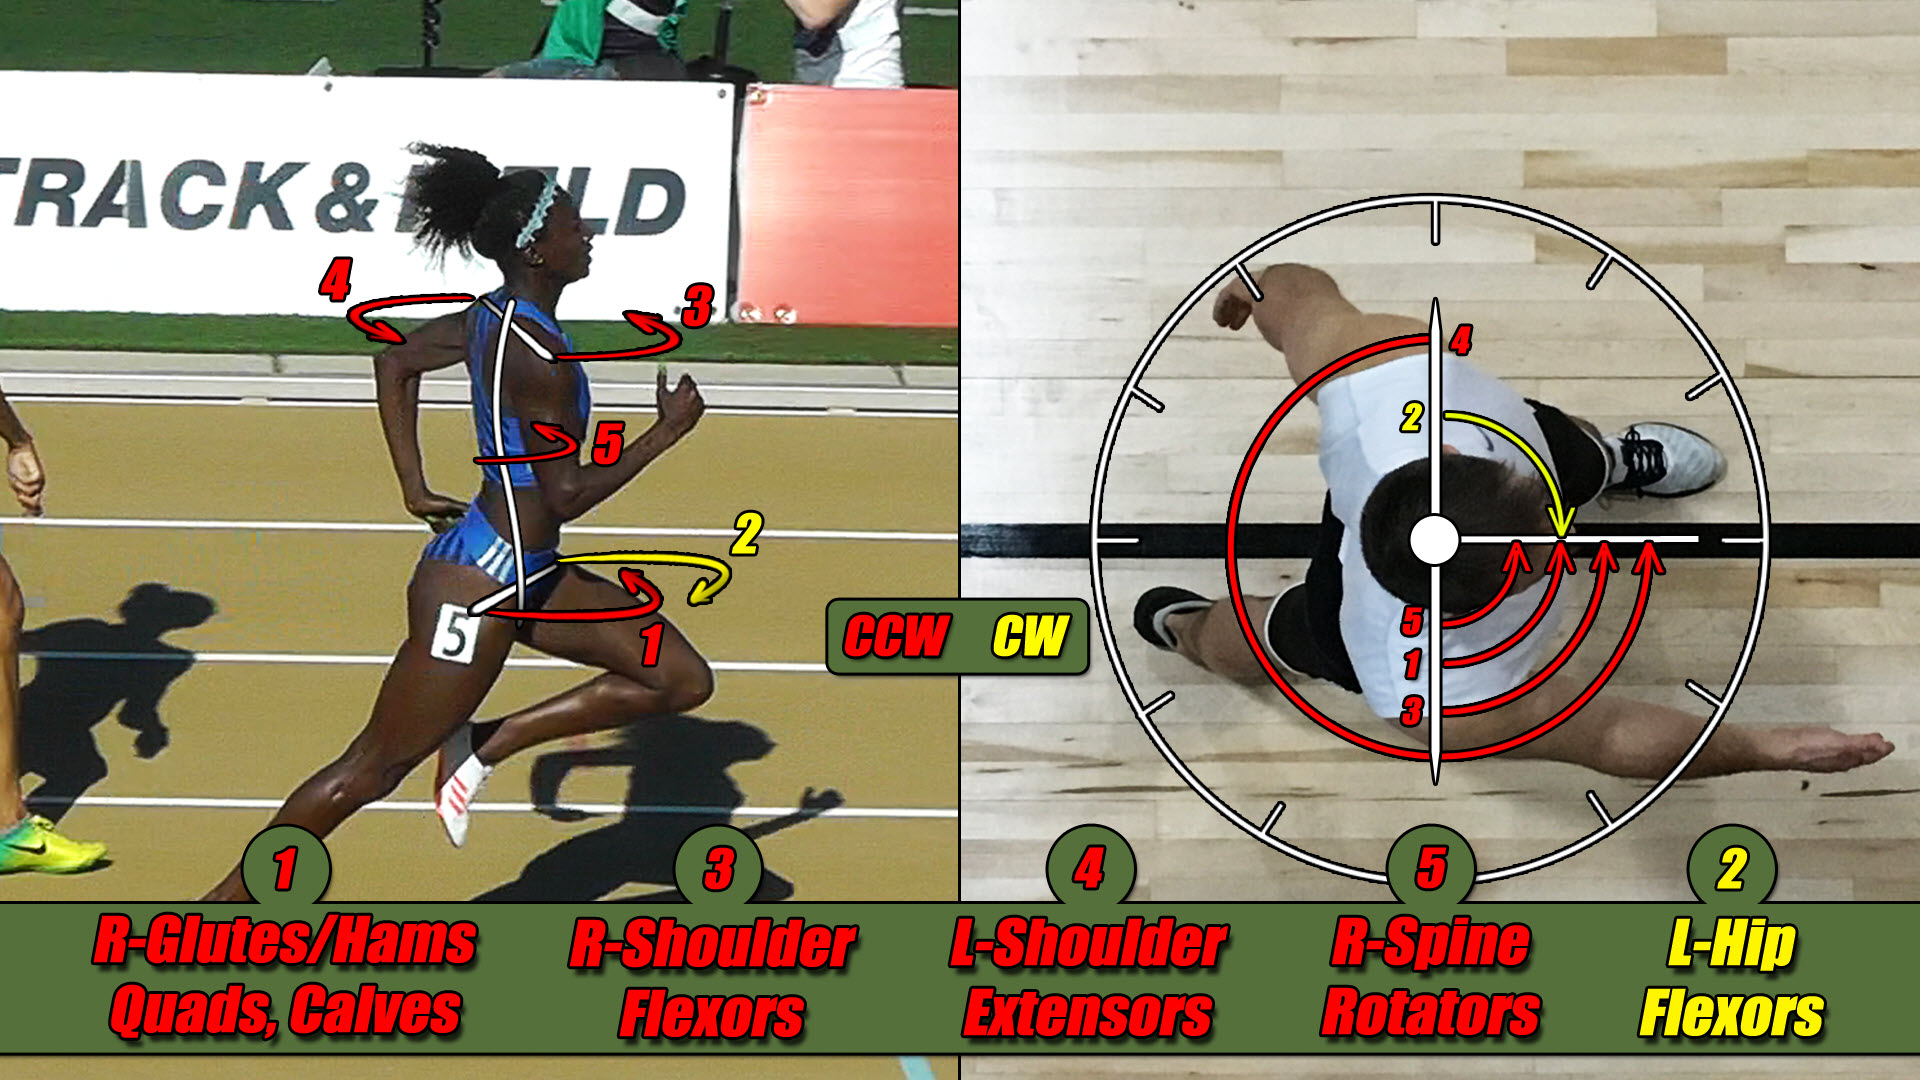
Now, with our athletes in their present configurations, we see that four of these five torques, shown in red, are trying to spin the body in a CCW direction and only one of them, shown in yellow, is trying to spin it in a CW direction. So, let’s talk about the 4 red ones first and turn our attention over to the male athlete since what I am about to say will be much easier for you to see and follow while looking at him from above.
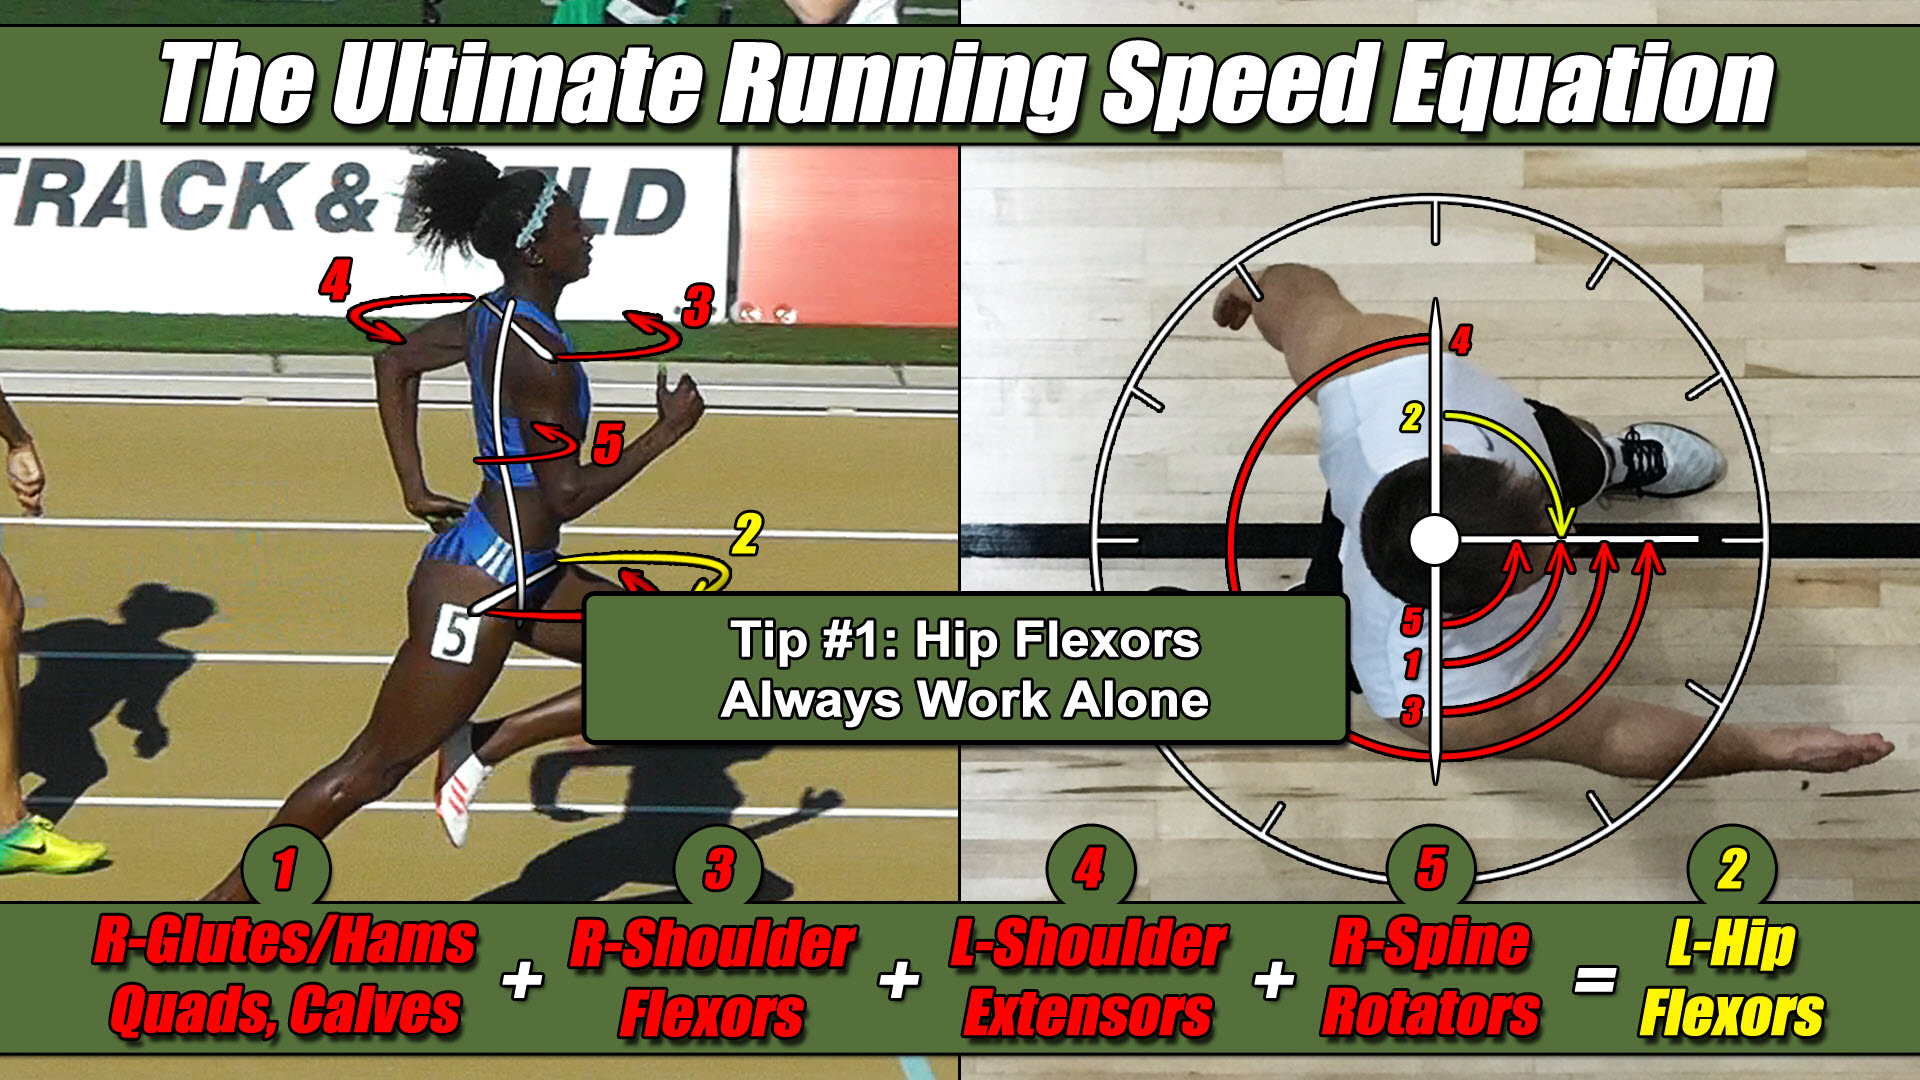
These four, red torques, consist of one from the right leg powered by the glutes/hams, quads and calves, one from the right arm powered by the shoulder flexors, one from the left arm powered by the shoulder extensors and one from the side of the spine and torso powered by the right spine rotators. See Figure 09-7 below.
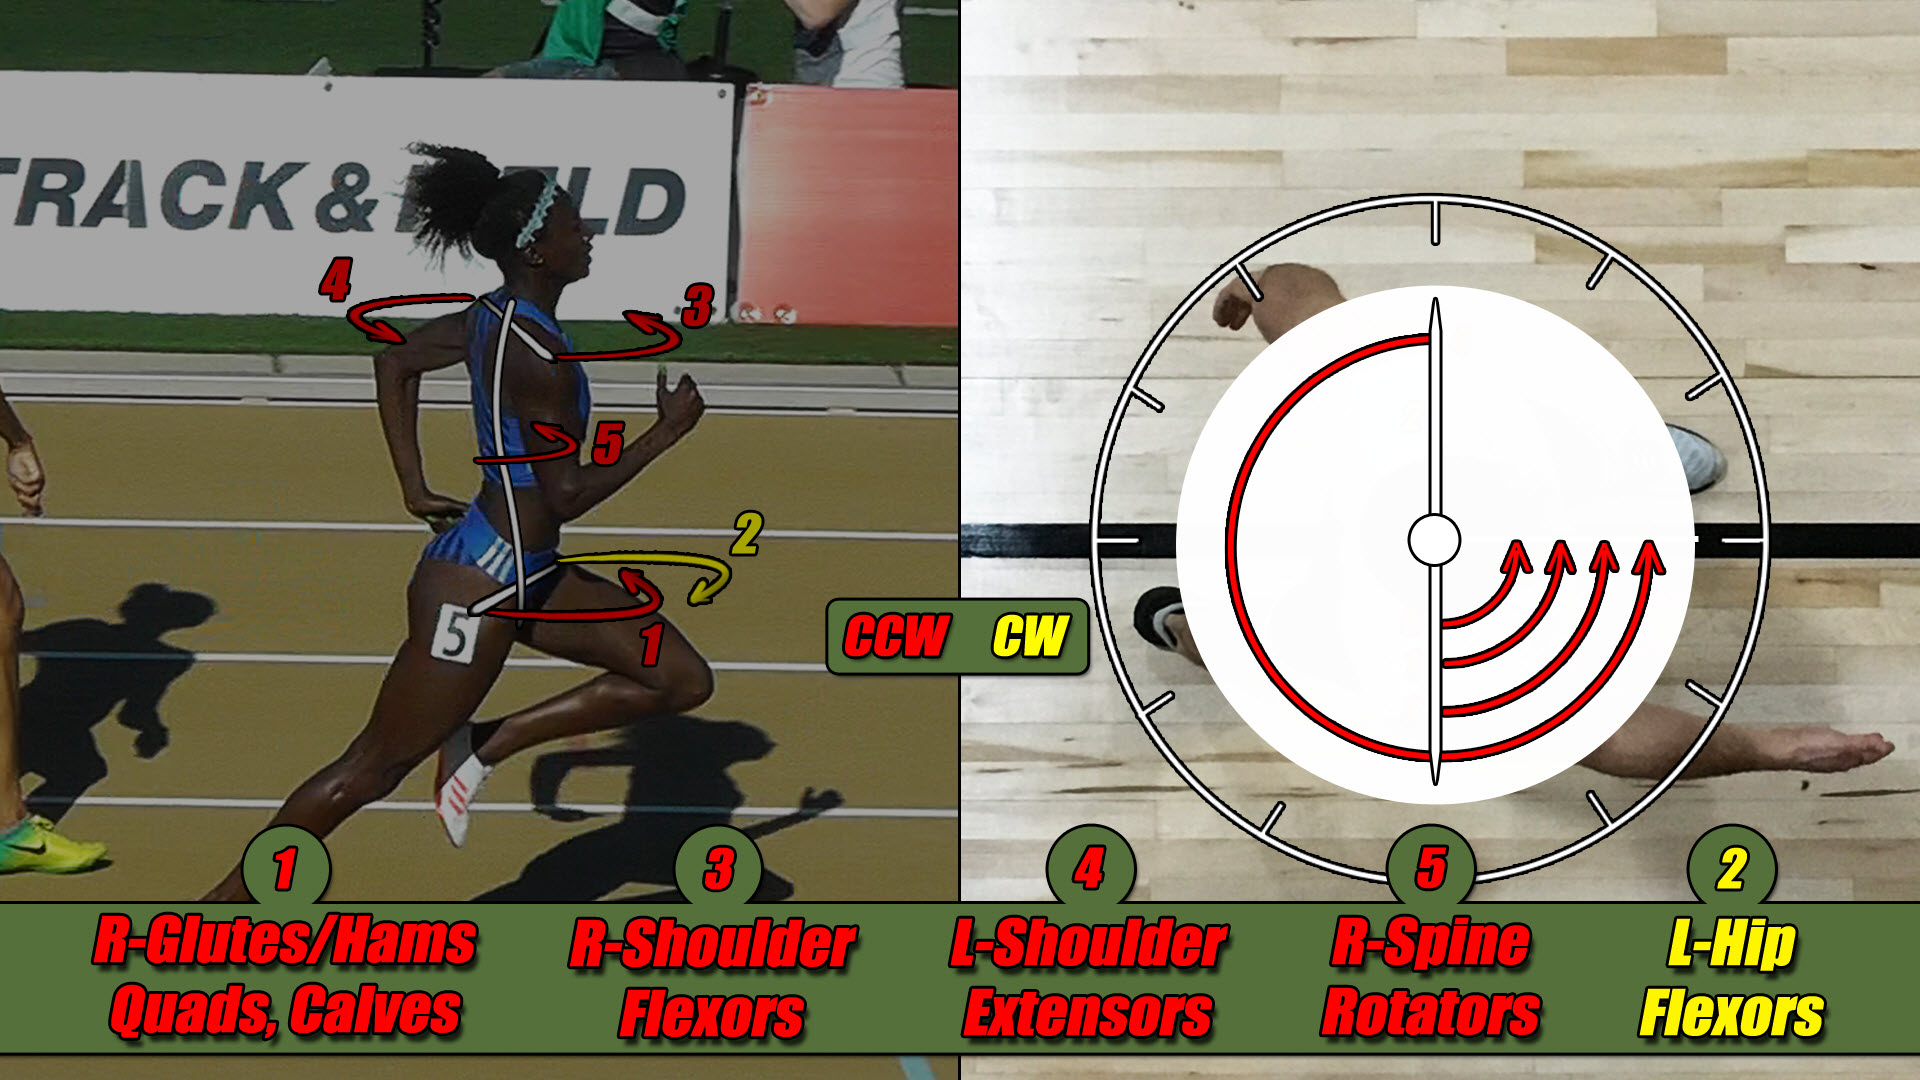
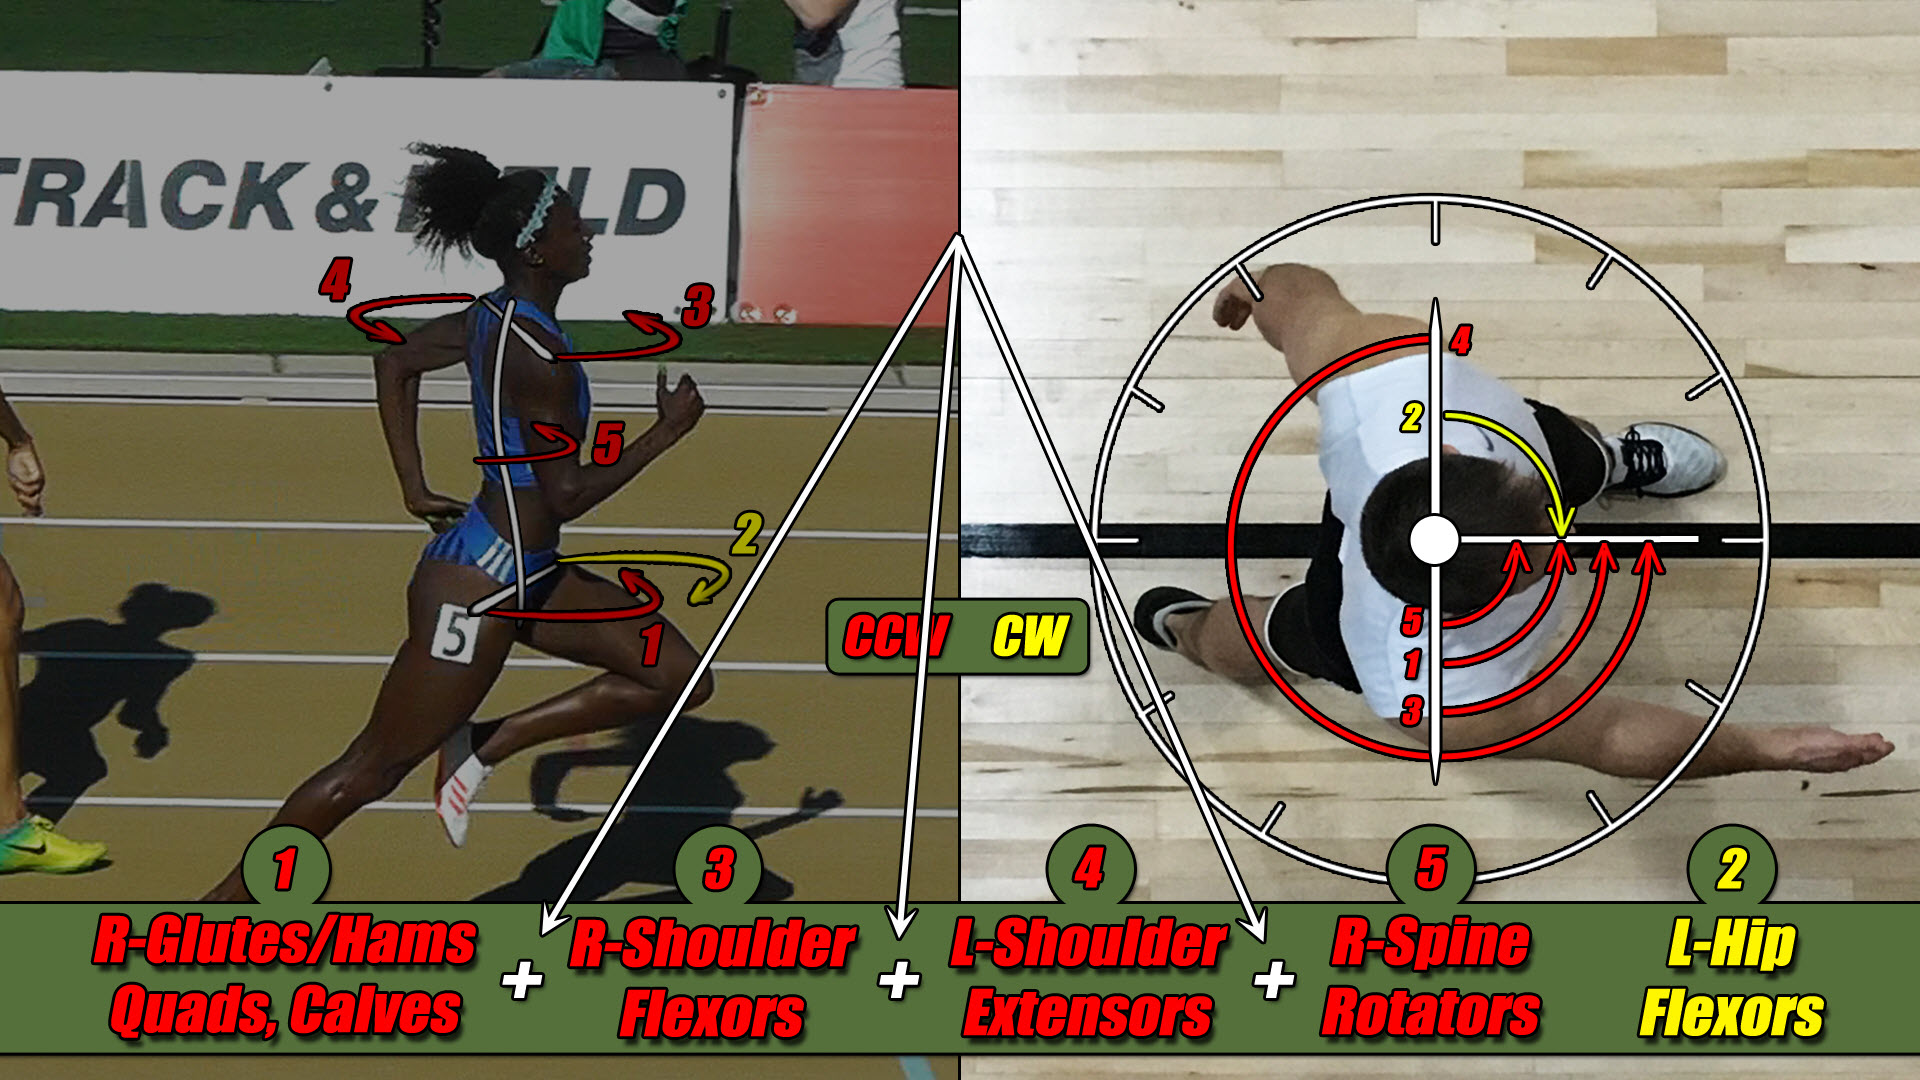
Since all 4 of them are trying to twist his body in the same CCW direction, their effect, is then, cumulative, meaning, their individual strengths get added together, twisting him even harder in the same CCW direction, than any one of them could do by themselves. See Figure 09-8.
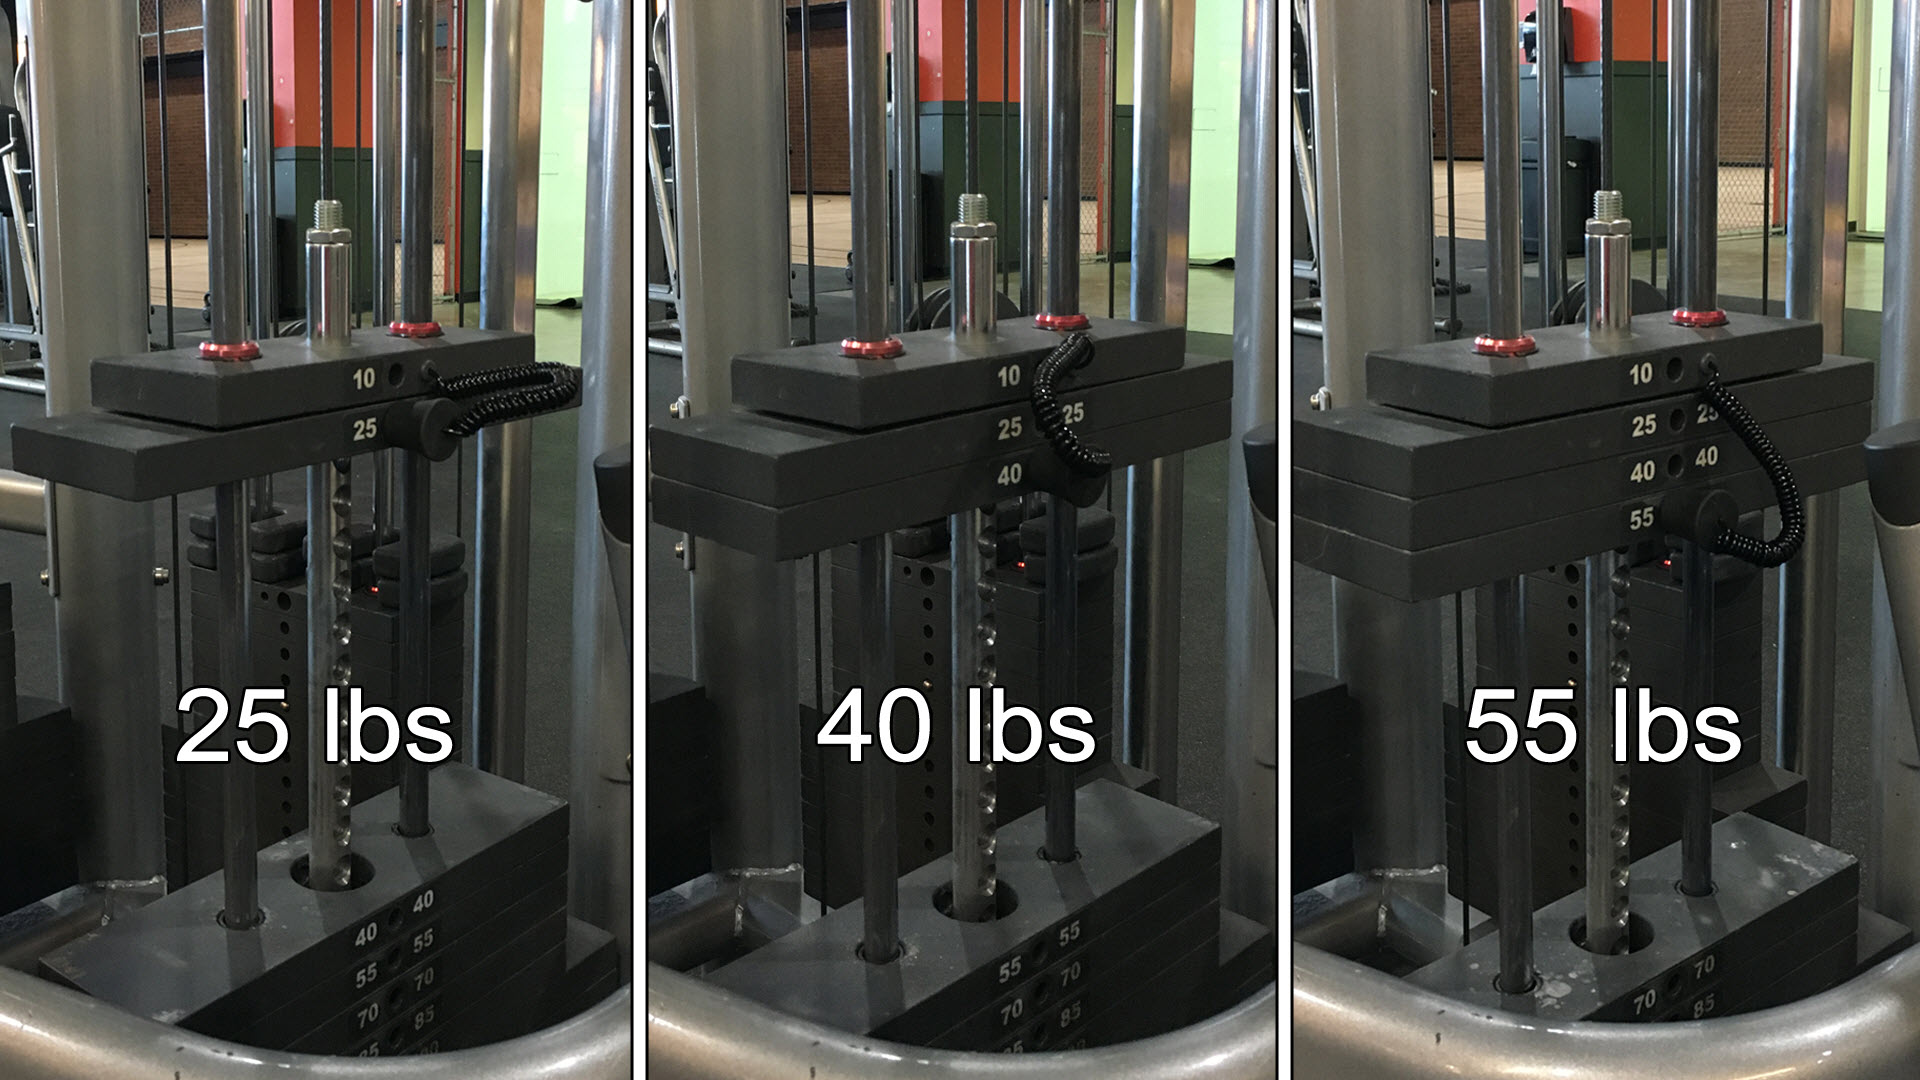
This principle of adding similar torques together for the purpose of increasing their overall effect on an object applies to other types of forces working in the same direction as well. For example, the force applied by a stack of weights to a cable is increased in direct proportion to the amount of weight being added underneath. Again, it’s the same principle. See Figure 09-9 below.
So, because these four torques are working together, their effect is once again cumulative and so, we can now put a “+” sign between them all down below since that is exactly what is happening with them. See Figure 09-10 below.
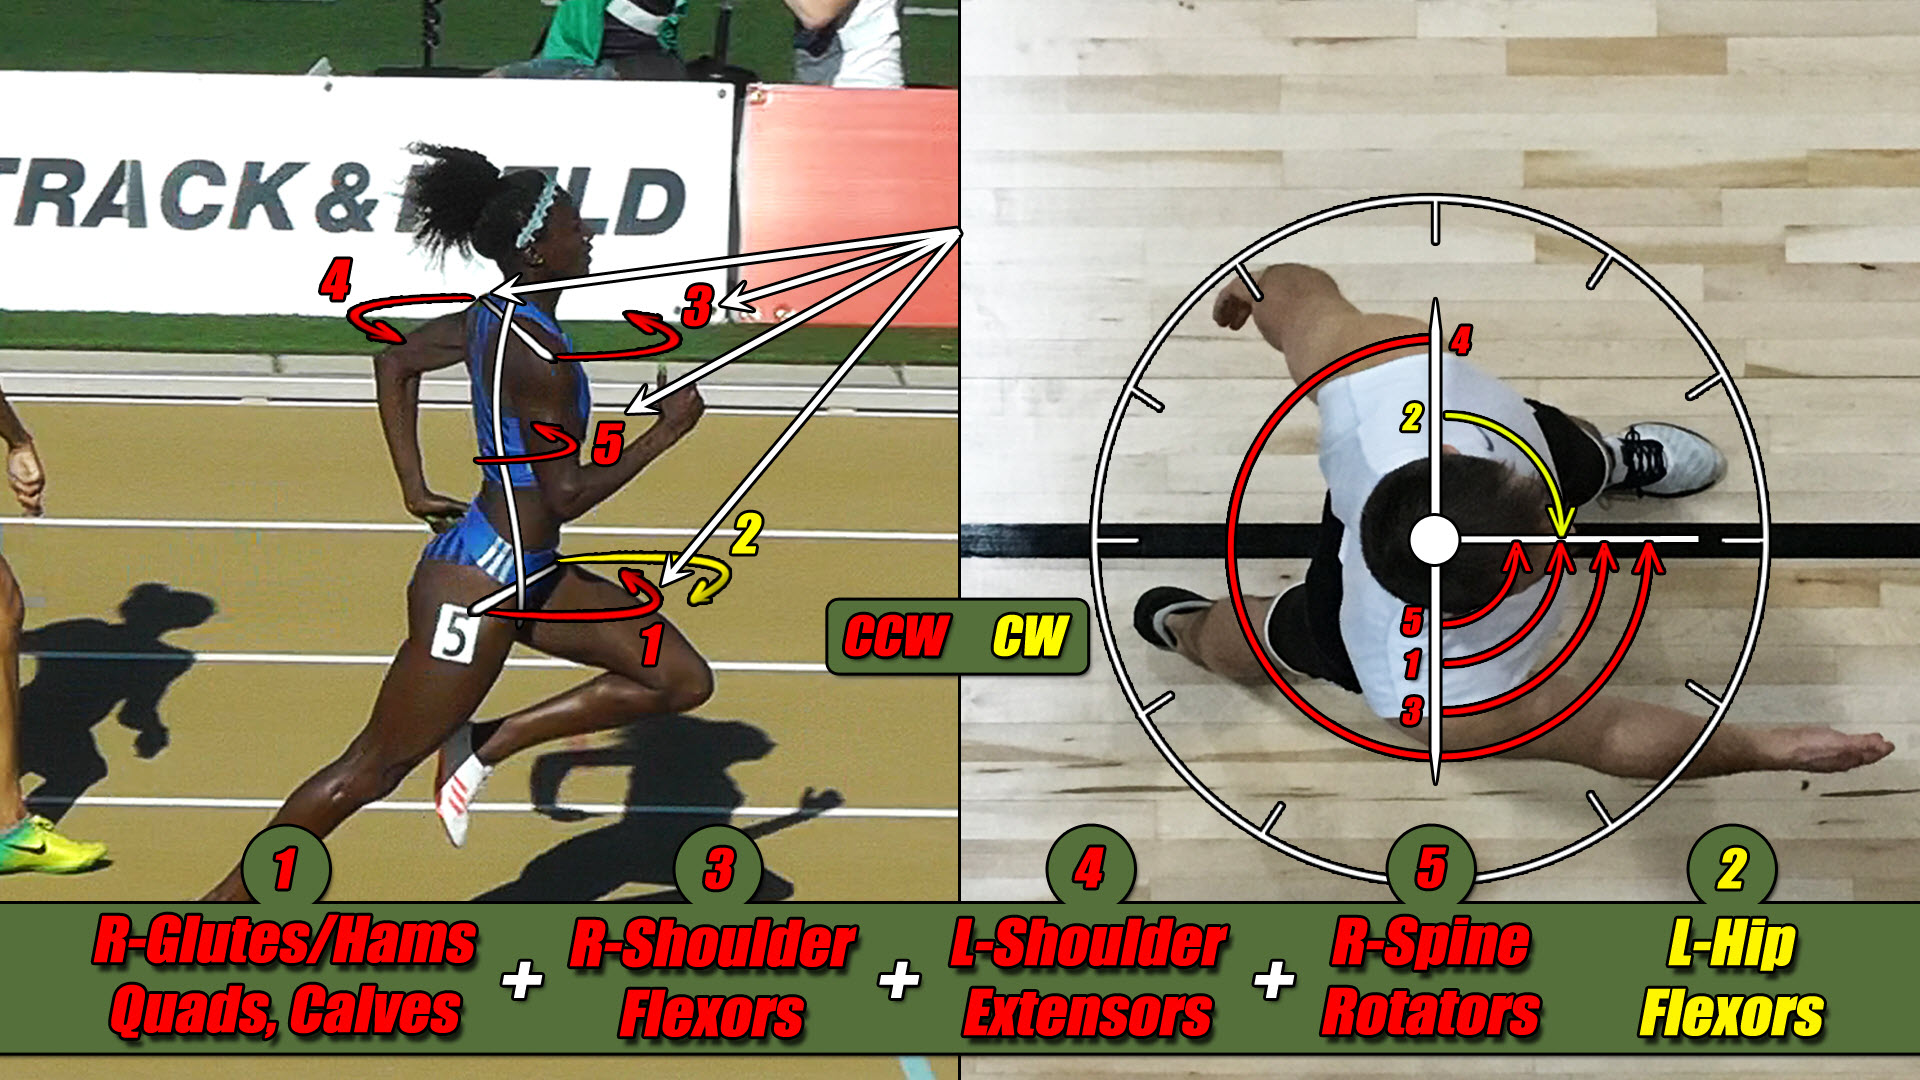
Now, these same four red colored torques on our female athlete are, likewise, also combining to try and twist her even harder in the same CCW and that should be easier for you to envision. See Figure 09-11 below.
Now, let’s talk about the one yellow CW torque, and turn our attention once again to the male athlete. We see that it is powered by the left hip flexors. See Figure 09-12 below.
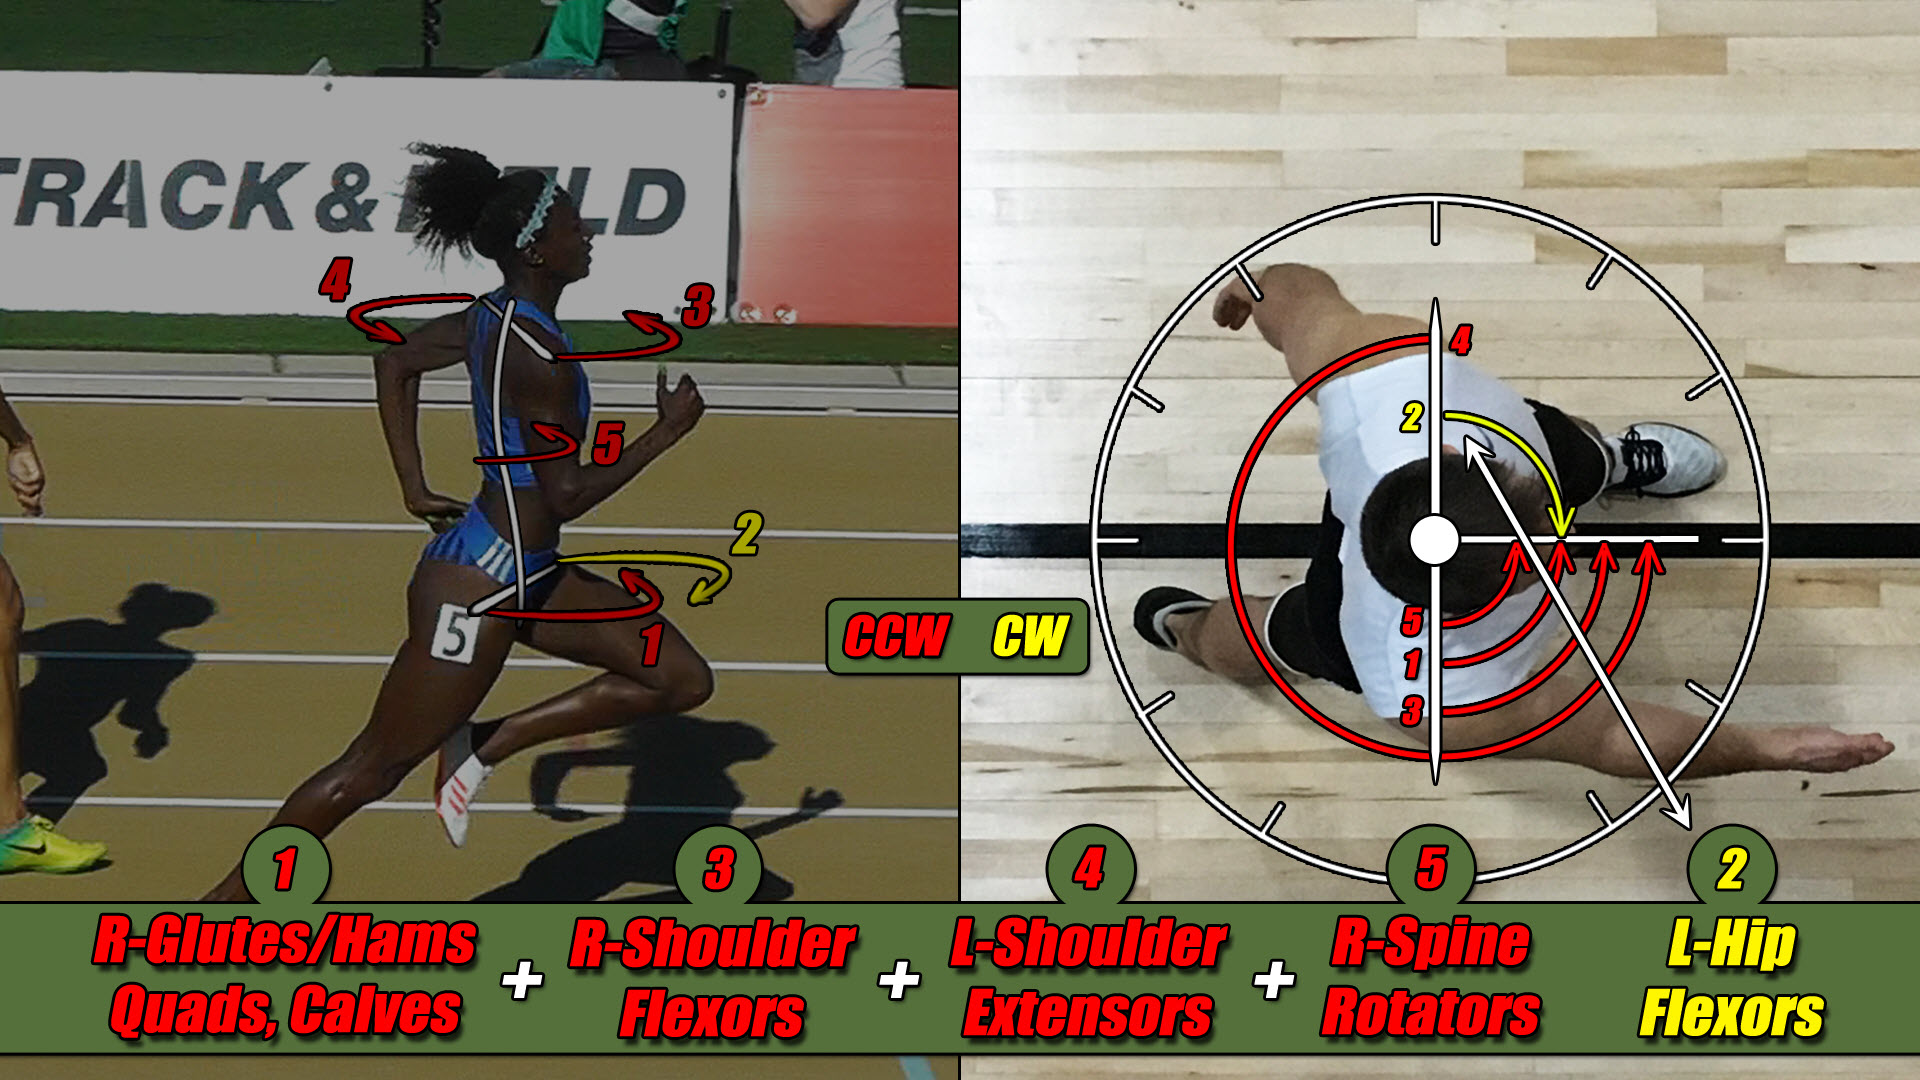
And, since this is only torque working in this direction, it must be strong enough, all by itself, to push back against the combined strength of the other four with equal strength in order to keep the athlete travelling in a straight-line path such as, the black line on the floor for our male athlete, or, within the proper lane as for our female athlete. See Figure 09-13 below.
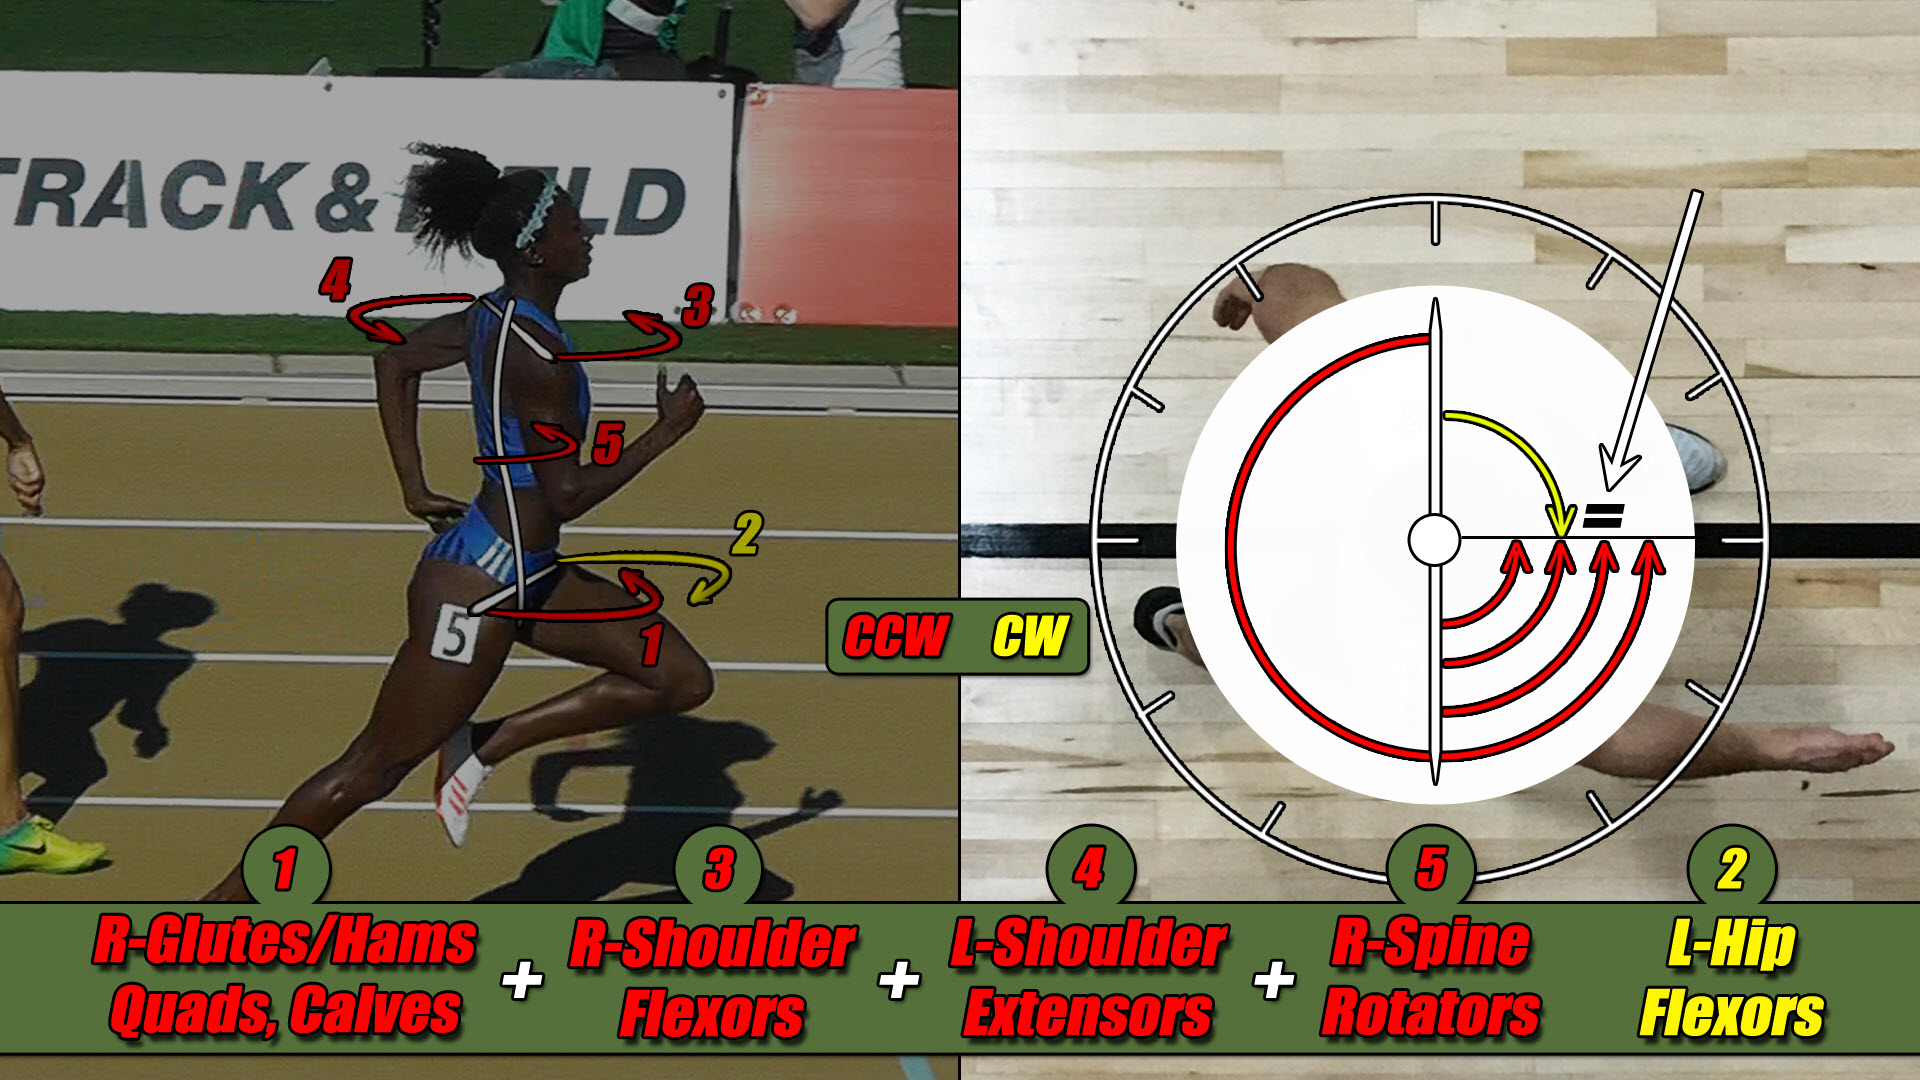
Therefore, we can place an equal sign down below, here showing how the strength of this one yellow CW torque is equivalent to the strength of these 4 red CCW torques. See Figure 09-14 below.
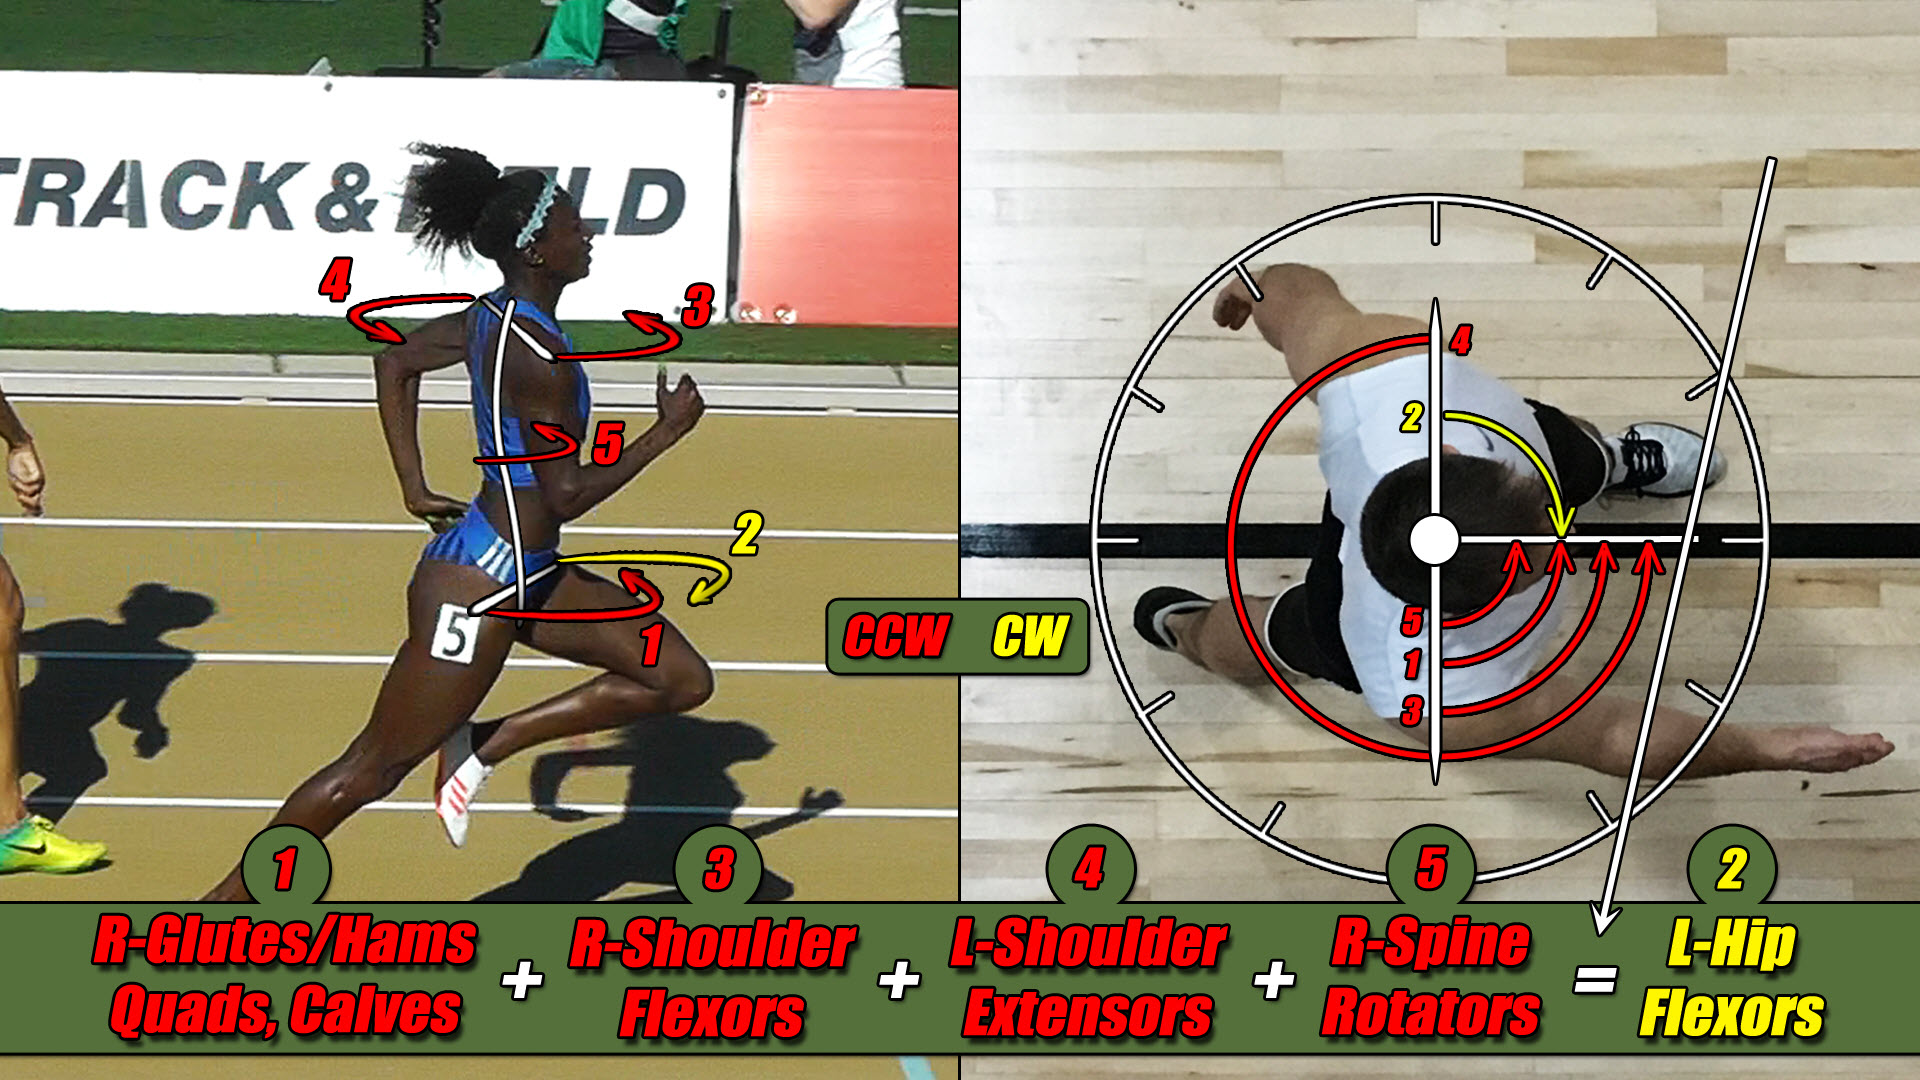
Or, another way of looking at this is we can simply say the strength of all of the CCW torques, must be equal to, the strength of all of the CW torques if the goal of the person is to move forward, in a straight path. See Figure 09-15 below.
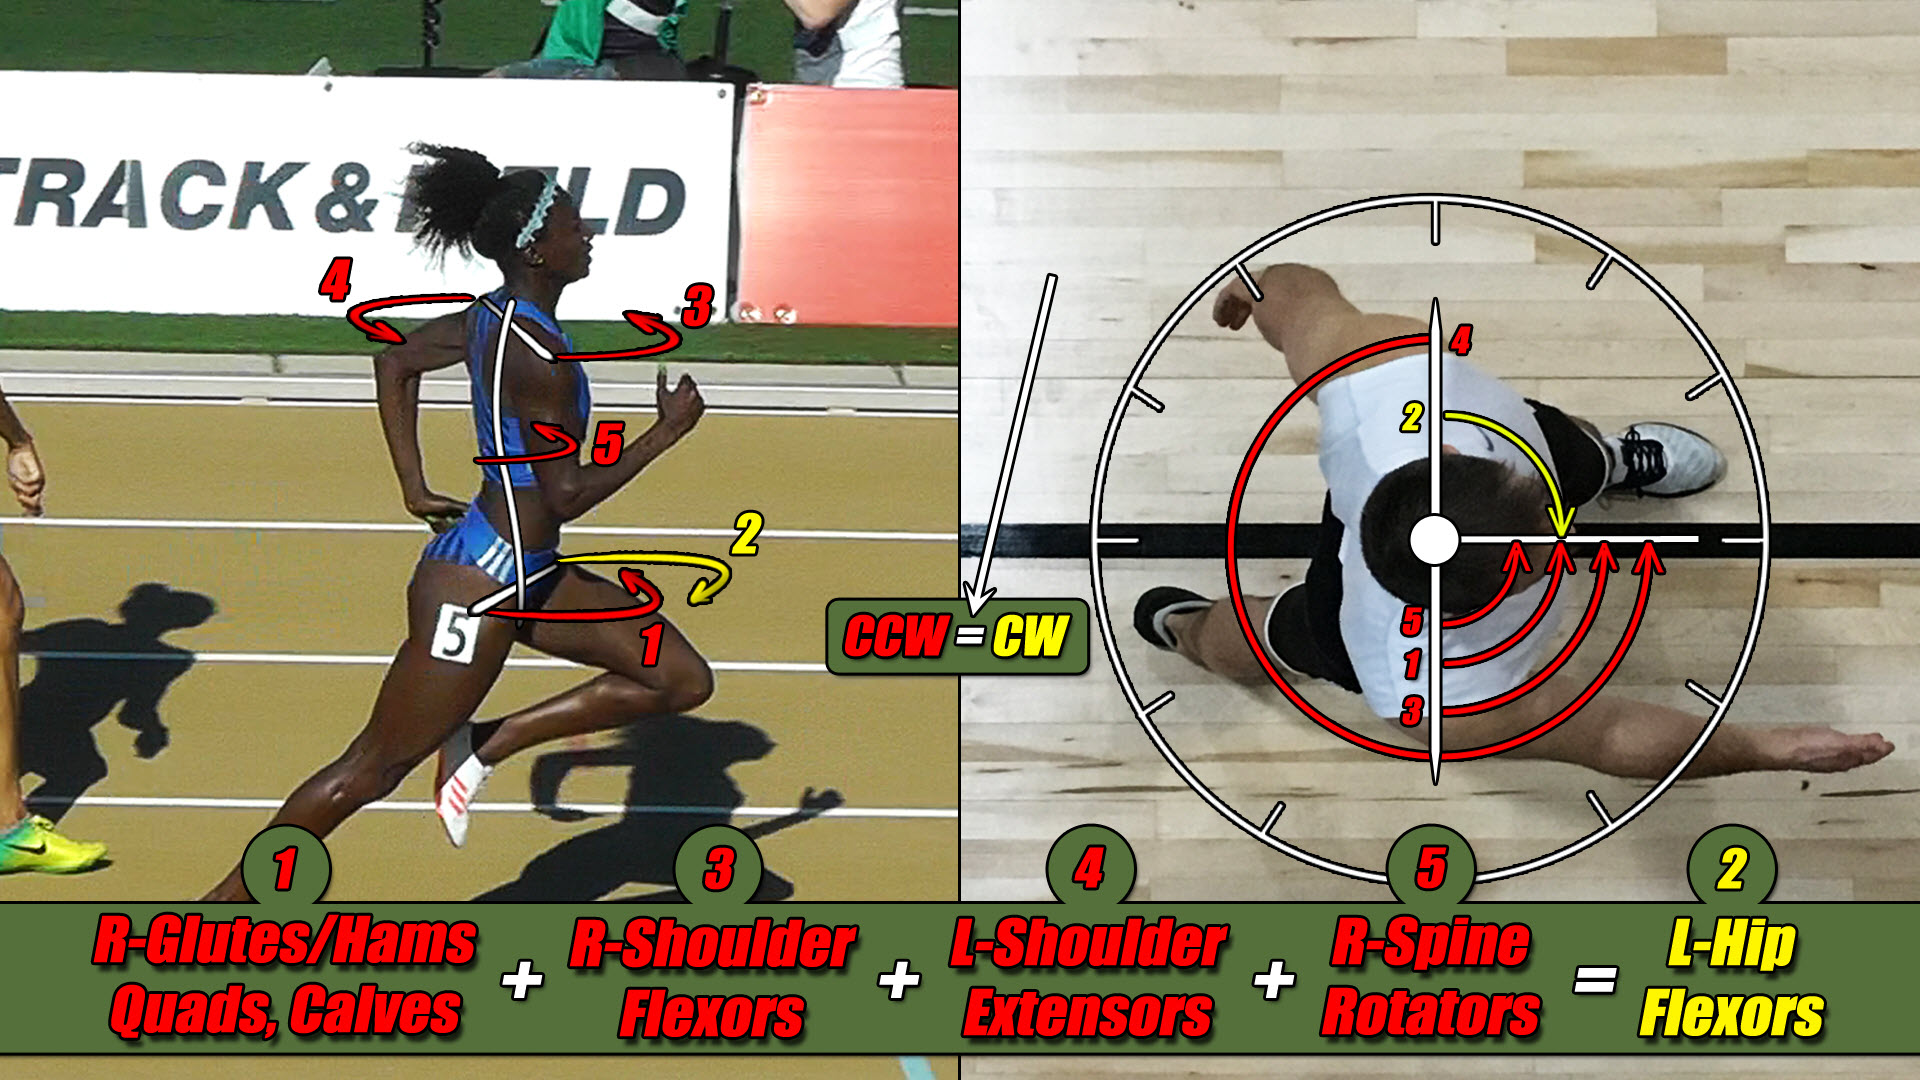
This equation, showing how these five torques work together when your run, is what I call the Ultimate Running Speed Equation. See Figure 09-16.
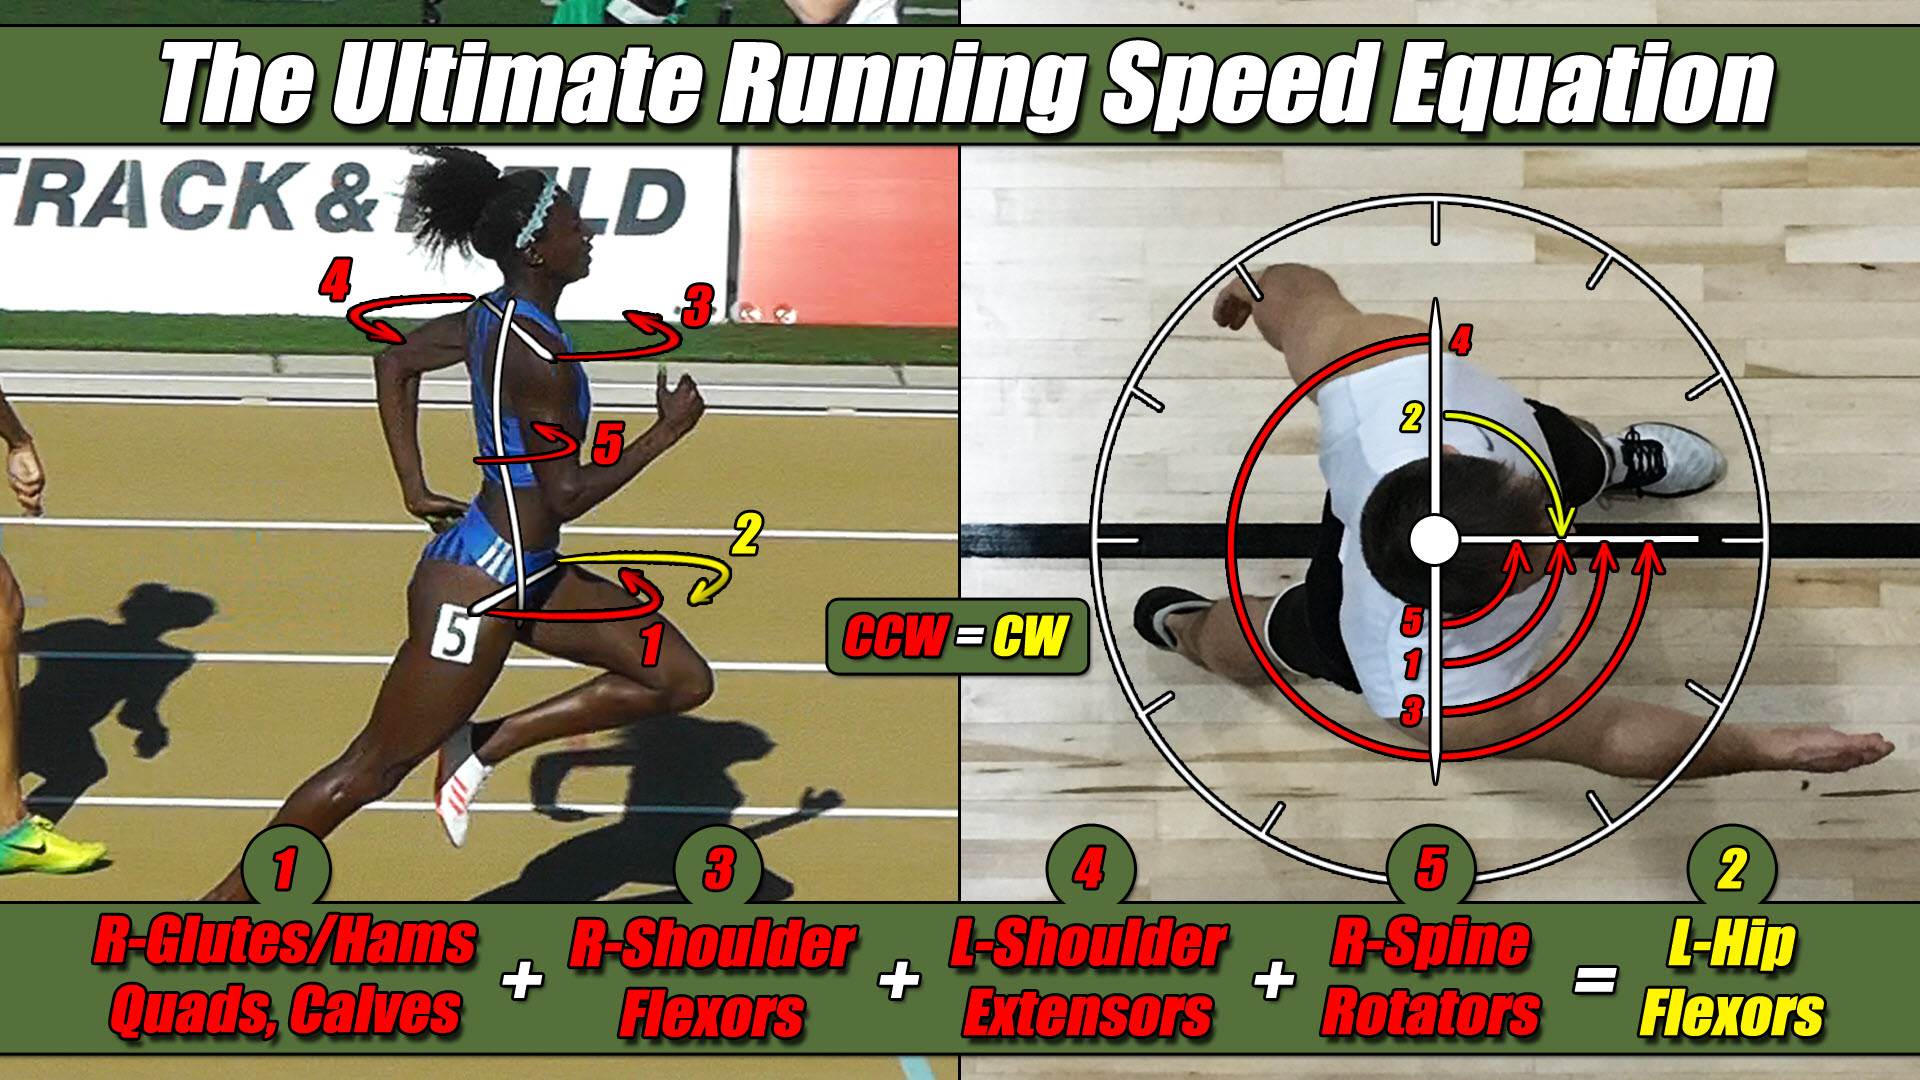
Now, I still have to show it to you with the athlete’s arms and legs positions reversed to help refine your understanding of these torques even more, however, everything on the screen in front of you is in place for you to begin seeing, and, believing what your body will ultimately need to run its very best.
Speaking of seeing and believing, whenever I work with someone and this Ultimate Running Speed Equation is finally revealed to them, they always have a lot of good questions for me.
And I find that very exciting because it tells me they are starting to break free from the old, traditional, one-dimensional mindset about what it takes to get faster, which, for many, has always been to simply hammer away on the glutes/hams, quads and calves during their workouts, and are now waking up, becoming more aware there are plenty of other things they could be doing to help themselves.
And, I suspect you, too, may be starting to have a few good questions of your own after seeing this Ultimate Running Speed Equation and if so, that’s great news because it means you, like they, are beginning to break free from similar, performance-inhibiting beliefs and are now more open to discovering new ways to help yourself.
Now, of the many good questions I get, the most important one from my experience has always been, what happens if one side of this equation is stronger than the other. In other words, what happens if, say, the combined strength of the four red CCW torques is greater than the strength of the one yellow CW torque, like this seen in Figure 09-17 below, then what?
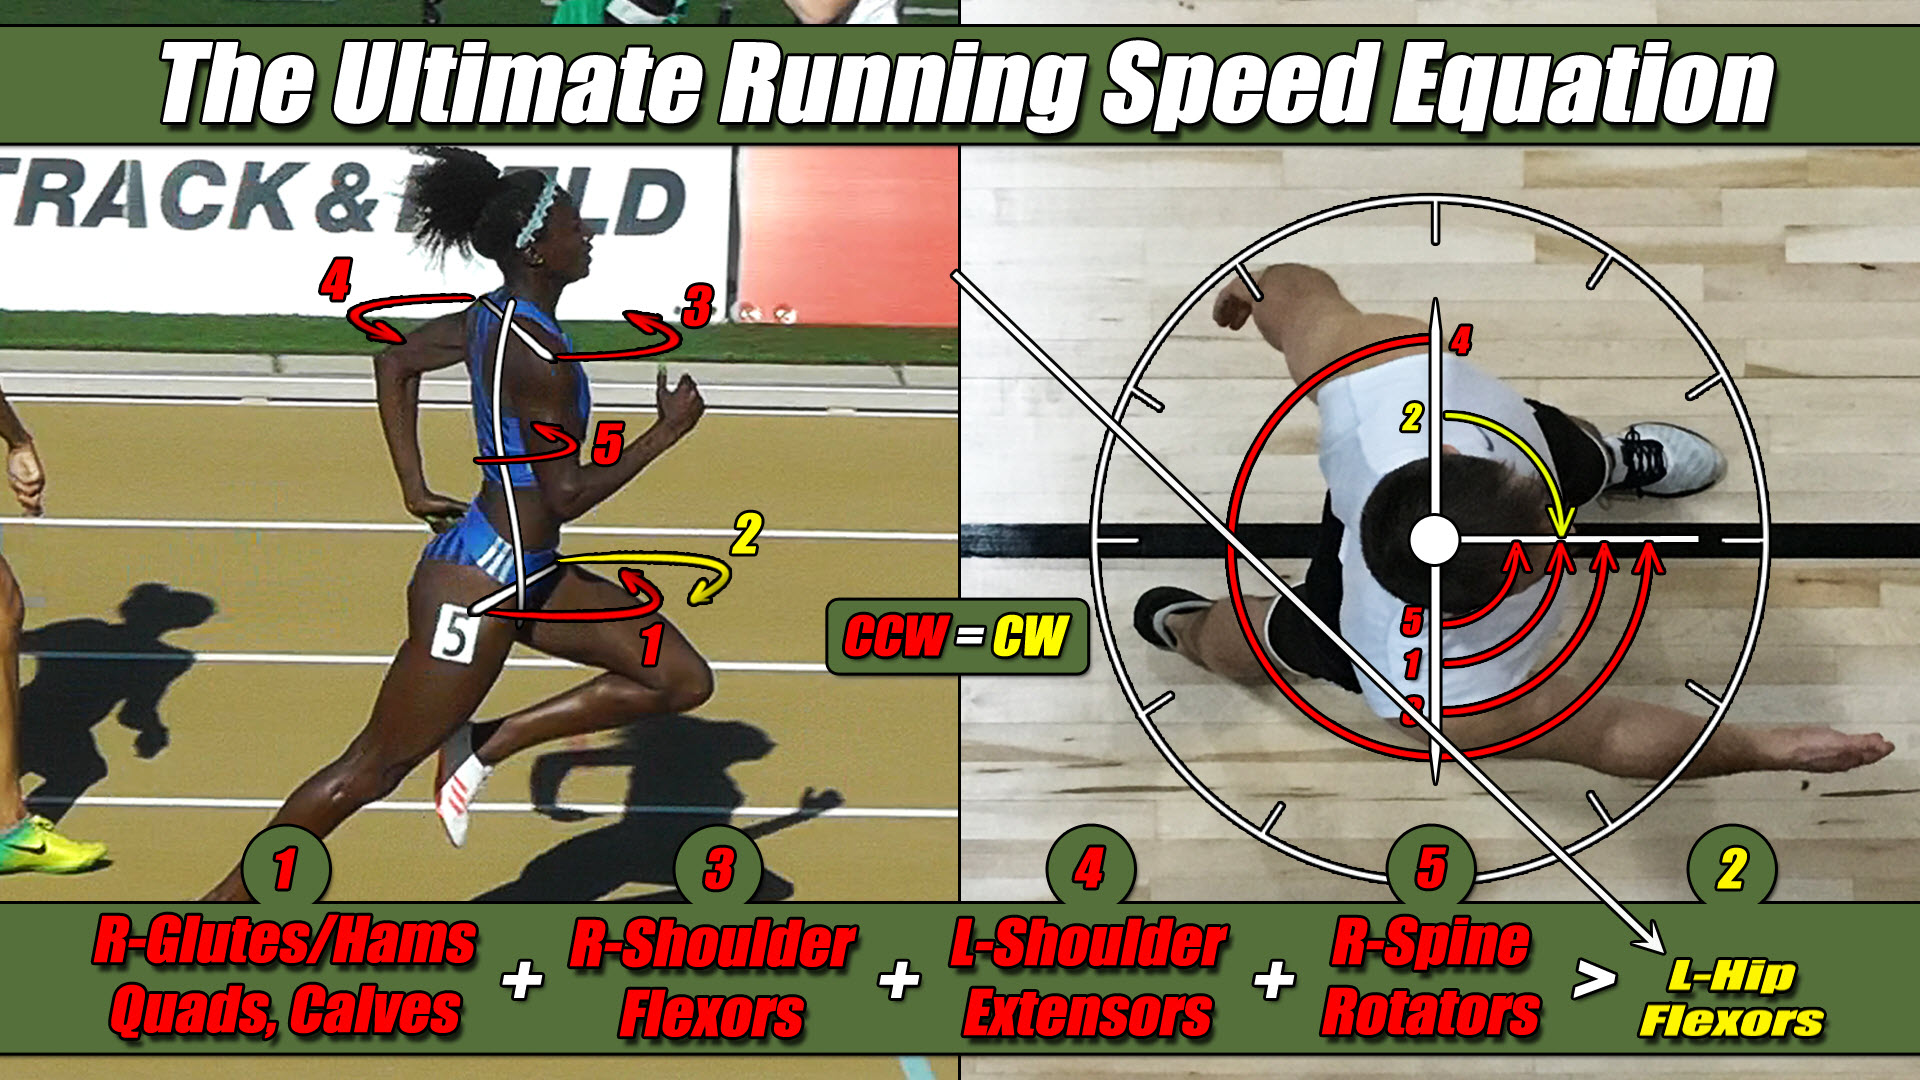
Well, the most important thing you have to understand about this Ultimate Running Speed Equations is that it is an equation of balance, an equation of torque balance, which means, your body is going to do everything it possibly can to keep the two sides of it equal when you run, otherwise the stronger side will constantly force you to over-rotate, such as in Figure 09-18 below, for example, causing you to waste valuable time and energy trying to recover from this strength imbalance.
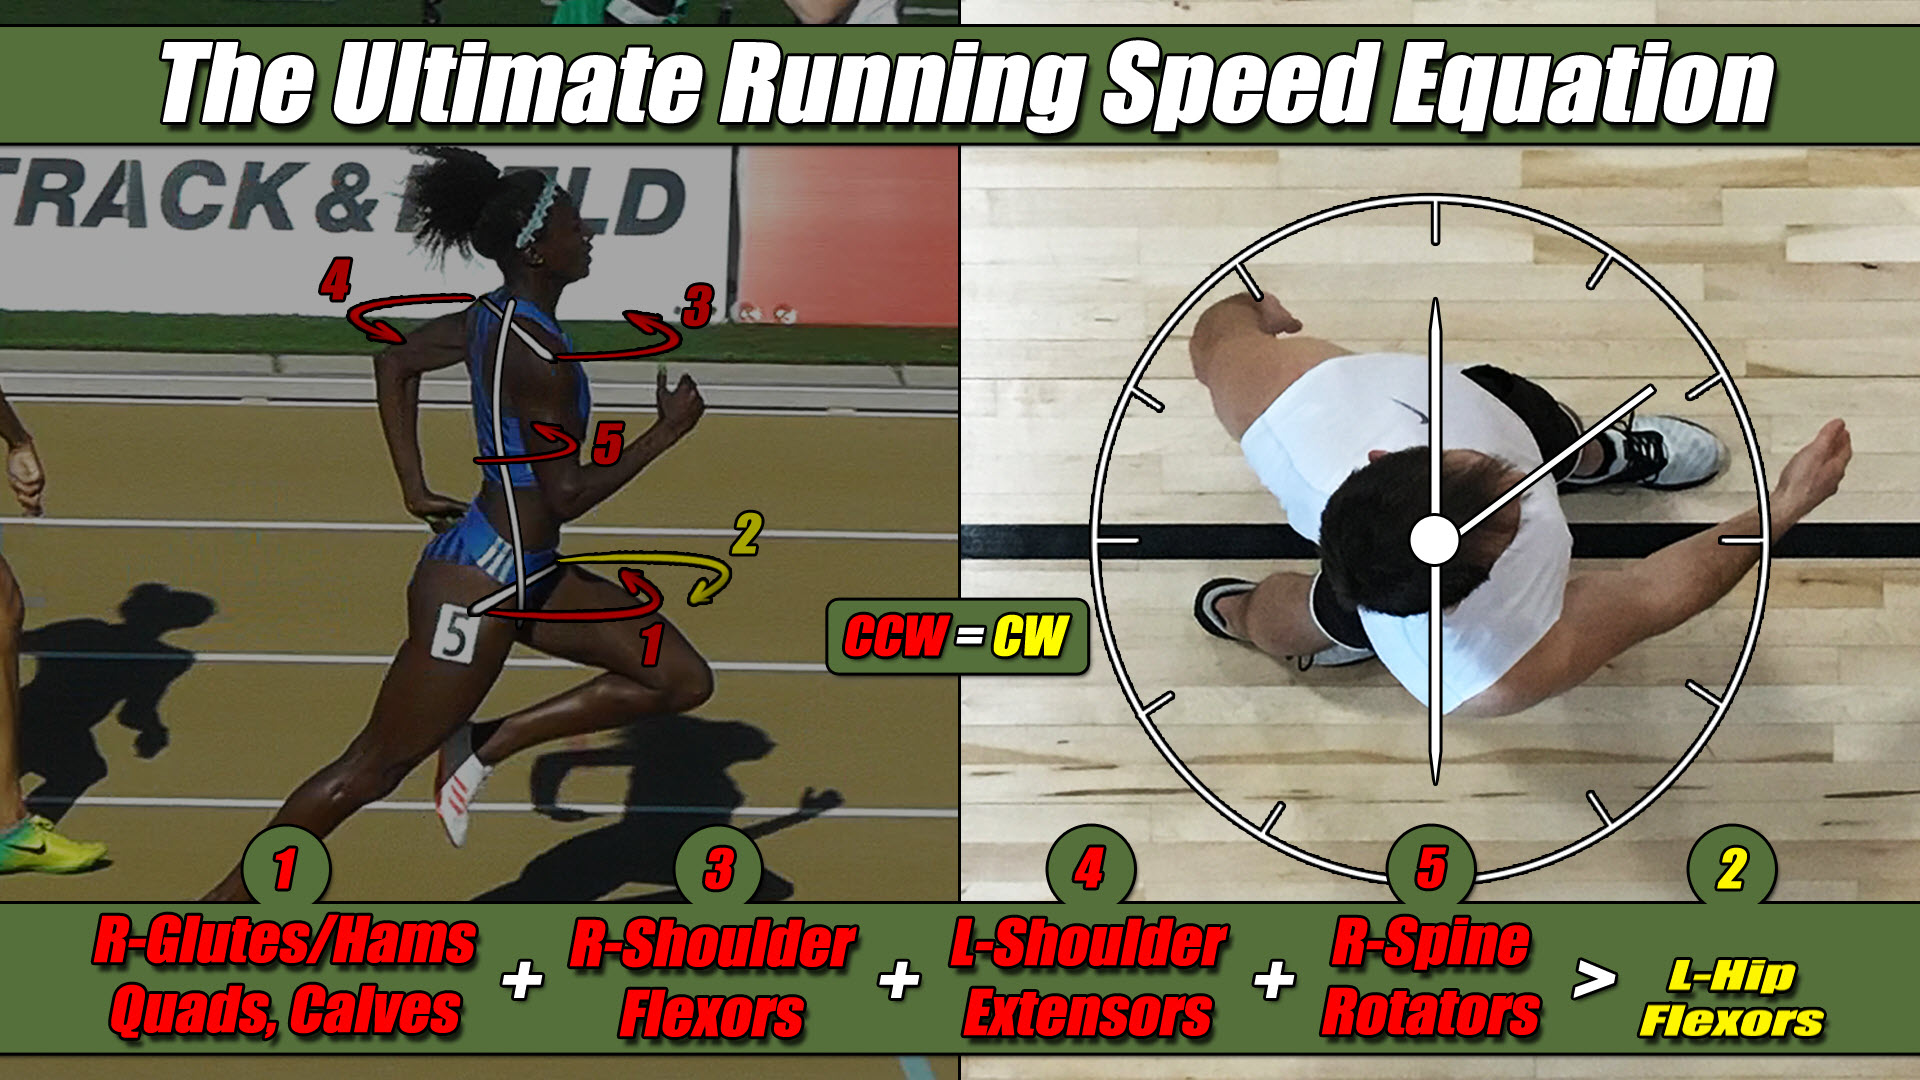
So, to prevent this from happening, the weak side doesn’t just spontaneously get stronger, but rather, your body will automatically compensate for this weakness, this torque imbalance, whether you want it to, or not, by reducing the strength of the stronger side (see Figure 09-19 below) …
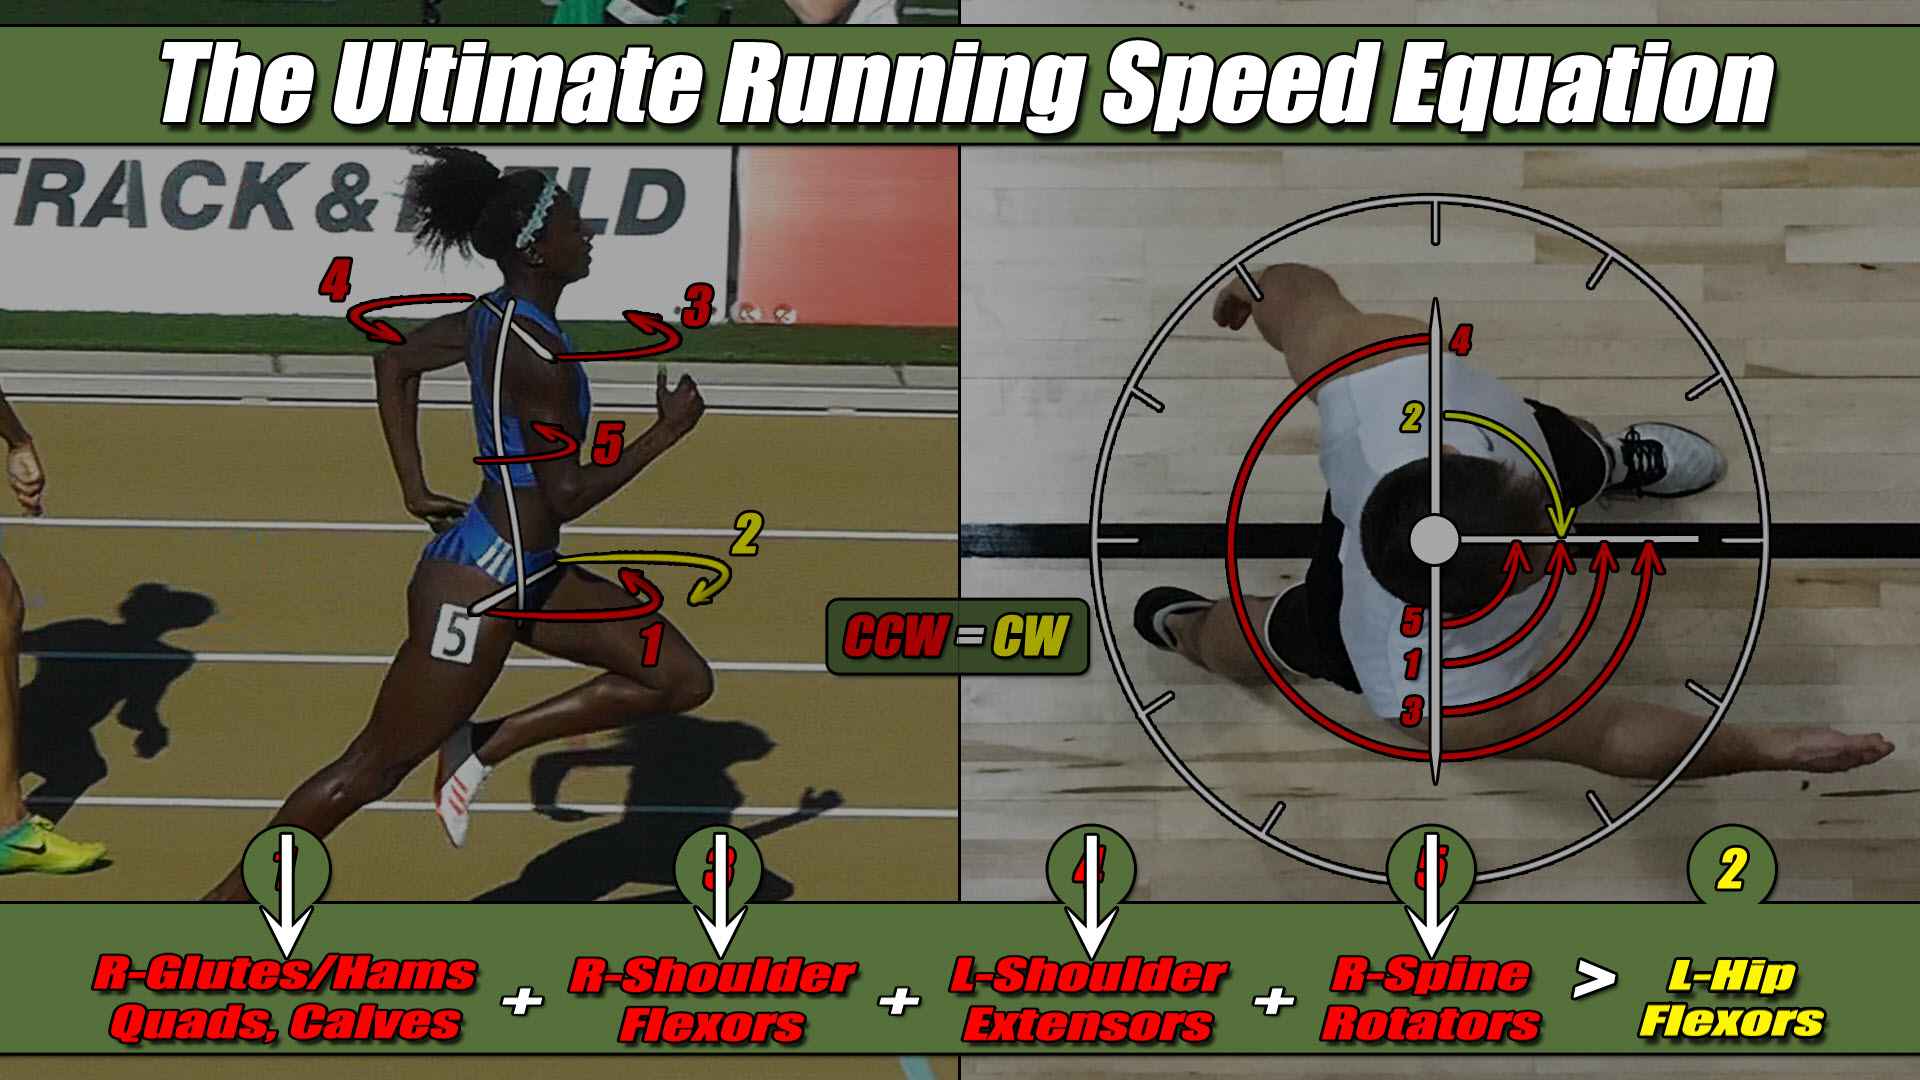
down to match the strength of the weaker side, (see Figure 09-20 below) …
so that you can at least run under control, without over-rotating, and with some reasonable form. However, as you might have guessed, your speed is coming down right with it and there’s nothing you can do about it.
This is a lot like having an injury to your knee, or ankle, or even your shoulder, as seen in Figure 09-21 below.
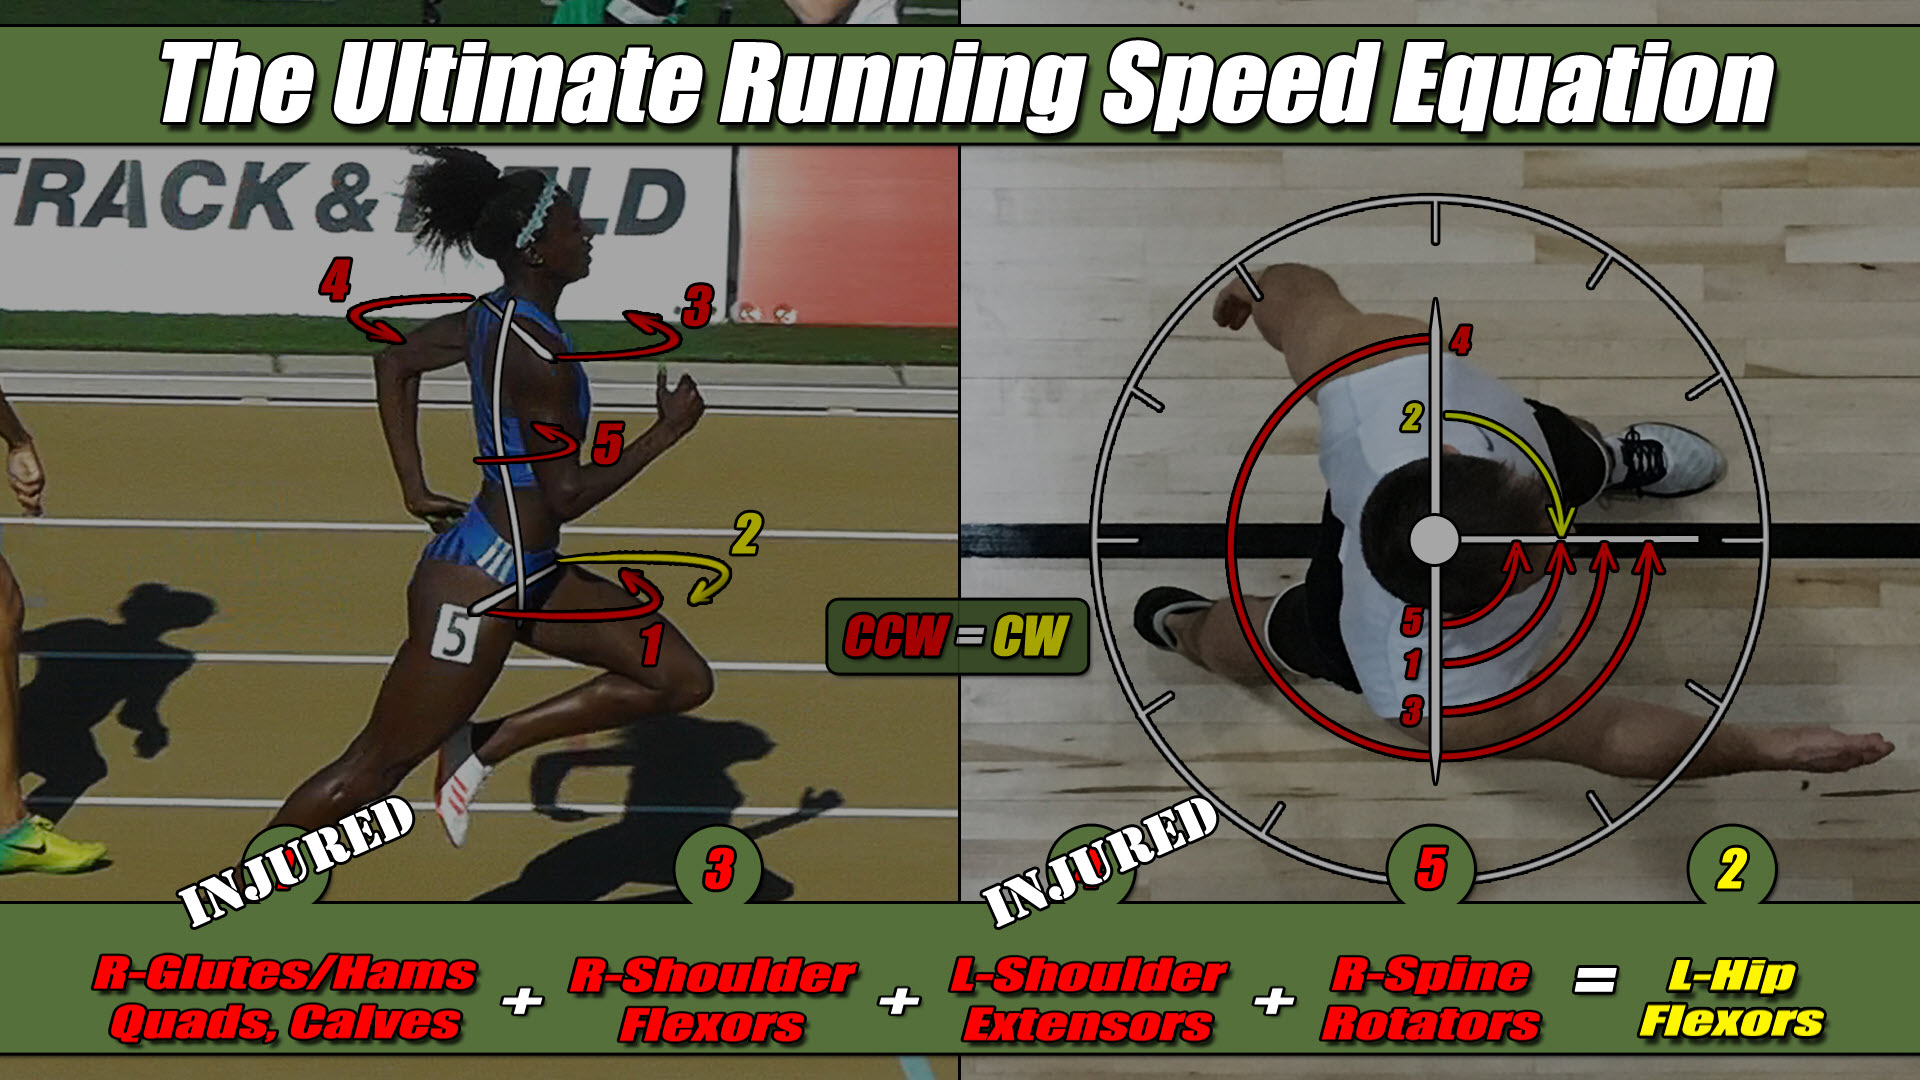
You’re not going to be able to generate the level of torque required from the injured extremity, or, extremities to play at full speed, so, your body adjusts to these weaknesses, these, weak links, by lowering the torques produced by the other, healthy areas down to match the level of the injured one’s to maintain proper balance.
The problem is when you are not injured and this drop in, torque output, occurs, it’s not easy to pick up on because it feels kind of natural and the only thing you really feel is the frustration of not being able to run as fast as you think you should. See Figure 09-22 below.
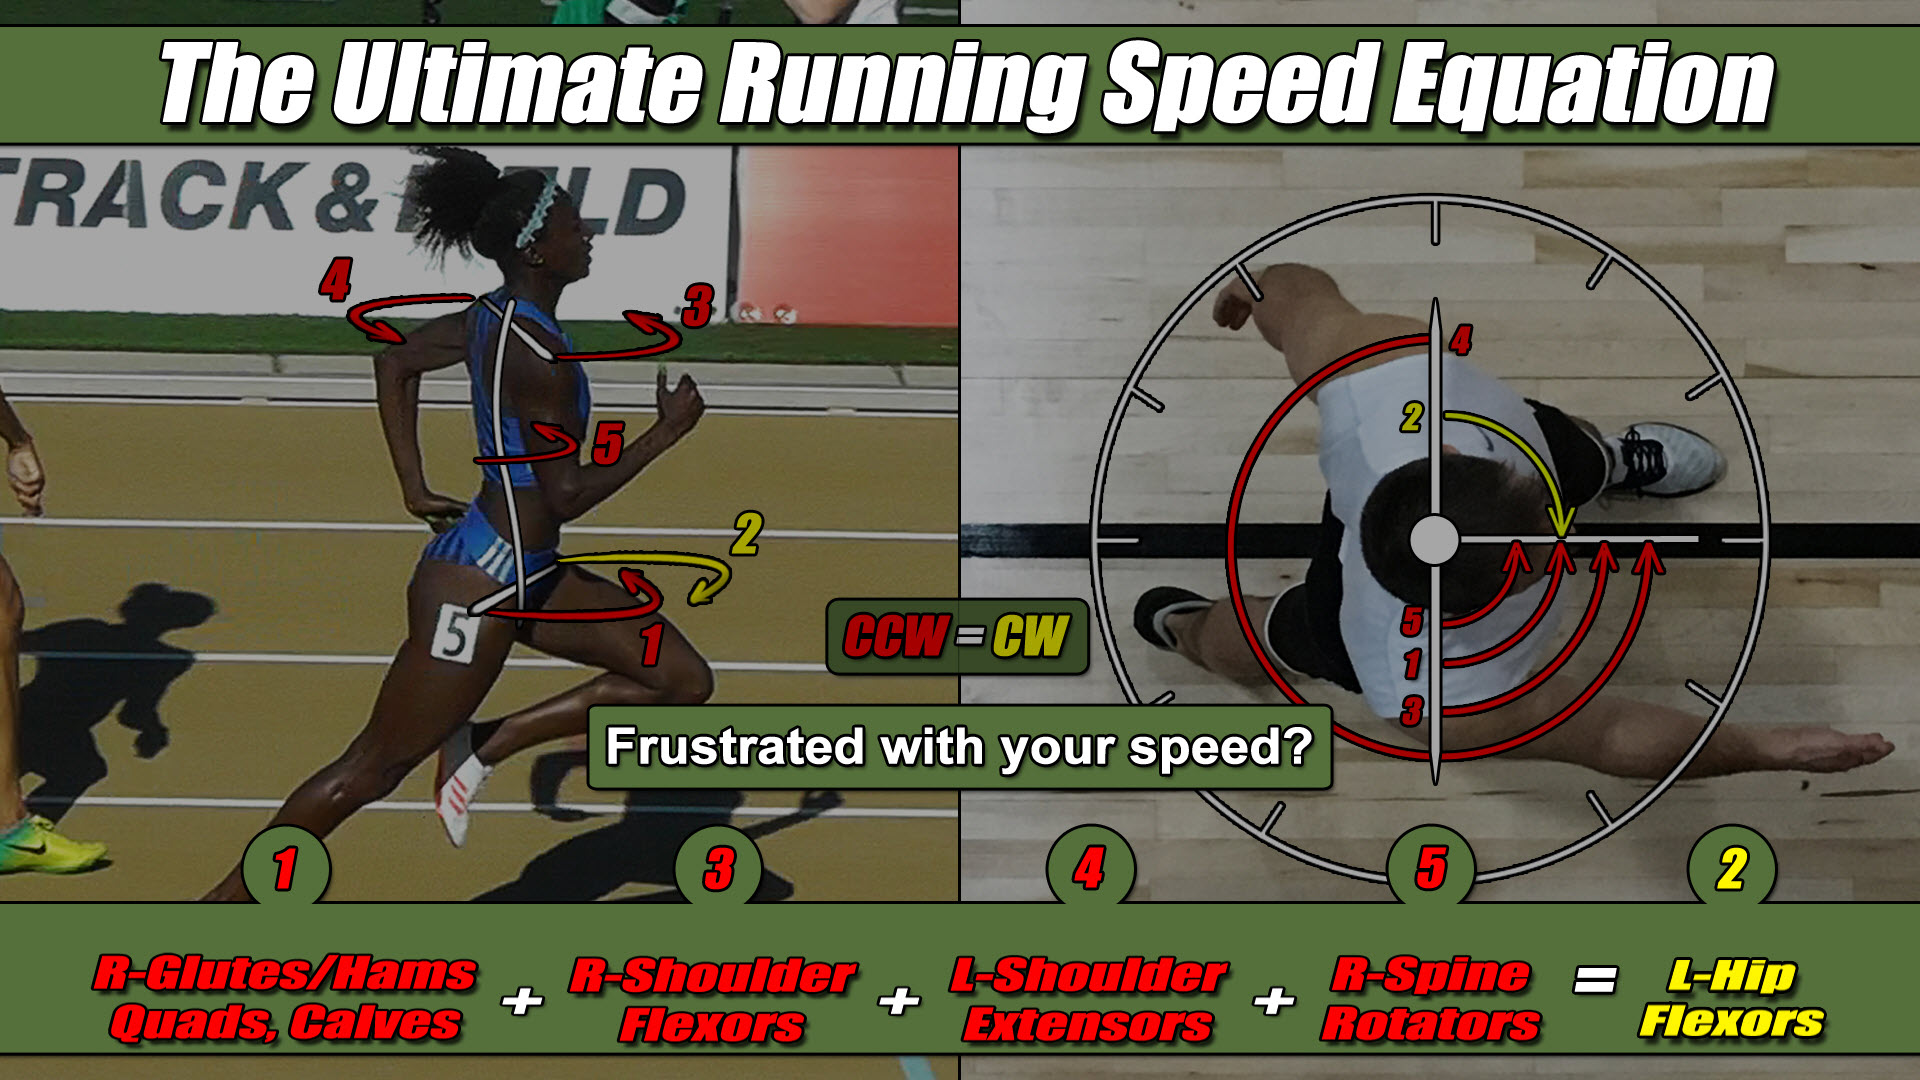
These are the athletes who complain of being stuck in first gear when they run and can’t figure out why…it’s because their level of torque balance (high hand gesture, low hand gesture) is being suppressed by a weakness in one or more of these five areas of their body.
And perhaps this is most apparent for those athletes who have a really high squat or deadlift, which, in our example here affects torque #1, where the glutes/hams, quads and calves are involved, but have very weak hip flexors producing torque in the opposite direction. They won’t be able to fully appreciate the force these squat and deadlift muscles can put out if the rest of their body is not in balance.
As you can imagine, there’s a lot more to talk about regarding this Ultimate Running Speed Equation and how we can learn from it to help us get faster. See Figure 09-23 below.
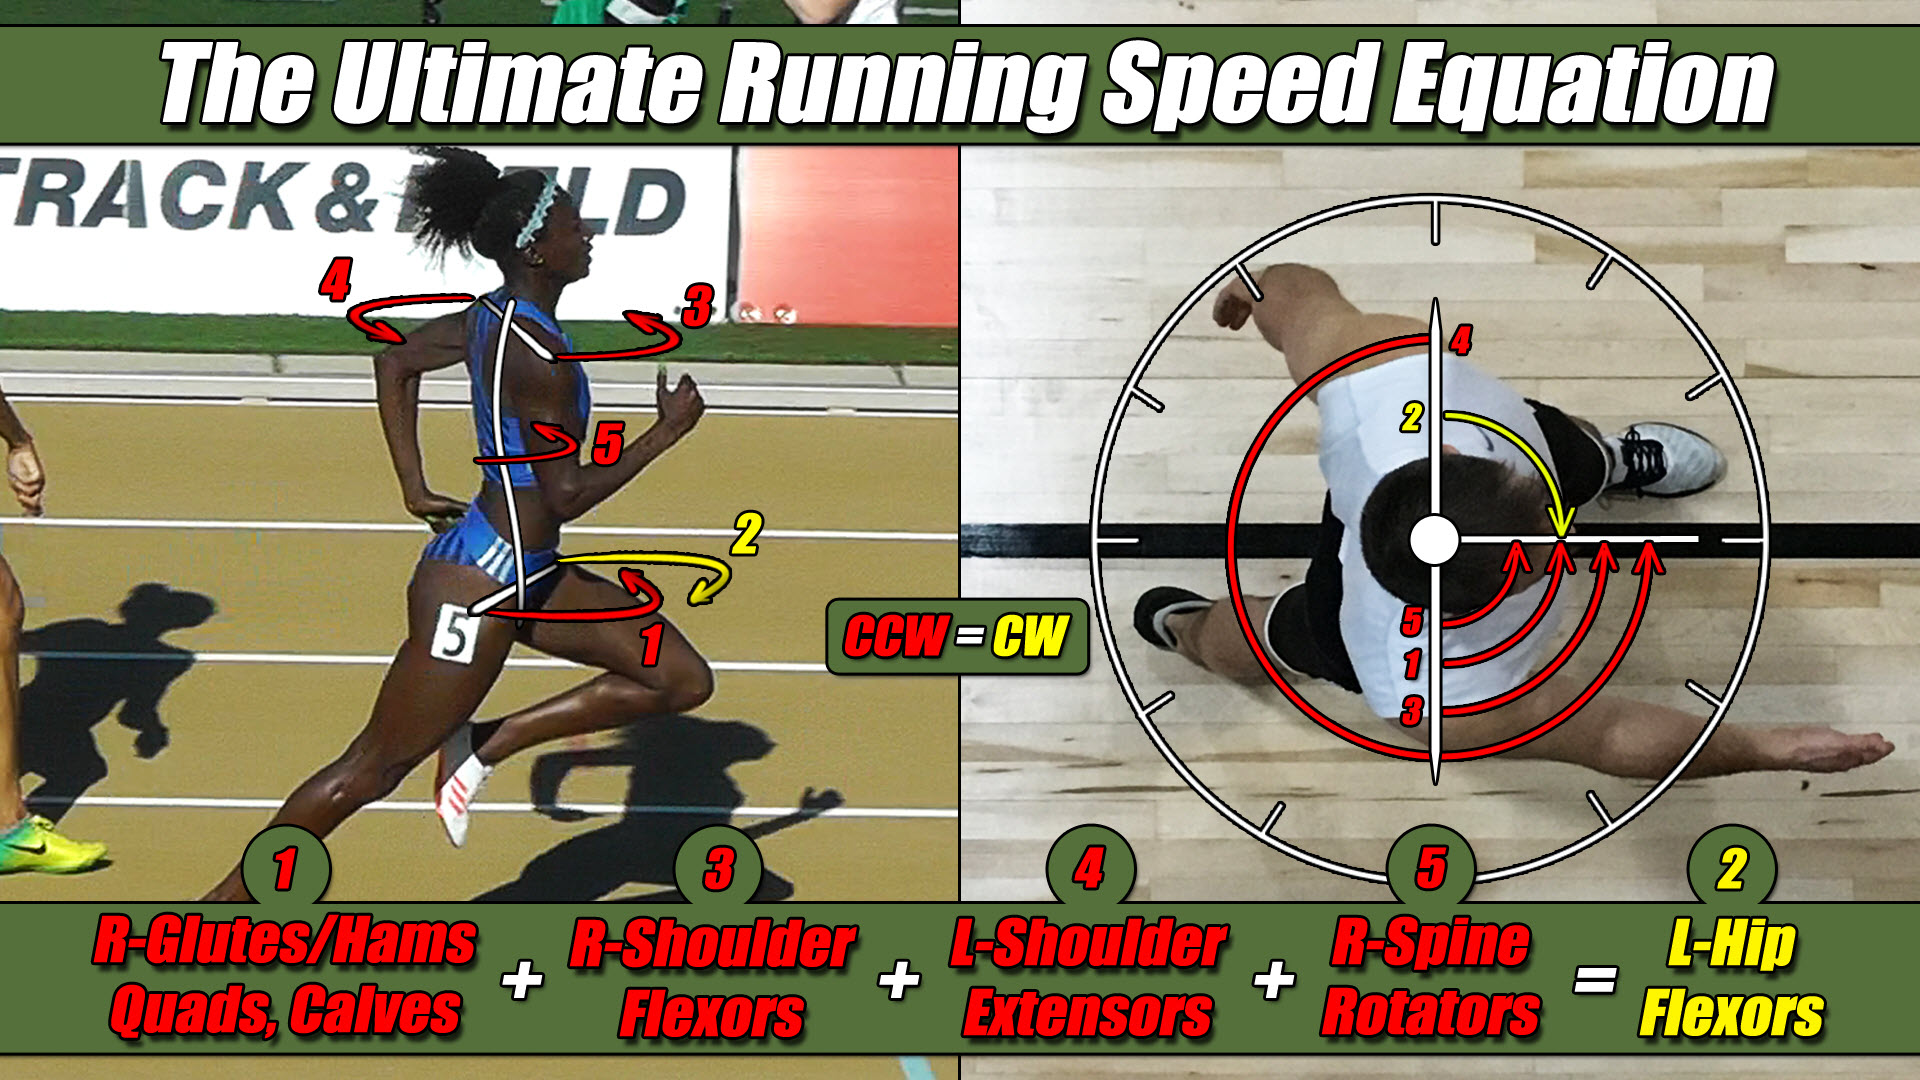
And I’ll do my best to include as many tips and insights about it as I can throughout the remainder of this video as well as the ones to follow but right now I want to move on and show you these five torques with the position of the athlete’s arms and legs reversed because, like I said a moment ago, this will help to further refine your understanding as to why they are all critically needed to run your very best.
But before I do, I want to direct your attention back to the hip flexors for a moment. See Figure 09-24 below.
I want to point out that not only do we see them working all alone here in yellow to oppose the other four, red, torques, they always work alone regardless of which side of the body they are flexed on. And so you will see a similar pattern coming up next when we switch the arm and leg positions of our athletes and that’s the first little tip I want you to keep in mind as we go forward. See Figure 09-25.
