- Why Isometrics with Resistance Band Training
Helps Athletes Beyond the Benefits of Weights
We receive numerous requests from trainers, coaches and athletes of all ages and sports backgrounds asking us to explain how our programs are different from others.
We also receive similar requests from developers of other speed training programs and jump training programs to explain the same.
In particular, most would like to know how isometric training with the resistance band differs from isometric training with weights. Most of them don’t see a difference and would like to know. Their initial gut feeling is that, “they’ve got to be the same”.
There is no quick and easy way to answer their question in simple layman’s terms that everyone can immediately understand, without first explaining a few basic engineering principles regarding forces.
Sometimes I feel that it would be a lot easier not to assume anything about the educational background regarding the person inquiring and simply answer their question the best and most accurate way I know how.
While I don’t expect the average person without a professional background in anatomy and engineering mechanics to understand everything in the sample that I have prepared below, I think it’s worth at least answering this question “the best way I know how.”
How does isometric training with the resistance band differ from isometric training with weights?
Dear Athlete, Coach or Trainer,
Thank you for your inquiry.
The answer to your question, “How does isometric training with the resistance band differ from isometric training with weights?” is as follows:
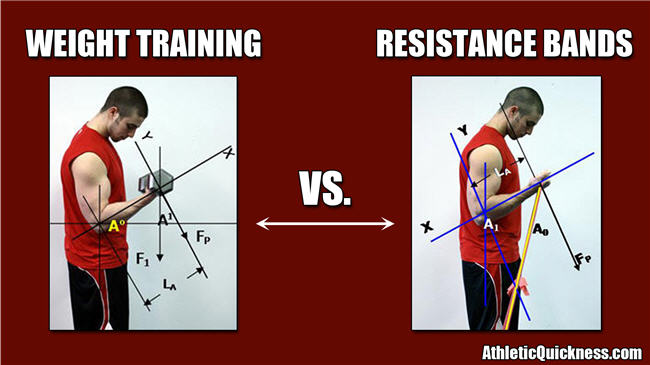
There are several differences between the two. One has to deal with the calculation of the moment of force at the joint being exercised. Let’s leave aside any training strategy for a minute and focus on this first.
The moment of force at the joint being exercised is first calculated by determining the perpendicular equivalent of the force acting on the moment arm, providing the angle of force (F1) in relation to the moment arm, LA, isn’t already at 90 degrees and isn’t acting parallel to it either.
If the angle of this force is some other number besides 90 or 180 degrees, the perpendicular equivalent force (FP) can be calculated by simple geometry by first determining the exact angle required to bring the force perpendicular.
By knowing the exact angle to bring the force perpendicular, we can calculate this new force, FP, on the moment arm as follows:
FPerpendicular = FP = F1 x cosine (A)
Here, “A” represents the angle required to bring the force perpendicular to the moment arm and F1 represents the original weight being exercised. FP, will never be greater than the original force, F1, only less than or equal to it.
Once we know the value of FP, we can then determine the moment of force, Mo, acting on the joint if we know the length of the moment arm, L A. This equation is:
Moment of Force = Mo = FP x L A
When using a static weight such as a dumbbell, there is only one variable in this equation (FP = F1 x cosine (A)) and that is the angle “A” of the joint in which the calculation of the perpendicular force is determined prior to the final calculation of the moment of force, Mo.
For now, this assumes that one will be performing a repetition with the weight. This is when the angle changes throughout the motion, thus constantly changing the value of the final moment of force calculation. We will relate this to isometric training here shortly.
When using a variable elastic resistance band instead of a dumbbell to perform a repetition, (not an isometric contraction hold just yet), there are now two variables in the equation. The second variable is F2, represents the force of the resistance band. It changes in length when it is stretched during a repetition and thus its resistance changes.
This is not the case with weights since they have a static force which does not change with a change in position. The first variable however, is the same as before – the angle of the joint.
Both of these variables change the perpendicular calculation of the force in the equation differently than with a static weight, because now both F2 and angle “A” are subject to change:
FPerpendicular = Fp = F2 x cosine (A)
And, it then changes the final calculation of the moment of force in this equation:
Moment of Force = Mo = FP x L A
The force using the resistance band while performing repetitions is only the same as with weights in just one location, and it is not necessarily at 90 degrees, if the exercise being performed allows for that much motion.
Everywhere else throughout the range of motion will have a different final moment of force calculation when using the resistance band. You probably already knew this or at least suspected it.
Now, the idea with most exercises is to push the limits of your muscles. This means that depending on the exercise, you should try to push your muscles to contract harder, faster and perhaps longer, depending on your fitness goals.
[sc name=”2step-optin”]
With this being the case then, the difference between isometric training with weights and isometric training with the resistance band depends on several factors. This first one is how much effort you are using while doing the exercise.
If a 250 lbs. athlete is holding a biceps curl at a position half way into the rep with a 1 lb. weight in one hand and a stretched resistance band equivalent to 1 lb. in the other, then trying to see any difference between the two is rather difficult.
Even though there are differences at this low effort level, the athlete may not perceive or appreciate any benefit with the exercise either with the weight or resistance band because his muscle’s physical limits are not being tested.
The first real difference between isometric training with weights and isometric training with the resistance band occurs when you decide to put considerably more effort into an exercise.
This is where the differences can start to be appreciated and become more visible.
If the isometric hold is done with enough effort, there should come a point in the exercise where the strength and coordination of the muscle begins to dissipate. If you are not getting to this point, the exercise will still be effective, just not as much. Now if you do get to this point, whether you are using isometric training with resistance bands or isometric training with weights, the differences between the two are like night and day.
As your muscles start to fail with an isometric contraction using weights, such as might be done while trying to get past a sticking point with your bench press where you try to hold the bar in one spot, the length of your muscles resisting the weight will at some point begin to change.
Your arms may go down a little; maybe even up a little; perhaps side to side a little; and even rock forward and back as you attempt to hold a steady isometric contraction.
[sc name=”2-stepoptin-blue”]
With all of these small adjustments to the resistance, the weight being held never changes in value; it is always constant regardless of position. The only change these small stabilizing movements in your arms will have is on the final moment of force calculation at each new position shift of elbow and shoulder joint movement.
These are considered one dimensional changes; they are very easy for trained muscles to adjust to and adapt to because there is only one variable in the equation leading up to the final moment of force calculation.
If you happen to be familiar with the exercise prior to attempting to hold a position with an isometric contraction, then your strength and coordination with this particular exercise is probably more developed to begin with.
Therefore, whenever you use isometric training with weights on an exercise or position you are already familiar with, there may not be much left to develop in the way of strength and coordination and ultimately speed of muscle contraction with this method.
Most people who have trouble seeing the difference between isometric training with weights versus resistance bands typically view the application of the resistance band as simply replacing the weights in conventional exercises. This makes it more difficult to see any real difference between the two.
Now if a variable resistance band were used in place of the weights on the bar, as one might be able to recreate by attaching two bands of similar length and resistance on each side of the bar, in place of the steel plates, and fastened to the ground below, then you will have multidimensional changes taking place when muscles begin to fail.
This is because as your arms go down a little, up a little, side to side a little, and forward and back a little, and the muscles begin to fail as you try to maintain an isometric hold, not only is the moment of force calculation changing with each small position change in the elbow and shoulder joints, but now the initial force you started with is changing also.
This is because the resistance band’s resistance is entirely a function of its length and therefore has the ability to create continuous changes in its force. Even when you think you are holding the resistance band steady, you should still be able to feel the subtle changes in tension taking place in your muscles provided the resistance is high enough.
The band is far more dynamic in nature than a steel plate because you are no longer resisting a static force but rather a force that instantly and infinitely changes in every direction of movement.
Even with the slightest movement in joint position as well as with the ongoing recruitment of motor units during an attempt at an isometric hold will alter the force supplied by the resistance band.
Muscles exposed to this type of training are forced to either over-compensate or under-compensate to these changes in resistance as you try to maintain the steady position of an isometric hold. This also occurs when weights are being held with an isometric contraction.
The difference is that during an isometric contraction with resistance bands, the muscles’ motor unit recruitment patterns are entirely new and different than what is expected by a muscle that has only been trained using a static weight.
This again is because of the two variables leading up to the final moment of force calculation when resistance bands are used instead of just one variable when weights are used.
When using the resistance band with an isometric training strategy, each attempt by the muscle at balancing and stabilizing the force while in a weakened state helps to create and re-enforce new neuro-pathways that accelerate the development of strength and coordination within it. These changes become even more pronounced the weaker the muscle gets and the longer the attempt at holding the isometric contraction becomes.
Applying this strategy of isometric training with resistance bands that simulate conventional exercises like the bench press has great value to an athlete. However, athletes will experience significantly more benefit when this strategy is applied during an exercise to joints in different planes and angles from what they normally perform in the gym.
By doing this, they are less likely to be pre-conditioned to the guided pathways of the machines or similar exercises. Coordination issues and strength levels within the muscles can then be developed far beyond their current level.
Muscle contraction speed is the net result of these improvements in strength and coordination.
By further targeting the muscles surrounding the less stable, and significantly more mobile, ball and socket joints of the shoulders and hips, it opens up incredible possibilities for athletic development.
The goal of all of our programs is to push the athlete into as many different zones of training as possible. This means finding new exercises and positions that expose immediate weaknesses in both strength and coordination. Using the resistance band with an isometric training strategy provides us with that opportunity.
The Math Shows Why Isometrics with Resistance Band Training Differs From Isometrics With Weights
Have you ever wondered why certain exercises are easy at the start, tough in the middle and perhaps easy again toward the end?
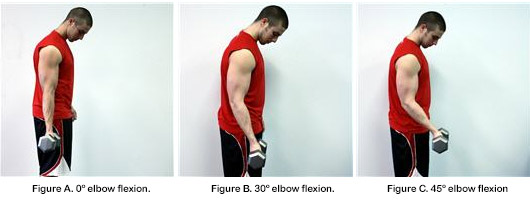
Take the biceps curl using dumbbells as an example. At the start of this exercise, let’s say you are standing up on both feet and a 25 lbs. weight is down by your side. See Figure A.
As you proceed with the biceps curl, you start to flex your forearms upward. During the first few degrees of elbow flexion, the weight is easy to move. For example, a 25 lbs. dumbbell flexed to just 30º in front of you feels only like 12.5 (lbs.– feet)** at the elbow. See Figure B.
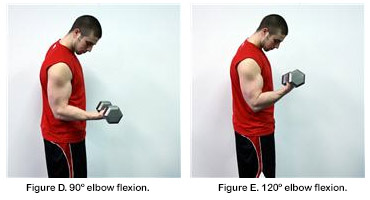
At 45º of elbow flexion, the 25 lbs. weight feels about 17 (lbs.– feet)** at the elbow. See Figure C. It’s not until you start getting near 90º of elbow flexion, where the full weight of the 25 lbs. dumbbell, held in your hand, is experienced at your elbow joint and biceps muscle. See Figure D.
If you go above 90º, the exercise starts to get easier again. See Figure E.
Some of you who are reading this may also find that you can catch your breath with this exercise at the top end of this motion, where the weight seems to collapse a little back toward your shoulders.
Everyone experiences this situation; it doesn’t matter who you are. This is because the mechanics involved in the biceps curl are basically the same for everybody. More specifically, the amount of force generated at the elbow joint, as you may have guessed, changes in proportion to the angle of this joint as it traverses its full range of motion during a curl.
**Introducing the MOMENT of FORCEMeasured not just in lbs., but in lbs-feet
You may have noticed that determining the force applied at the elbow joint was not just written in lbs. but in lbs.–feet. This unit of measurement is the called the Moment of Force,and it is defined more specifically as follows:
A moment of force is any force that can provide the effect of turning about an axis if it does not act parallel to the axis or have a line of action which passes through the axis.
Understanding the concept of how the moment of force is calculated is not necessarily easy, but it is not that hard either. It involves a little basic geometry, and that’s about it.
Once you see how the moment of force is calculated one or two times, you should be able to calculate it for any angle in our biceps curl example by simply interchanging one number; and you will then be able to see why the biceps curl exercise is easier in some places than others.
Do the math!
In Figure 1 below, the athlete is holding a 25 lb. dumbbell down by his side in the starting position. His elbow is not flexed but rather extended to 180º, and his forearm is perpendicular to the ground. The forearm represents the moment arm, LA, and is estimated, for our purposes, at 1 foot in length.
In this position, the weight has a line of action which passes through the axis, which is the elbow joint. So, our expectation, based upon the definition of the moment of force above, is that there should be 0 lbs. of force applied to the elbow joint in this positon.
We also know this instinctively when we perform it in the gym since this is also a resting position for this exercise. In other words, no force on the biceps muscle in this position means no extra effort is required to move the weight at the elbow joint. Let’s see how this calculates:
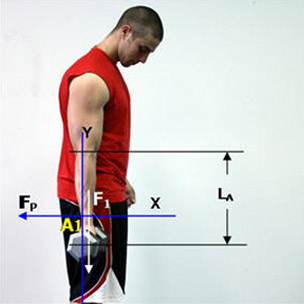
Figure 1. Elbow fully extended to 180º.
Calculation of moment of force at the elbow joint using the following equation:
Melbow = FP x L A
In Figure 1 above we have:
F1 = 25 lbs., A1 = 90º, LA = Moment Arm (forearm length) = 1 ft.
First, we have to convert the 25 lbs. weight acting straight down to one that is perpendicular to the moment arm (forearm).
FP = Fperpendicular = F1 x Cosine A1 (90º)
Fperpendicular = 25 lbs. x 0 = 0 lbs.
Now we can calculate the moment of force at the elbow joint using the equation:
Melbow = FP x LA
Melbow = 0 lbs. x 1 foot = 0 lbs-feet.
The moment of force is calculated to be 0 lbs. feet, i.e. no moment force on the elbow. This is what we expected and is why this exercise is easiest in the beginning; the elbow joint has no rotational force applied to it, i.e., the force will not cause the elbow joint to rotate clockwise or counterclockwise in this position
Now let’s see what happens when we decide to move the weight by flexing the elbow to say, 30º. See Figure 2 below.
Here, the elbow is flexed to 30º. This is angle A0 in the figure near the elbow. The force F1 is still 25 lbs. and is acting straight down; however, it needs to first be converted to a force acting perpendicular to the moment arm, LA. Again, LA is the length of the forearm and is estimated to be 1 foot long. The perpendicular force is labeled FP in the figure. The angle A1, is 60º and is the angle needed to bring this force perpendicular to the moment arm, not 30º. Therefore, the moment of force is calculated below:

Figure 2. Elbow fully extended to 30º.
Calculation of moment of force at the elbow joint using the following equation:
Melbow = FP x L A
In Figure 2 above we have:
F1 = 25 lbs., A1 = 60º, LA = Moment Arm (forearm length) = 1 ft.
First, we have to convert the 25 lbs. weight acting straight down to one that is perpendicular to the moment arm (forearm).
FP = Fperpendicular = F1 x Cosine A1 (60º)
Fperpendicular = 25 lbs. x 0.5 = 12.5 lbs.
Now we can calculate the moment of force at the elbow joint using the equation:
Melbow = FP x LA
Melbow = 12.5 lbs. x 1 foot = 12.5 lbs-feet.
As expected, the amount of force at the elbow joint starts to increase with flexion of the elbow joint by the biceps muscle. This number should increase all the way up to 90º of elbow flexion, then it should begin to decrease again after that.
This is because the only variable in this equation is the angle in which the elbow joint is flexed, and that variable is tied into the perpendicular force equation, which is needed to ultimately determine the moment of force, by calculating it’s cosine equivalent. The maximum value of any cosine computation is 1, and that occurs only at 90º. Every other number produces a cosine computation of less than 1.
This is what is experienced in the gym with this exercise, so let’s go ahead and see if our calcuations prove this. Let’s see what happens at 45º of elbow flexion. See Figure 3 below.
Here, the elbow is flexed to 45º. This is angle A0 in Figure 3 near the elbow. The force F1 is still 25 lbs., however, it needs to first be converted to a force acting perpendicular to the moment arm, LA. The angle A1, is also 45º and is the angle needed to bring this force perpendicular to the moment arm. cTherefore, the moment of force is calculated below:

Figure 3. Elbow is flexed to 45º.
Calculation of moment of force at the elbow joint using the following equation:
Melbow = FP x L A
In Figure 3 above we have:
F1 = 25 lbs., A1 = 45º, LA = Moment Arm (forearm length) = 1 ft.
First, we have to convert the 25 lbs. weight acting straight down to one that is perpendicular to the moment arm (forearm).
FP = Fperpendicular = F1 x Cosine A1 (45º)
Fperpendicular = 25 lbs. x 0.707 = 17.67 lbs.
Now we can calculate the moment of force at the elbow joint using the equation:
Melbow = FP x LA
Melbow =17.67 lbs. x 1 foot = 17.67 lbs-feet.
Again, as expected as well as experienced in the gym, the amount of force at the elbow joint starts to increase with flexion of the elbow joint by the biceps muscle.
Now let’s see what happens at 90º. This is angle A0 in Figure 4 below. The force F1 is still 25 lbs., however, in this case, it does not need to be converted to a force acting perpendicular to the moment arm, LA because it already is. This is angle A1, and is the ‘angle’ between F1 and FP, which is 0º. Therefore, the moment of force is calcuated below:

Figure 4. Elbow is flexed to 90º.
Calculation of moment of force at the elbow joint using the following equation:
Melbow = FP x L A
In Figure 4 above we have:
F1 = 25 lbs., A1 = 0º, LA = Moment Arm (forearm length) = 1 ft.
First, even though the force (F1) is already perpendicular to the moment arm, we should calculate it anyway.
FP = Fperpendicular = F1 x Cosine A1 (0º)
Fperpendicular = 25 lbs. x 1 = 25 lbs.
Now we can calculate the moment of force at the elbow joint using the equation:
Melbow = FP x LA
Melbow = 25 lbs. x 1 foot = 25 lbs-feet.
Again, as expected as well as experienced in the gym, the amount of force at the elbow joint increase with more flexion of the elbow joint by the biceps muscle.
But does the moment of force continue to increase with elbow flexion beyond 90º? Experience in the gym tells us it should decrease, but let’s take a look anyway.
This time the angle of the elbow joint is 120º. This is angle A0 in Figure 5. The force F1 is still 25 lbs., however, it needs to first be converted to a force acting perpendicular to the moment arm, LA. The angle A1, is determined through geometry as 30º and is the angle needed to bring this force perpendicular to the forearm. Therefore, the moment of force is calculated below:

Figure 5. Elbow is flexed to 120º.
Calculation of moment of force at the elbow joint using the following equation:
Melbow = FP x L A
In Figure 5 above we have:
F1 = 25 lbs., A1 = 30º, LA = Moment Arm (forearm length) = 1 ft.
First, we have to convert the 25 lbs. weight acting straight down to one that is perpendicular to the moment arm (forearm length).
FP = Fperpendicular = F1 x Cosine A1 (30º)
Fperpendicular = 25 lbs. x 0.866 = 21.65 lbs.
Now we can calculate the moment of force at the elbow joint using the equation:
Melbow = FP x LA
Melbow = 21.65 lbs. x 1 foot = 21.65 lbs-feet.
Again, as expected, the biceps curl becomes easier once we get past 90 degrees of elbow flexion.
Again, the only variable in this equation is the angle of the elbow joint:
Melbow = F1 x’s Cosine A1 x LA
F1 = 25 lbs. (Constant)
LA = 1 foot. (Constant)
A1 (Varies from 0º to about 140º for natural elbow flexion)
The static weight of the dumbbell never changes both in its amount of force as well as it’s direction of force. It is always 25 lbs. acting straight downward and, therefore, the entire force delivered to the biceps muscle through the elbow joint is a function of the angle of the joint only.
What happens when resistance bands are used?
When resistance bands are used this way instead of weights, there are two more dynamic variables that get added to the equation which makes calculating the amount of force delivered to your muscles a little more difficult. It also makes the final forced delivered to them more unpredictable.
The first additional variable has to do with the change in the value of the force that is applied with different degrees of motion of a particular joint, such as the elbow in our example here.
Whereas a weight will always deliver the same force, 25 lbs in this example, the force of a stretched band increases as the band is stretched further and decreases as the band is stretched less.
The second additional variable is the direction of force delivered by the stretched band. Unlike the static weight which always acts straight down, the direction, or vector of the force supplied by the band is always directed back to where the other end is attached. It rarely acts perpendicularly straight down.
What happens when the band is held steady as in an isometric contraction?
Both of these variables continuously change, even with isometric holds during an exercise. This is because a muscle undergoing a significant amount of force while trying to hold the resistance in a fixed position will still move, ever so slightly as motor units are recruited to support the demand of the force.
These small changes, sometimes only a millimeter or two in the beginning, start to increase as a muscle weakens and begins to tire. The more they increase, the more dynamic the change is in the amount of force and direction of force delivered back in to the muscle forcing it to immediately compensate even to the slightest of changes.
Therefore, the variable resistance of the bands along with the varying angles of its force, when applied to muscles using an isometric training strategy and for the proper length of time, is the key to training your muscles for a more dynamic and athletic response. It is an extremely superior form of speed training when done properly. We call it pure speed training.
It will take some explaining to do and will be done in part 3. If you understood this much so far, or at least can relate to the idea that changes in angles affect the amount of forces on the joints, it shouldn’t be a problem for you.
When Using Resistance Bands, Use Them With An Isometric Training Strategy
When most people exercise with the resistance band, the same types of routines they do with weights tend to carry over with the resistance band
What this means is that most weightlifting exercises are usually done while performing repetitions with the weights, where the muscles are exercised through their full range of motion.
The biceps curl with a dumbbell is one example: While holding the dumbbell down by the side, the forearm is flexed at the elbow until the weight held in the hand ends up in front, up near the chest, and then lowered back down again. This process is typically repeated 8-12 times.
Through habit more than anything else, this same strategy is carried over with the exercise bands. The most likely first attempt at an exercise when one is handed a band is to do the same thing with them as they would normally do with a weight, whether it’s performing biceps curls, triceps push-downs, seated rows, and others. The band is typically used as a resistance aid, in place of the weight, to exercise a muscle through its full range of motion.
There is nothing wrong with this strategy but there are a few things to be aware of. First of all, with regards to training with resistance bands, whenever you train with them, you should be aware that when you start an exercise, you are typically at your weakest. This is because your joints are typically fully extended where you cannot get much leverage (think arm bars in jiu jitsu), and there is no momentum from the exercise that you can initially take advantage of such as is common with body weight exercises.
Combine this with the resistance band having not yet been stretched to a point where its resistance has any impact on the exercise, and you can see where the beginning of any exercise using an un-stretched band will have little or no effect on your conditioning.
As you proceed with the exercise, the range of motion of the joint being exercised starts to increase, and as that is happening, the band is starting to stretch, increasing in resistance. You end up at a point in the exercise where your leverage over it is very high, and therefore you have maximum control of it, and the resistance of the stretched band is also at its highest.
When using resistance bands with a repetitious strategy similar to weight training, the only real affect they have on muscles is the latter part of the exercise.
But let’s take a closer look at the mechanics involved in using the resistance band this way. Let’s look at what happens to the amount of force it delivers as it goes through various stages of the common biceps curl.
We are going to start the analysis of forces exerted on the elbow joint by a resistance band with the elbow already flexed to 90º. This is because we are going to eventually compare each stage of the biceps curl with a resistance band with those of the previous article in which a 25 lbs. weight was used. In that article, we learned that a 25 lbs. weight had its maximum moment of force of 25 lbs. feet when the elbow was at 90º. This is shown again here in Figure 1.
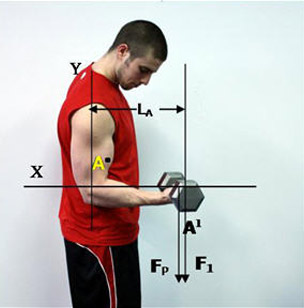
Figure 1. Elbow is flexed to 90º.
And for reference again, the calculation of the moment of force when the elbow is flexed to 90º is as follows:
Melbow = FP x LA
In Figure 1 above we have:
F1 = 25 lbs., A1 = 0º, LA = Length of Moment Arm = 1 ft.
First, even though the force (F1) is already perpendicular to the moment arm, we should calculate it anyway.
FP = Fperpendicular = F1 x Cosine A1 (0º)
Fperpendicular = 25 lbs. x 1 = 25 lbs.
Now we can calculate the moment of force at the
elbow joint using the equation:
Melbow = FP x LA
Melbow = 25 lbs. x 1 foot = 25 lbs. feet.
So this will be our reference point to match the resistance band with 90º of elbow flexion. We already know that the dumbbell has its maximum moment of force at this angle, and now we are going to purposely set up the resistance band to deliver the same moment of force at this 90º angle as well. After that, we will also see how the force of the resistance band begins to differentiate itself from the force of the dumbbell at different degrees of elbow flexion.
Now, in Figure 2 below, the athlete is holding a resistance band in his hand with the elbow flexed to 90º, similar to when he was holding the 25 lbs. dumbbell in this position. Here we need to make sure this position will also deliver a 25 lbs. feet moment of force back to the elbow with the resistance band used in its place. To do that, we first have to be aware of a unique difference between the force of the band and the dumbbell weight.
The force of the resistance band, F1, always points back to where the band is attached, and not straight down as is always the case with a weight. You can compare directions of F1 in both Figure 1 above and Figure 2 below to see this difference.
In Figure 2, the force of the resistance band is not perpendicular as in Figure 1, but rather at an angle, A1, calculated to be about 18º to perpendicular. (You can see how this angle was calculated in Figure 5 below.) Therefore, unlike this position of the weight at 90º of elbow flexion where there was no need to convert it to a perpendicular force equivalent since it was already there, this conversion needs to be done here.
Converting the force, F1, to a perpendicular equivalent force, FP, will mean that F1 is going to have to be a value greater than 25 lbs. in this position to end up at an FP of 25 lbs.
Let’s calculate the amount of force, F1, needed by the resistance band in Figure 2 before going any further.
F1 x cosine 18º = FP = 25 lbs.
F1 = (25) / (cosine 18º)
F1 = 26.28 lbs.
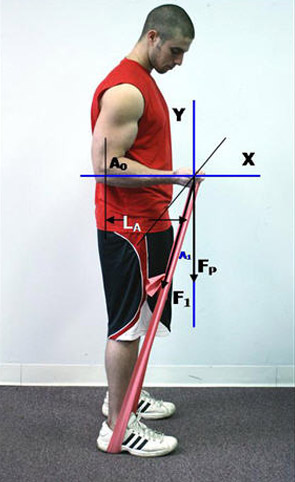
Figure 2. Elbow flexed to 90º.
A force, F1, of 26.28 lbs. will be needed by the band in this position to end up with a perpendicular force, FP, of 25 lbs. This will match up with the 25 lbs. weight, thereby both producing a moment of force of 25 lbs. feet when the elbow joint is 90º.
This is obviously a different amount of force that needs to be supplied by the band to end up with an equivalent moment of force of 25 lbs. feet at the elbow. This difference is primarily due to the fact that the force of the resistance band does not act perpendicular to the ground as the weight does but, rather, it always acts in a direction back toward its attachment.
This force, F1, will continuously change throughout the range of motion for the biceps curl using a dynamic resistance band. It will not change when using a static dumbbell.
Spring Constant, “k”, of the Resistance Band
The next thing we need to know about this set-up is we need to know the spring constant or stretch constant, k, of the band. The spring constant ‘k’ is defined as how many lbs./inch the force of the band can supply when stretched a certain distance. In mathematical terms, this equation is written as: k = force/distance.This equation is more commonly written in the form of:
F = -kx
This equation is referred to as Hooke’s law, where ‘F’ is the restoring force exerted by the resistance band; ‘x’ is the displacement or distance the band stretches; and ‘k’ is the spring constant. This equation has a negative sign in it because the restoring force always acts in the opposite direction of the displacement. For example, when the band is stretched upward, it pulls back downward.
Since the comparison is being made between performing a biceps curl with weights and one with the resistance band, this information is required. The spring constant for the band being used in Figure 2 above is 0.75 lbs./inch. However, the band used in our example is actually tied in a loop and therefore consists of ‘two’ bands of resistance. The spring constant for this exercise is then: 2 x 0.75 = 1.5 lbs./inch.
How far does the band stretch when the elbow starts out at 0º of flexion and ends up at 90º of flexion?
The biceps curl exercise typically starts with the elbow extended down by the side at 0º as shown in Figure 3. In this sample exercise, it will end up when the elbow is flexed to 90º as shown in Figure 4. Naturally the band will have to stretch to get there, so along with knowing the spring constant of the band, we will also need to know the distance, ‘x’, it will be stretched.
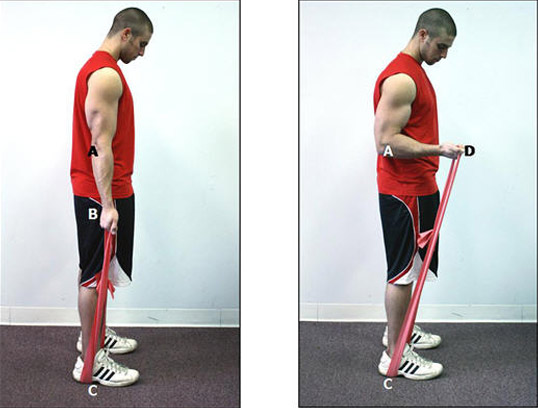
Figure 3. 0º elbow flexion. Figure 4. 90º elbow flexion.
First calculate how far the band stretches from its position in Figure 3 to Figure 4. We know that the moment arm (length of forearm), LA, doesn’t change and it is estimated at 1 foot long. We also know the angle of the elbow joint will be 90º. Therefore, we get the following in Figure 5:
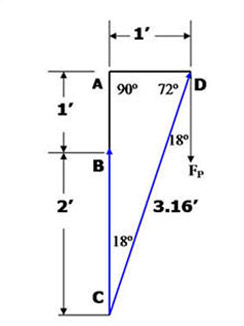
Figure 5.
Line AB represents the length of the forearm (moment arm, LA) in the starting position and is 1’ long. Line AD also represents the length of the forearm, LA, but in the ending position. Again, its length is 1’.
Line BC represents the distance from the hand holding the band in Figure 3, to the ground. This distance was estimated at 2’. Line BC therefore also represents the starting length of the resistance band at the beginning of the exercise.
Line CD represents the ending length of the resistance band when the elbow is flexed to 90º. Its length was determined to be 3.16’ based on Pythagoreans Theorem for right triangles.
It was calculated as follows: C = hypotenuse of triangle, or line CD;
A = length of one side (line AC); B = length of other side (line AD).
C2 = A2 + B2 Where A = 1 and B = 3
C = Square root (1)2 + (3)2 = 3.16’
Therefore, to calculate how far the band stretches, we simply subtract the beginning length from the ending length and get:
Band stretch = 3.16’ – 2’ = 1.16 or (1.16’) x (12 inches/foot) = 13.92 inches.
The band stretches a total of 13.92 inches from the start position to the end position.
Determining the amount of pre-stretch force
needed in the band at the beginning of this exercise:
Now, since all bands are made differently and therefore have different spring constants, we will need to determine how much pre-stretch resistance there needs to already be in the band in Figure 3. In other words, the band held in the hand in this position will need to have a certain amount of stretched tension in it even before starting the exercise so that the target force of 26.28 lbs. can be met and matched up with the 25 lbs. weight in this same position.
If the band is stretched a total of 13.92 inches when going from the first position in Figure 3 to the second position in Figure 4, then the amount of force is increased by:
13.92 inches x (1.5 lbs./inch) = 20.88 lbs.,
where 1.5 lbs./inch represents the spring constant.
This number represents the change in the amount of force of the resistance band when the elbow was at 0º, down by the side, to one where the elbow is at 90º. What this means is this number will need to be subtracted from the final force, F1, to determine the amount of pre-stretch force needed in the band to start the exercise:
26.28 lbs. – 20.88 lbs. = 5.4 lbs.
Therefore, when the band is being held down by your side to start the exercise as shown in Figure 3, it will need to already be pulling 5.4 lbs. of force. In other words, the band simply cannot be hanging down in this position without any tension in it. It has to be pre-stretched from the ground up to the hand with a 5.4 lbs. force.
The distance the resting band needs to be pre-stretched then is calculated as:
5.4 lbs / 1.5 lbs/inch = 3.6 inches.
(The length of the loop at rest, with no stretch in it can then be calculated as follows:
24” – 3.6” = 20.6”.)
While this 5.4 lbs. starting force may seem a little odd, remember that the 25 lbs. dumbbell weight held down by the side in this same position also has a force; that being the static 25 lbs. It just doesn’t have a moment of force at the elbow and neither does the resistance band in this same position.
These two positions with the resistance band, when compared to identical positions with a weight, show just how different the forces in each are when an exercise as simple as the biceps curl is being performed with them.
Now take a look at three more positions of the biceps curl using the resistance band and compare them to similar positions when a dumbbell is used.
Calculating the Moment of Force On the Elbow
MElbow, at 30º of Elbow Flexion
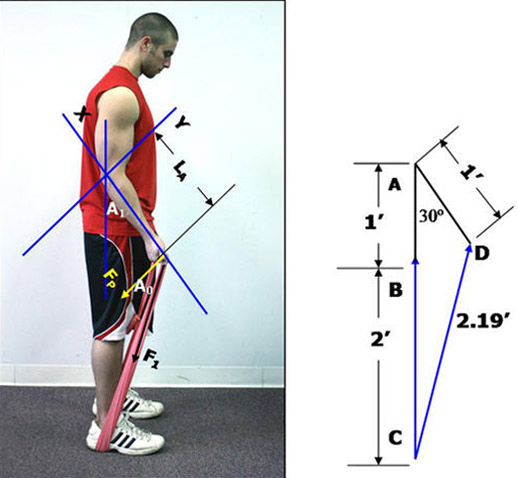
Figure 6. Elbow flexed to 30º.Figure 7.
Step 1. Calculating how far the band stretches from its position in Figure 3, the starting position, to Figure 6, the new ending position.
We know that the moment arm (length of forearm), LA, doesn’t change and it is estimated at 1 foot long. We also know the angle of the elbow joint will now be 30º. This information is drawn out in Figure 7 above.
The line CD represents the new length of the resistance band after it has been stretched from its original position to one where the elbow is now at 30º. Its value was calculated using the Law of Cosines as follows:
A = The distance of line AC, which is: 1 + 2 = 3
B = The distance of line AD, which is 1
C = Line CD, which is the new stretched distance. Its value is unknown and is what we are going to calculate.
gamma = Angle DAB which is 30º
C2 = A2 + B2 – 2AB (Cosine (gamma))
C2 = 32 + 12 – 2(3)(1) cosine (30º)
C2= 9 + 1 – 5.19 = 4.80
C = 2.19 feet.
Therefore, to calculate how far the band stretches, we simply subtract the beginning length from the ending length and get:
Band stretch = 2.19’ – 2’ = 0.19’ or (0.19’) x’s (12 inches/foot) = 2.28 inches.
Step 2. Determining the force in the resistance band, F1.
If the band is stretched a total of 2.28 inches when going from the first position in Figure 3 to the second position in Figure 6, then the amount of force is increased by:
2.28 inches x (1.5 lbs./inch) = 3.42 lbs.,
where 1.5 lbs./inch represents the spring constant.
This number represents the change in the amount of force of the resistance band when the elbow was at 0º, down by the side, to one where the elbow is at 30º.
If the resistance band already had a pre-stretch tension in it of 5.4 lbs., then the new force, F1, of the resistance band with the elbow flexed to 30º is:
F1 = 5.4 lbs. + 3.42 lbs. = 8.82 lbs.
Step 3. Determining the angle of this force, F1, to the moment arm (forearm) and then determining the angle needed to bring this force perpendicular to it.
First, we need to determine the angle ADC in Figure 7. This is the largest of the three angles however it is also easily solved by the law of cosines:
32 = 12 + 2.192 – 2(1)(2.19) cosine (ADC)
9 = 1 + 4.79 – 4.38 cosine (ADC)
3.20 = -4.38 cosine (ADC)
-0.7315 = cosine (ADC)
ADC = 137.01º
ADC = 137.01º = Angle of F1 in relation to the moment arm.
Therefore, the angle needed to bring F1 perpendicular, A0 in Figure 6, is:
A0 = 137.13 – 90 = 47.13º
Step 4. Calculating the perpendicular force, FP.
FP = F1 cosine (47.13)
FP = 8.82 x (.6803) = 6.00 lbs.
Step 5. Calculating the Moment of Force, Melbow, at the elbow.
Melbow = FP x LA
Melbow = 6.00 lbs. x 1 foot = 6.00 lbs. feet.
Calculating the Moment of Force On the Elbow
MElbow, at 45º of Elbow Flexion
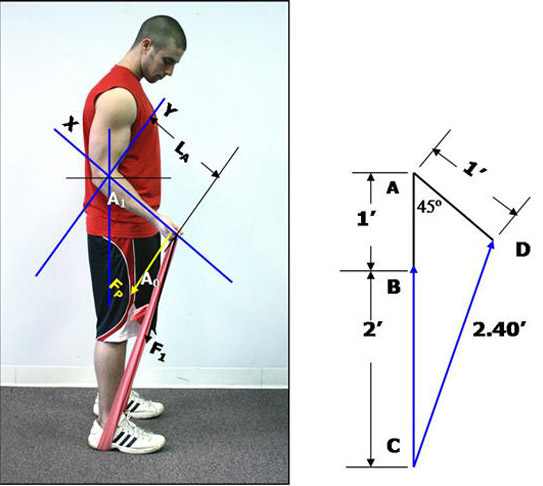
Figure 8. Elbow flexed to 45º.Figure 9.
Step 1. Calculating how far the band stretches from its position in Figure 3, the starting position, to Figure 8, the new ending position.
Again, we know that the moment arm (length of forearm), LA, doesn’t change and it is estimated at 1 foot long. We also know the angle of the elbow joint will now be 45º. This information is drawn out in Figure 9 above.
The line CD represents the new length of the resistance band after it has been stretched from its original position to one where the elbow is now at 45º. It’s value was calculated using the Law of Cosines as follows:
A = The distance of line AC, which is: 1 + 2 = 3
B = The distance of line AD, which is 1
C = Line CD, which is the new stretched distance. Its value is unknown and is what we are going to calculate.
gamma = Angle DAB which is now 45º
C2 = A2 + B2 – 2AB (Cosine (gamma))
C2 = 32 + 12 – 2(3)(1) cosine (45º)
C2= 9 + 1 – 4.24 = 5.75
C = 2.399 or 2.40 feet.
Therefore, to calculate how far the band stretches, we simply subtract the beginning length from the ending length and get:
Band stretch = 2.40’ – 2’ = 0.40’ or (0.40’) x’s (12 inches/foot) = 4.80 inches.
Step 2. Determining the force in the resistance band, F1.
If the band is stretched a total of 4.80 inches when going from the first position in Figure 3 to the second position in Figure 8, then the amount of force is increased by:
4.80 inches x (1.5 lbs./inch) = 7.20 lbs.,
where 1.5 lbs./inch represents the spring constant.
This number represents the change in the amount of force of the resistance band when the elbow was at 0º, down by the side, to one where the elbow is at 45º.
If the resistance band already had a pre-stretch tension in it of 5.4 lbs., then the new force, F1, of the resistance band with the elbow flexed to 45º is:
F1 = 5.4 lbs. + 7.2 lbs. = 12.60 lbs.
Step 3. Determining the angle of this force, F1, to the moment arm (forearm) and then determining the angle needed to bring this force perpendicular to it.
First, we need to determine the angle ADC in Figure 11. This is the largest of the three angles however it is also easily solved by the law of cosines:
32 = 12 + 2.42 – 2(1)(2.4) cosine (ADC)
9 = 1 + 5.76 – 4.8 cosine (ADC)
2.24 = -4.8 cosine (ADC)
-0.4667 = cosine (ADC)
ADC = 117.82º
ADC = 117.82º = Angle of F1 in relation to the moment arm.
Therefore, the angle needed to bring F1 perpendicular, A0 in Figure 9, is:
117.82 – 90 = 27.82º
Step 4. Calculating the perpendicular force, FP.
FP = F1 cosine (27.82)
FP = 12.6 x’s (.8844) = 11.14 lbs.
Step 5. Calculating the Moment of Force, Melbow, at the elbow.
Melbow = FP x LA
Melbow = 11.14 lbs. x 1 foot = 11.14 lbs. feet.
Calculating the Moment of Force On the Elbow
MElbow, at 120º of Elbow Flexion
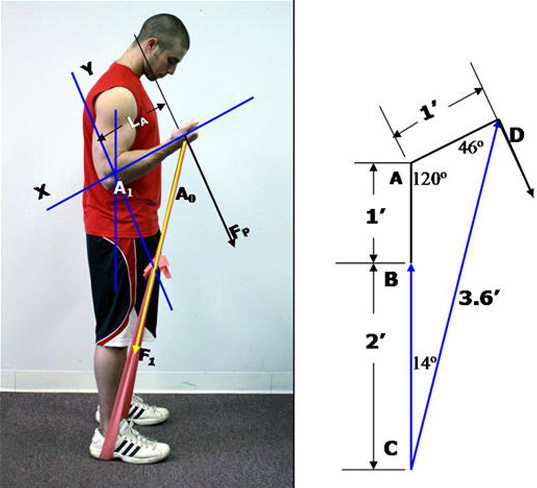
Figure 10. Elbow flexed to 120º.Figure 11.
Step 1. Calculating how far the band stretches from its position in Figure 3, the starting position, to Figure 10 , the new ending position.
Again, we know that the moment arm (length of forearm), LA, doesn’t change and it is estimated at 1 foot long. We also know the angle of the elbow joint will now be 120º. This information is drawn out in Figure 11 above.
The line CD represents the new length of the resistance band after it has been stretched from its original position to one where the elbow is now at 120º. Its value was calculated using the Law of Cosines as follows:
A = The distance of line AC, which is: 1 + 2 = 3
B = The distance of line AD, which is 1
C = Line CD, which is the new stretched distance.
Its value is unknown and is what we are going to calculate.
gamma = Angle DAB which is now 120º
C2 = A2 + B2 – 2AB (Cosine (gamma))
C2 = 32 + 12 – 2(3)(1) cosine (120º)
C2= 9 + 1 – 6(-0.5) = 13.00
C = 3.60 feet.
Therefore, to calculate how far the band stretches, we simply subtract the beginning length from the ending length and get:
Band stretch = 3.6’ – 2’ = 1.6’ or (1.6’) x (12 inches/foot) = 19.2 inches.
Step 2. Determining the force in the resistance band, F1.
If the band is stretched a total of 19.2 inches when going from the first position in Figure 3 to the second position in Figure 10, then the amount of force is increased by:
19.2 inches x (1.5 lbs./inch) = 28.80 lbs.,
where 1.5 lbs./inch represents the spring constant.
This number represents the change in the amount of force of the resistance band when the elbow was at 0º, down by the side, to one where the elbow is at 120º.
If the resistance band already had a pre-stretch tension in it of 5.4 lbs., then the new force, F1, of the resistance band with the elbow flexed to 120º is:
F1 = 5.4 lbs. + 28.8 lbs. = 34.2 lbs.
Step 3. Determining the angle of this force, F1, to the moment arm (forearm) and then determining the angle needed to bring this force perpendicular to it.
Now we have to determine the angle of F1 is to the moment arm and then the angle needed to bring this force perpendicular to it.
To do this we need to determine the angle ADC in Figure 11. This is the largest of the three angles however it is also easily solved by the law of cosines:
32 = 12 + 3.62 – 2(1)(3.6) cosine (ADC)
9 = 1 + 12.96 – 7.2 cosine (ADC)
-4.96 = -7.2 cosine (ADC)
0.6889 = cosine (ADC)
ADC = 46º
ADC = 46º = Angle of F1 in relation to the moment arm.
Therefore, the angle needed to bring F1 perpendicular to A0 in Figure 11 is:
90 – 46 = 44º
Step 4. Calculating the perpendicular force, FP.
FP = F1 cosine (44)
FP = 34.2 x (.7193) = 24.6 lbs.
Step 5. Calculating the Moment of Force, Melbow, at the elbow.
Melbow = FP x’s LA
Melbow = 24.6 lbs. x 1 foot = 24.60 lbs. feet.
Comparing the starting Force, F1, between the resistance band and the 25 lbs. dumbbell at the same positions:
| Elbow Joint Position | F1 Resistance Band | F1 25 lbs Dumbbell |
| 0º | 5.40 lbs. | 25 lbs. |
| 30º | 8.82 lbs. | 25 lbs. |
| 45º | 12.60 lbs. | 25 lbs. |
| 90º | 26.26 lbs. | 25 lbs. |
| 120º | 34.20 lbs. | 25 lbs. |
Comparing the force F1 of the resistance band with the dumbbell shows what you probably already expected and that is the force of the resistance band varies throughout the range of motion. What is interesting here is that the force F1 not only starts out lower than the 25 lbs dumbbell, but that it also goes higher than it as well. Because of the changing values in force supplied by the resistance band, it is probably not best to use them in an exercise that involves gross movement in the joints, as in this example. Instead, using them with an isometric training strategy will have a much larger impact on the tendons and muscles.
Comparing the Moment of Force, Melbow, between the resistance band and the 25 lbs. dumbbell at the same positions:
| Elbow Joint Position | Melbow Resistance Band | Melbow 25 lbs Dumbbell |
| 0º | 0.00 lbs. | 0.00 lbs. |
| 30º | 6.00 lbs. | 12.50 lbs. |
| 45º | 11.14 lbs. | 17.67 lbs. |
| 90º | 25.00 lbs. | 25.00 lbs. |
| 120º | 24.60 lbs. | 21.65 lbs. |
Comparing the moment of force at the elbow also shows just how different using the resistance band and dumbbell is. At first glance, it looks as though the peak moment of force occurs at 90º of elbow flexion for both, and that the moment of force of the dumbbell drops off faster after that, which is true. However, the moment of force supplied by the resistance band actually peaks higher than the dumbbell. Its value peaks at 26.07 lbs. feet when the elbow is flexed to 105º. So, whereas the moment of force turns around at 90º of elbow flexion using the dumbbell, it doesn’t turn around until the elbow is at 105º when the resistance band is used.
How sensitive are your muscles to these changes?
What he have shown here in this example of the biceps curl are some of the obvious and outward differences between the amount of force supplied by the resistance band and that supplied by the 25 lbs. dumbbell at different degrees of elbow flexion.
These types of changes will always be present whenever you exercise your muscles.
Your awareness to these changes in resistance level and joint position is known as proprioception. Proprioception means a sense of self. It is an awareness of where your arms and legs are in space. For example, if you were to close your eyes and place your right hand behind your back, you would know that your right hand is behind your back, even without having to see it.
Your awareness to your arm’s position is supplied to your brain by specialized receptors called proprioceptors which are located in your muscles, joints and tendons. They provide information about the angle of the joint, length of the muscle and tension in the tendons. All of this information is integrated to give your brain the awareness of the position of your arm.
The two most common proprioceptors are the muscle spindle and golgi tendon organ. Muscle spindles provide information about the changes in muscle length. They are located in parallel and within the muscle belly themselves. Golgi tendon organs provides information about the changes in muscle tension and are located in series with the muscle tendon.
Both of these proprioceptors are highly sensitive to even the slightest amount of change in position and tension. You don’t have to move your arm several inches for the muscle spindle to signal that a change in position has occurred. You can sense a change of the order of millimeters. As an example, try moving the tip of your index finger ever so slightly. Your muscle spindles signal this change immediately.
You also don’t need to increase the resistance by a few pounds for the tension in the golgi tendon organ to signal that an increase has occurred. Try interlocking your fingers together and then slowly begin to pull apart. You can sense the increase instantly.
While your sensitivity to changes in muscle tension and position is high to begin with, it becomes even more pronounced when the effort required by the muscle increases.
We will discuss the significance of this for your athletic training in the next article and also show you why using the resistance band with an isometric training strategy is such a great training strategy when your goal is to build strength AND speed within the muscle.
Always glad to help!
Dr. Larry Van Such
[sc name=”2step-optin”]
[sc name=”baseball testimonial banner – green”]


